play ps1 games on android
Showing posts with label windows 10. Show all posts

How To Record Streaming Video on Windows 10

Recording a streaming video is required when you also want to watch it offline. If you record a streaming video then you can watch the video on different devices and offline. To record a streaming video the best and free option is Windows 10 game DVR. But Windows 10 game DVR is the simplest built-in screen recorder in Windows 10 with no settings to change. So, it is not the right option for you if you are looking for customization options too in a screen recorder. In this article we will tell you how to record streaming video.

Movavi Screen Recorder Studio: How to Record Streaming Video, Recorder PC Screen, and Webcam

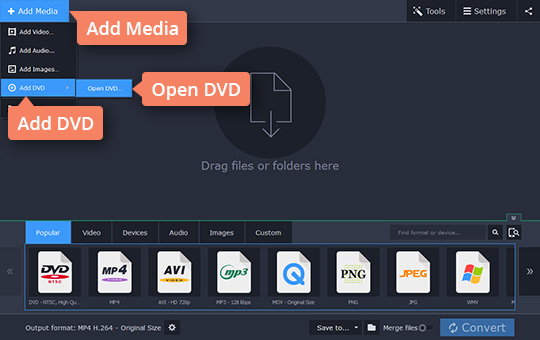
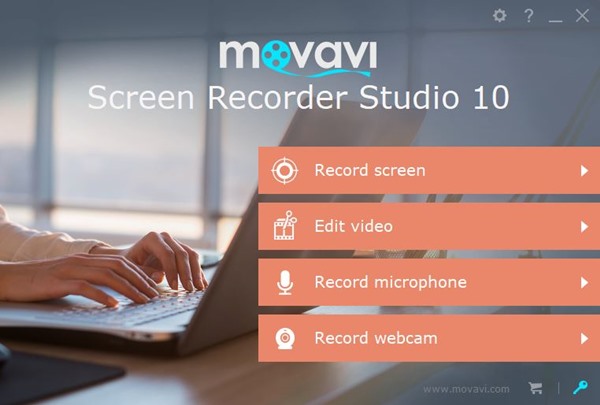
With Movavi Screen Recorder Studio you can record streaming videos and save them for offline viewing. With this screen recording software you can also record your computer’s screen. If you want to create video tutorials, app reviews, software tutorials then you should use this software. It can also record webcam and has a powerful built-in video editor with multiple effects, multimedia content, and decent video editing tools. Read the step-by-step tutorial to use this software.
  • Download and install the screen recorder with audio.
  • Open the program and select ‘Record Screen’ from the splash menu.

  • You have two options to record your computer screen. These are cropped size and full screen. Cropped size lets you select any area of the computer’s screen. You can also manually enter the screen size next to the crop button. The crop function also auto detects window sizes and selects it.

  • In ‘Effects’ tab you can customize mouse click and keyboard strokes.
  • Choose the screen recording size option and click the ‘REC’ button to start recording your screen.
  • Now when the screen recording is enabled you can easily record any streaming video. The video is by-default with system audio and microphone is disabled to prevent noise.
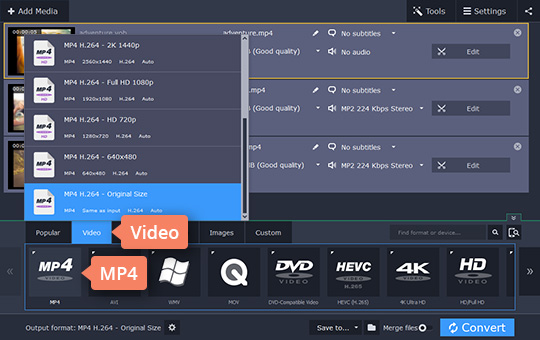
  • Click the ‘Stop’ button when you want to stop recording. On clicking the ‘Stop’ a an intermediate video editor will open which lets you cut your recorded video. For advanced video editing click the green button in the top right corner which says ‘Open in Editor’.
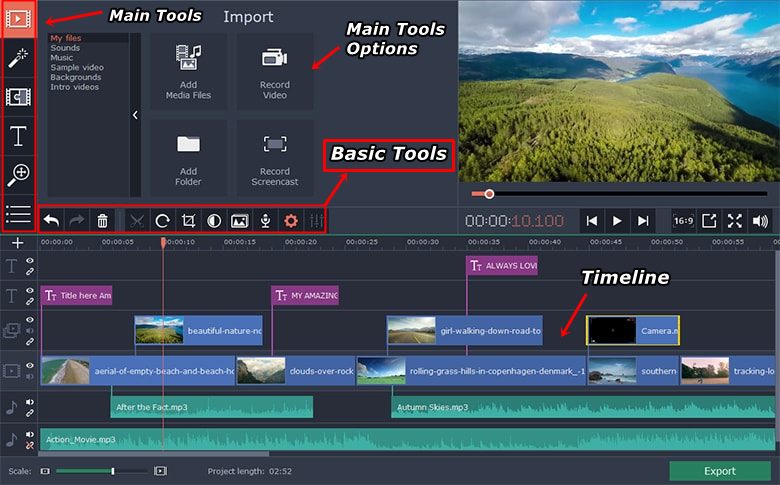
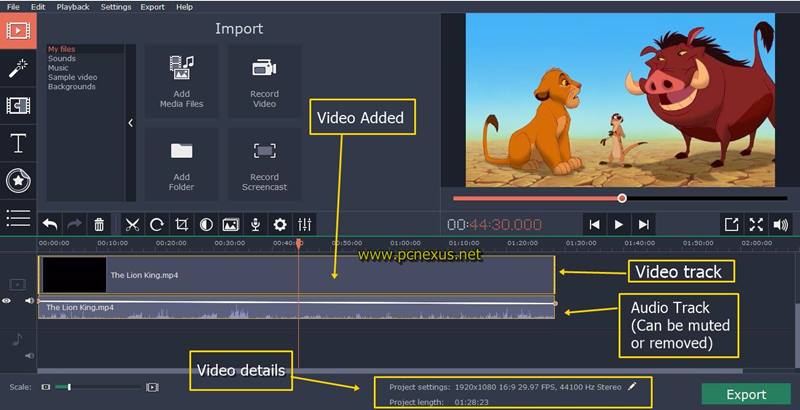
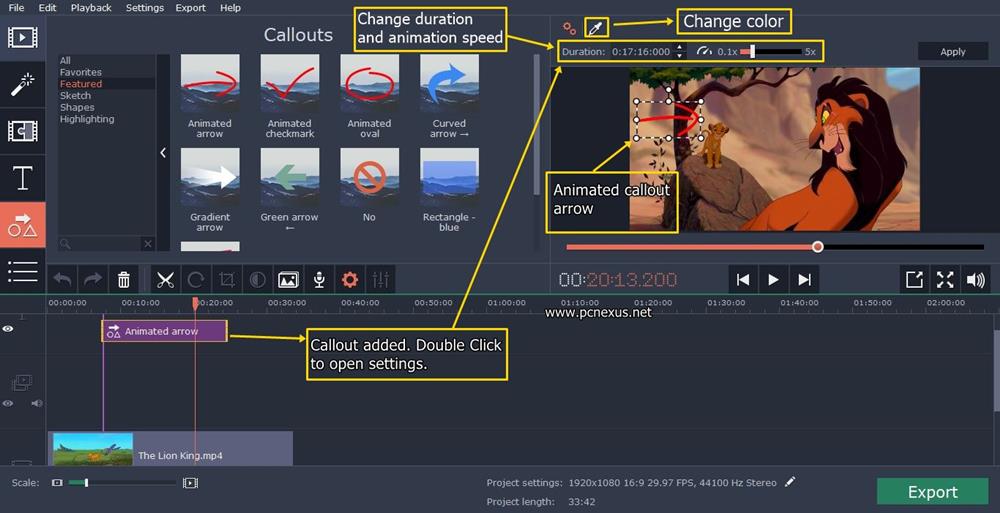
  • This will open the advanced editor and here you can edit your video as you wish.


So, this is how you can easily record streaming videos using the software mentioned above. I would the appreciate the built-in video editor which has ability to bring about a new life in your recorded video. You can record screen and edit videos like a pro using this software. So, we just have told you how to record a streaming video and now its your turn to test the software yourself.

How To Fix 100% Disk Usage In Windows 10

Recently we shared a post on upgrading your old PC and notebooks to latest Windows 10 legally. You should upgrade your PC/laptop to Windows 10 because it is highly secured and gets timely security updates. If you are using Windows 10 that your computer is safe from ransomware, viruses, and other software vulnerabilities. Indeed Windows 10 is a great and possibly the best operating system today, I won't talk about MAC OS here. But like its predecessors, Windows 10 also comes with several system-level problems. Some of these problems will stay forever if not fixed. First of all, if you have not got your free copy of new Windows 10 then read this post.

Recently I have encountered a serious problem on my Windows 10 notebook which is related to the disk usage. I noticed it a few days back and found that the system performance was ultra slow due to 100% disk usage. The Windows 10 system was using the disk resources completely and no spare resources were left for other programs. The notebook was booting very slowly and the programs took ages to load. So, I started some research on the internet and found that most of the tech websites blamed several internal Windows 10 services for 100% disk usage. But unfortunately none of the listed solutions worked for me and the disk usage remained 100% even after applying the fixes.

So, if your Windows 10 system is eating up your disk resources and making the disk usage to 100% then don't waste time in searching the internet for fixes. I am telling several fixes that you'll find on most websites and those fixes don't work at all.

7 Fixes That Don't Fix The 100% Disk Usage in Windows 10

  • Disable Windows search
  • Disable Superfetch
  • Check antivirus software
  • Disable flash plugin in browsers like chrome or firefox
  • Disable or uninstall Skype
  • Check PCI-Express Firmware Bug (storahci.sys)
  • Disable diagnostic tracking

If you are going to try any of the above non-working fixes then it would be a waste of time. I am unable to get it why Windows search will elevate the disk usage to 100%. Most people also blame superfetch for 100% disk usage but it is also not true. Based on my investigations I found that the flash plugin, Skype, storahci driver, and the diagtrack are not responsible for the 100% disk usage. However I will suggest you scan your computer for viruses with your antivirus, I recommend Avast Internet Security. But my antivirus didn't find any virus and the disk usage was still 100%. I also recommend you to scan your computer with adwcleaner to remove any potentially unwanted program, get adwcleaner here.

task manager disk 100 windows 10

So what actually is causing this problem? Finally, I found that the Windows update service (cleanup) was causing the 100% disk usage problem. It doesn't matter whether your computer using an HDD or SSD as both kinds of drives are affected. Windows update service downloads many updates frequently. So it will also create a lot of junk files on your system. The size of these junk would be in GBs. Windows update downloads new updates and replaces older files with new files and creates a backup of old files. This backup is almost useless and should be deleted. You can find and delete Windows update junk files via 'Disk cleanup'.

How To Fix 100% Disk Usage In Windows 10

The tutorial tells the solution in two parts. So we will first discuss about the part 1 then move on to part 2.

➜ Part 1

  • Go to 'My PC'. Right click on C:\ drive and click 'Properties'. Then click 'Disk cleanup'.
  • Wait for few seconds till the second dialog box opens. Click 'Clean up system files'.
  • If you see 'Windows update cleanup' then check it. Also check other junk files except the 'Windows error reporting'.


  • After selecting the files click 'OK'. Then another dialog box will open. Click 'Delete Files' to delete the junk files.

➜ Part 2

Now you have deleted the junk files. Now Part 2 starts here. In this part we will first stop the Windows update service and then delete the 'SoftwareDistribution' folder. Follows the steps below.
  • Press the Windows key+X and select 'Command Prompt (Admin)'.
  • In the command prompt type the following command below.
net stop wuauserv
  • If this command fails then press Windows key+R and type 'services.msc' and hit enter.
  • Here find 'Windows update'. Right click on it and select 'Stop'. After stopping the service right click on it and click 'Properties'.
  • In 'Startup type' select 'Disabled'.Click 'OK' and close the services management console.
  • If somehow the Windows update service fails to stop then restart your computer and use any of the method above to stop it.
  • After stopping the service go to 'My PC' and open 'C:\Windows'.
  • Find the 'SoftwareDistribution' folder here and delete it.


➜ Important Note: Do not skip the steps below. The steps below tell how to start Windows update service. You should never keep Windows update disabled otherwise your computer won't receive any updates from Microsoft.

  • After deleting this folder press Windows key+R and type 'services.msc' then hit enter.
  • Here find the Windows update service. Right click on it and click 'Start'.
  • After the service gets started again click on it to select 'Properties'.
  • Make sure in 'Startup type' 'Manual' is selected. Click 'OK' and exit.
  • Restart your computer.

After applying this above mentioned fix the 100% disk usage problem will be fixed. You can check it yourself by opening the task manager. To open the task manager press Windows key+X and select 'Task Manager'. Here check the disk usage it would be less than 10% and sometimes 0%.

FAQ 1: My Disk Usage Is Still 100% Even After Applying The Fix

Well the disk usage will be 100% if you transfer data from the hard disk or write on to it. You may see high disk usage after initial booting. However this effect will be there for only few minutes. After that the disk usage will return to normal. If even after applying the fix the disk usage is 100% then check Windows update. Use the following commands to fix this issue.

  • Press Windows key+X and click 'Command Prompt (Admin)'.
  • Type 'net stop wuauserv'.
  • If the service doesn't get stopped then re-execute the command.
  • After the service gets stopped type the command 'net start wuauserv' to start the Windows update service.

So we have fixed the 100% disk usage problem in Windows 10 for any HDD or SSD. So if you find this article useful then please take two minutes to share it.

How to Transfer Files From PC to Android Phone Without USB

Transferring files from your PC to Android phone is not a difficult task at all. All you need is just a USB cable to connect your Android phone to PC for file transfer. But if you don't want to use the USB cable at all then you can share files between PC and Android phone via WiFi network. Using a home or a secured Wi-Fi network to transfer files between your PC (Windows 10 and Mac OS) and Android phone is a good option because it will be faster than USB.

For transferring files from PC to Android phone you can also use Bluetooth. But again Bluetooth isn't good for sharing large files. Finally, you are left with the Wi-Fi file transfer. So without wasting much time, you should try this option to quickly and wirelessly share files between PC and Android phone.


Transfer Files From PC to Android Phone Over WiFI Networks

  • First of all, make sure you have a secure home Wi-Fi network. Avoid public WiFi networks at all cost.
  • Connect your PC and Android phone to this home Wi-Fi network.
  • On your Android phone download and install Asus File Manager app from Google Play Store.
  • Open the Asus File Manager app and scroll down to select 'PC file transfer', tap this option.


  • Then you have to tap the 'START' button to turn your Android into a file server.
  • Once you tap the 'START' button you will see an IP address followed by a port number. This IP address is of your Android phone which hosts your files over a particular secure port. Note down this IP address.

pc to android wifi file transfer

  • Now on your PC open any browser like Chrome, Mozilla, Internet Explorer and enter this IP address followed by the port number and hit enter.
  • Your browser will now show you the internal and external storage of your phone on this web page.
  • Click any storage type to open it. Now you will see all the files from your phone's internal or external storage.


  • Click on any file to download it directly. Large files will download with fast speeds to your PC.
  • Click 'UPLOAD FILE' button in the top right corner to copy files from your PC to Android phone. You can copy any type of files to your Android phone from your PC using the Asus File Manager app.
  • Tap 'STOP' on your phone when you finish transferring files.

So this is how you can transfer files from PC to Android phone without USB and using the Wi-Fi network. If you liked the article then please take two minutes to share it.

Movavi Video Editor 15 Plus Review: An Easy, Affordable, and Versatile Video Editor

Video Editing is just like a tough science subject for many. The reason being the unavailability of reliable and easy to use video editors. I am not saying that there aren’t good video editors available. But most of the video editors available today are either very expensive or hard to use. And some of them are built for professionals only. So beginners in the field of video editing always keep a distance from these video editing software.

To overcome these difficulties Movavi developed a video editing software which is easy to use, versatile, and affordable. This software is Movavi Video Editor 15 Plus which has just been released as the latest and new version. The Movavi is good for beginners and even professionals. With this software, anyone can edit his/her videos with ease. This is the only nice and easy to use video editor that you will love to use. This software is highly recommended to YouTube video creators, video producers, video editing professionals, and people who want to edit their videos just for any purpose.

Download Movavi Video Editor 15 Plus


It is a good practice to download and install the software while you read the review. This is because you’ll learn software features easily while you read this review.

Movavi Video Editing Software is available to download on Mac and Windows 10 and older Windows operating systems are also supported. This software comes with a 7-day trial period so that you can test it and later decide to buy.

Is Movavi Video Editor 15 Plus Safe?

Yes, Movavi Video Editor 15 Plus is free from any malware, adware, trojans, or spyware. This software product is 100 percent virus free. Movavi is a trusted name for multimedia software since 2004. So you can download and install this software without any worries. But only download from their official website link which is given above.

Movavi Video Editor 15 Plus Review: Essential Features

  • Easy to use video editing software for Mac and Windows.
  • Provides all basic video editing options like cutting a video, crop, and rotate it.
  • Contains a lot of filters and transitions that you can apply to a video. You can also purchase effects from the effects store.
  • It also has a video creating and editing wizard known as montage mode. It will guide you in creating a video by using multiple video clips and photos.
  • Essential features like callouts, highlight and conceal are available in this software. With callouts, you can point out anything in a video through animated arrows, shapes, and circles.
  • With the conceal feature you can blur a specific area of the video to hide any info or faces.
  • With the ‘Titles’ you can create the intro for your video and edit text. It has built-in animated templates for titles.
  • Lets you combine two videos for a side-by-side video playing. It is also known as a picture in picture video.
  • Supports all popular video formats including 4K formats.
  • Use object animation to make your own animation.
  • Use chroma key or green screen removal to change the background of a video.
  • Add new tracks and change their order in the video timeline.
  • Unlink overlay tracks and place clips anywhere you want on them
  • Highly useful for YouTube video creators.

Movavi Video Editor 15 Plus User Interface Explained

Here is a screenshot explaining the UI details of Movavi Video Editor 15 Plus.


Main Tools

There are four tools that are fixed and the fifth one is replaceable using the hamburger menu. The first option is for importing the media files like audio, video, and pictures. The second option with a magic wand is for the filters. The third option gives access to the transitions. And the fourth one is customizable you can click the menu icon below the fourth option and select any one option from the list that you want to use the most during video editing. These options include ‘callouts’, ‘pan and zoom’, ‘stabilization’, ‘highlight and conceal’, and ‘chroma key’.

Basic Video Tools

Check out the explanation for basic video tools below.


Movavi Video Editor 15 Plus Review: Edit a Video

  • Open the video editor and load a video or simply drag and drop the video on to the timeline.
  • When the video is added it will be visible on the timeline and you can see the video and audio on the timeline.


  • Below the video, the long bar with waveforms is the audio. You can completely delete this audio if you want to mute the video. You can also add another audio file and drag it over to the video to match its entire length. So, the audio will be played from video’s start to the end.
  • Click the ‘Filters’ button and select the filter you want to apply. You can apply multiple filters.
  • Then check out the transitions and see if you want to apply any transition effect anywhere in the video.
  • Click the ‘Titles’ button and use the text templates to create the intros or end credits for your videos. Titles can be applied anywhere in the video.
  • Clicking the hamburger menu you can access functions like ‘highlight and conceal’, ‘chroma key’, ‘Callouts’, ‘stabilization’, and ‘animation’.


  • Above the video timeline you can access basic tools like cut, crop, rotate, audio properties, and video properties. Check the basic video tools above.
  • After editing the video you can export to any video format.

Movavi Video Editor 15 Plus Review: Exporting the Edited Video

  • Once you finish editing the video just click the ‘EXPORT’ button. A video export dialog will open up. Select any format in which you want to export your video.


  • Click the ‘Advanced’ button to change the resolution, codec, frame rate, bit-rate, and audio channels.
  • After selecting the format and quality click the ‘Start’ button. The conversion will take time according to your project length and will depend on the processing speed of your CPU.
  • You can also save your movie project and work on it later. To save a project go to ‘File>Save project’ or simply press ‘Ctrl + S’.

Movavi Video Editor 15 Plus: System Requirements

These are the minimum system requirements for Movavi Video Editor 15 Plus.
  • Operating system: Microsoft Windows XP/Vista/7/8/10 with up-to-date patches and service packs installed.
  • Processor: Intel, AMD, or compatible dual-core processor, 1.5 GHz or above.
  • Graphics card: Intel HD Graphics 2000, NVIDIA GeForce series 8 and 8M, Quadro FX 4800, Quadro FX 5600, AMD Radeon R600, Mobility Radeon HD 4330, Mobility FirePro series, Radeon R5 M230 or higher graphics card with up-to-date drivers.
  • Display: 1280 × 768 screen resolution, 32-bit color.
  • RAM: 512 MB RAM for Windows XP and Windows Vista, 2 GB for Windows 7, Windows 8, and Windows 10.
  • Hard drive space: 800 MB available hard disk space for installation, 500 MB for ongoing operations.

Conclusion

Overall Movavi Video Editor 15 Plus is a nice video editor especially suited for YouTube creators which require a cheap and reliable video editor. There are lots of filters and transition effects. The object animation feature is very good at what it says. You have the option to test it completely for 7 days before purchasing it.

Windows 10 New Zero-Day Vulnerability May Affect Your PC, Stay Vigilant

A Twitter user SandboxEscaper just found a new zero-day vulnerability in Windows 10. The Twitter user also posted a proof-of-concept on their Github which tested and verified by US-CERT. Microsoft is aware of this vulnerability and is currently planning to a release a patch on its Patch Tuesday cycle on September 11, 2018. But currently, there is no fix to this vulnerability.


The vulnerability becomes active if a hacker is able to exploit the Advanced Local Procedure Call (ALPC) system. It allows a hacker to gain the system access as an administrator on a vulnerable Windows 10 64-bit PC or a Windows Server 2016. Some experts believe that for this vulnerability to exploit a PC it should gain local access first. It is not easy for a hacker to gain local access to your computer. For this purpose, a hacker will try many phishing tricks with you or trick you to install a custom developed malware which lets him/her local access on your Windows 10 PC.

Therefore the risk and threat level of this zero-day vulnerability are pretty low. As long as you stay vigilant about your network and PC security hackers will have a hard time targeting you.  As there is no patch available for this zero-day vulnerability, therefore, you can just prevent it until Microsoft releases a patch for this.

Also Read: How to Download Windows 10 Redstone 5 ISO

How to Prevent Windows 10 Zero-Day Vulnerability

  • Install a good antivirus on your Windows 10 computer. Don’t just rely on free antivirus software. We highly recommend you Avast Internet Security 2018. Even if you don’t want to buy it then you can use its fully functional 30 days trial period to protect your PC until 11th September 2018. On or after this date Microsoft will release an update.
  • Update Windows 10 and install any pending updates. Keep Windows 10 updated in all situations.
  • I don’t know whether SMB has any relation with it but you can disable port 445 SMB to be on a safe side and to prevent ransomware attacks.
  • Do not reply to suspicious emails, emails that ask you to download and install any files. Simply delete those emails which contain an executable (.exe) attachment.
  • Do not click any unknown links in suspicious emails.
  • Use a good quality VPN like ExpressVPN to hide your network activity.
  • Do not download and install software from unknown sources. And always verify the software publisher before installing a software.


So just wait for the official patch from Microsoft for this Zero Day Vulnerability and in the meantime follow the tips above to safeguard your Windows 10 PC.

How to Download Windows 10 Redstone 5 ISO Build 17713

If you are a user of Windows Insider Programme then you may already have started getting the Windows 10 Redstone 5 preview. Windows 10 Redstone 5 is the upcoming major update to Windows 10. It is currently in testing phase and will be released to the general public in October 2018 as Windows 10 October 2018 Update Build 17746. The Windows 10 Redstone 5 will be coming with great new features and enhancements. So if you can't wait till October then you should install it right now for free.


This is the first time when Microsoft released the ISO files of Windows Insider previews officially. However, a normal user is barred from downloading the Windows 10 Redstone 5 ISO. At present only a Windows Insider Programme can download it. Also, make sure that Windows Insider Previews aren't stable and come with unfinished features. So your system may crash or show you BSODs. So if you are going to download and install the Windows 10 Redstone 5 ISO then make sure that you have a proper backup of your precious data.

Also Read: Preventing the Windows 10 Zero-day Vulnerability

How to Download Windows 10 Redstone 5 ISO Build 17713

Here is a quick tutorial for downloading the Windows 10 Redstone 5 ISO.
  • Go to 'Settings>Update & Security>Windows Insider Programme'.
  • Click 'Get started' and follow the on-screen instructions to link a Microsoft account.
  • Select ‘Just send me early updates’, when it appears and then click ‘Confirm’.
  • You will be prompted to restart your computer after this.
  • Now go to this Windows Insider Redstone 5 ISO Download link.
  • Sign in with your Microsoft account and then wait for few seconds.
  • Now scroll down a little bit and click the dropdown which states 'Select edition'.

  • Select Windows 10 Insider Preview - Build 17713.
  • Click 'Confirm' and then select 'Language'. Then again click 'Confirm'.
  • If you see links to Windows 10 Redstone 5 64-bit ISO or Windows 10 Redstone 5 32-bit ISO then download accordingly.
  • The ISO weighs 4.6GB in size so you'll need fast internet or Wi-Fi to download this ISO.

Note: If you want to download regular Windows 10 ISO then see this tutorial.

How to Install Windows 10 Redstone 5 ISO Build 17713

After downloading the ISO you'll need to create a bootable USB so that you can install it on your PC. To make a bootable USB you can use Rufus software. If your computer supports UEFI then make the bootable USB with GPT support. Here are some useful tutorials for you.

If you liked the article then please share it.

How to Bring Back Missing WiFi Network Profile Options in Windows 10

Windows 10 automatically sets a WiFi or Ethernet network to public. Windows 10 by default applies the ‘Public’ profile for every network you connect the first time. The WiFi network profile will remain set to ‘Public’ unless you change it to ‘Private’. Windows 10 provides three network profiles which are ‘Public’, ‘Private’, and ‘Domain’. The ‘Domain’ profile is only available to the enterprise version of Windows 10. Windows 10 considers the ‘Public’ profile more safe and strict because in this profile the PC isn’t discoverable by other PCs on the same network and file and printer sharing is also disabled by default.


However, if you want to change your WiFi from public to private then it can be done in just a few clicks. But make sure that you only set your home network as private. Never set a public WiFi network to private which is freely available in coffee shops, airports, or railway stations. So, changing a WiFi network from public to private can be done by changing the Windows 10 network profile. Network profile gives two options for every WiFi or any other type of network which are ‘Public’, and ‘Private’.


But the problem is that many users complain that the network profile is missing. The network profile should be there in network properties and between the “Connect automatically when in range”, and “Metered connection” options. But for many users, this Windows 10 network profile is missing and they can’t set their WiFi from public to private. The Windows 10 version 1803 and 1709 both have this problem. See the image below.

Windows 10 public private wifi options missing

How to Bring Back Missing Windows 10 Network Profile Options


There is a reason why network profile options are missing in Windows 10. The reason is simple if you are using a third party firewall or an antivirus with a built-in firewall like ‘Avast Internet Security’ rather than the Windows defender firewall then the network profile options get hidden. The only thing you can do to bring back these options is to disable the third party firewall for a few minutes. After disabling the third party firewall the network profile options will come back again. Now you can easily set your WiFi network from public to private or vice versa. When you enable the third party firewall the options will disappear again.


To change the network profile for a particular WiFi first connect to it and follow the steps below.
  • Make sure you have disabled the third party firewall for a while.
  • If you are using Avast Internet Security then go to ‘Protection>Firewall’. Disable it for 10 minutes.
  • Now in Windows 10 go to ‘Settings>Network & Internet>Status’.
  • Click ‘Change connection properties’.


  • Now you’ll see two options here. Set the WiFi from public to private if it is a home network.

  • To be on a safe also disable the network discovery and file and printer sharing if you are not going to use it in ‘Network & sharing centre’ by changing the ‘Advanced sharing options’.
  • Now you can re-enable the third party firewall.

Check Out The Video Tutorial

Here's a video tutorial on our YouTube channel. You can check this tutorial for even more understanding.

You don’t always have to disable your third-party firewall to change the network profile. You can change it via multiple ways like from using the secpol.msc, using the registry editor, and using the Windows PowerShell. We will discuss these options in the next article.

Also Read

How to Direct Download Windows 10 ISO from Microsoft Website
Create bootable Windows 10 USB with BIOS/UEFI support

So, this is how you can bring back the missing network profile in Windows 10. If you liked the article then please share it.

How to Import Windows Live Mail Messages to Mozilla Thunderbird

Windows Live Mail has bee discontinued by Microsoft and it is no longer available for download. If you try to run your existing Windows Live Mail client then it will keep crashing. Microsoft has retired it finally and now you have to move on to some other email clients. If you are looking for a free email client for Windows 7 or Windows 10 then you can try Mozilla Thunderbird.


Mozilla Thunderbird is a free email client with all the necessary features that you'll require in a Windows mail client. Mozilla Thunderbird also supports Add-ons or extensions which bring several impossible works to reality. One such task is to restore the Windows Live Mail backup on Mozilla Thunderbird. This task seems impossible because there is no direct way to import Windows Live (.eml) messages to Mozilla Thunderbird. EML is the file format of the email messages exported as a backup by the Windows Live Mail.

Import Windows Live Mails Messages to Mozilla Thunderbird With ImportExportTools

  • Make sure you have the backup of your old Windows Live Mail messages. I can't show you how to take a backup as eml because the client is no longer working.
  • If you are currently running Windows Live Mail then try to export your messages from Windows Mail in .eml format.
  • Now save the backup to your desktop and download and install Mozilla Thunderbird from this link.
  • Open it and click the hamburger menu in the top right corner. Here go to 'Options>Account Settings'.
  • Now click 'Account Actions' and then click 'Add Mail Account'. A dialog box will open asking you to enter the username and password of your email. Enter the details and follow the instructions to add the mailbox to Mozilla Thunderbird.

  • Now after setting up the mailbox download the ImportExportTools from this link.
  • Now open Mozilla Thunderbird and click the hamburger menu in the top right corner and then select 'Add-ons'. In the 'Add-ons Manager' click the 'Extension' tab on the left side.
  • Now click the gear/settings icon just before the search button and click 'Install Add-on From File'. Pick the ImportExportTools add-on from where you saved it to install. After installing the add-on restart the program.

  • Now we are ready and it's up to you where you want to import the eml messages to local folders or the original mail account.
  • Currently, I am importing the Windows Live Mail eml messages to local folders in Thunderbird.
  • To import right click on 'Local Folders' and select 'New Folder'. Create a new folder for convenience and import the eml messages to this folder.
  • Right click on this newly created folder and open the submenu of 'ImportExportTools'. Click 'Import all messages from a directory' and then select 'also from its subdirectories'.


  • Locate the Windows Live Mail backup folder and open it.
  • Your all eml messages will be imported to Mozilla Thunderbird in this new folder.
Note: The ImportExportTools has a problem importing very large eml backups. It doesn't work with multiple subdirectories. So if you have a large eml messages backup then this will not work. In this case you have to manually import each subdirectory which is nothing but just a collection of folders and Windows Live messages in eml format. So, this manual importing process will be time consuming but is definitely worth spending time. Because you can see all the emails in one place.

So this is how we can import Windows Live Mail messages to Mozilla Thunderbird using a third party add-on. If you liked the article then do take two minutes to share it.

How to Play and Watch DVD Videos on Different Devices

DVD videos were popular some years ago which replaced the VCD format and introduced high quality video format for a CRT TV. DVD videos have a maximum resolution of 480p. 480p videos are good enough to watch if you talk about the video quality. Being an old video format DVD videos can still deliver good quality entertainment on HDTVs too. But DVD videos have a strange format (.vob) which is not cross compatible. You can’t play DVD videos directly on an iPhone, iPad, Android phone except for some HDTVs which support the .vob format.

To watch DVD videos across multiple devices one should convert them to a compatible format like MP4. MP4 is the default video format of Android devices and is supported by iPhone, iPad, and HDTVs. So to convert DVD to MP4 you will need a reliable video converter which can give you good video conversion features, multiple device support, and faster conversion. In this tutorial we will talk about Movavi Video Converter.

How to Convert DVD Videos to MP4 With Movavi Video Converter

  • Download and install the Movavi Video Converter from the Movavi’s official website.
  • Open the Movavi Video Converter and click the ‘Add Media’ button then click ‘Add DVD’. Finally click the sub option ‘Open DVD’ and select the ‘Video_TS’ folder on your DVD because it contains all the media files that we will be converting.
  • Click the ‘Video’ tab and select ‘MP4’ from this list. When you click it then the pre-configured setting will show up. Select the best setting which you want to choose.
  • If you still want to customize the video settings then click the ‘Customize’ button (gear icon) in the bottom left corner just next to the ‘Output format’. Here you can customize video settings further like changing the resolution, bitrate, frames per second etc.
  • After making the customization settings click the ‘Convert’ button.
  • Please note that if you are converting multiple DVD videos to MP4 then you can also combine them by enabling the ‘Merge’ option just before the ‘Convert’ button.
  • Other quality features include video editing tools like crop, trip, watermark, rotate, stabilization, and video adjustments.

Conclusion

At just $39.95 for a lifetime license the Movavi Video Converter is a nice choice if you are looking a cheap reliable video converter that is small enough in size but provides great features for video conversion. It nearly supports more than 180 video formats so you don’t need to worry about the formats. Apart from videos you can also convert videos to popular audio formats and can also convert images to another formats. Movavi Video Converter comes with a 7-day trial period and a 30-day money back guarantee. So before buying you can always try it for 7 days.

How to Download and Offline Update Avast Antivirus With Latest Virus Definitions

Avast antivirus is the number one computer security software developer based in Czech Republic. It has the highest antivirus market share with 20.5% percent. Avast's free antivirus is so popular that it can be found on almost every Windows PC because of it high malware detection rate. Avast software provides a range of products including the Avast Internet Security, Avast Premier, and Avast Pro Antivirus. They also provide VPN service namely SecureLine. If you are currently looking for a reliable antivirus then you can go for Avast free antivirus. And if you want top-notch computer security then go for Avast Internet Security which is a paid antivirus program.


For an antivirus to work properly it should be updated regularly. When connected to the internet the Avast antivirus gets streaming updates. These updates are tiny virus definitions that protect your PC from malware, trojan, and viruses. Avast keeps receiving these streaming updates many times in a day if connected to the internet. But sometimes Avast virus definitions won't update automatically. This can be due to slow internet. The antivirus program also does not update the virus definitions if they are tool old. If the automatic updates aren't working then you can manually download and install the latest definitions update file for Avast antivirus.

Download and Offline Update Avast Antivirus With Latest Virus Definitions

  • Go to Avast offline update file page - go here
  • Scroll down a little bit and check the links for 'Avast VPS update'.
  • Download the update for versions 12+
  • To check your program's version open the antivirus and click 'Menu'. Click 'Settings' and then click 'Update'. Check the program version if it is greater than 12 then download the 12+ VPS update.
  • After downloading the Avast update file(ypsupd.exe) simply double click on it to install it.

  • The antivirus definitions will updated within few seconds.
  • And you can use the same file to update the same program on another Windows PC.
If you liked the article then please share it.

How to Find Saved Wi-Fi Passwords in Windows 10

Wi-Fi passwords become quite difficult to remember when you are using a couple of Wi-Fi networks to connect your multiple devices. It is crucial that you don't use easily predictable weak Wi-Fi passwords as they can be guessed by anyone. The first step for securing your Wi-Fi is to use a strong password. A strong password may contain special characters, capital letters, or weird strings of words. Initially you may memorize the password but later you will forget it.

The only way to connect a device to a Wi-Fi network without manually entering the password is to use the router's WPS key. WPS (Wi-Fi Protected Setup) key will automatically insert the password in the device which is requesting network access. WPS should be used carefully though. But if your router doesn't support a WPS key then the only way left is to find and retrieve the saved Wi-Fi password from Windows 10.

How to Find Saved Wi-Fi Passwords in Windows 10

  • Make sure your Windows 10 PC is connected to that Wi-Fi network which is saved in your PC.
  • Go to 'Settings>Network & Internet'. Click 'Change adapter options'.

  • Double click the Wi-Fi adapter icon with green signals.
  • Then click 'Wireless properties'.

  • A dialog box will open. Click the 'Security' tab.
  • To show the password click 'Show characters' just below the 'Network security key'.
Find Saved Wi-Fi Passwords in Windows 10

The password will be visible and you can note it down. Use this password to connect other devices to this same Wi-Fi network

➜ Also Read


Find Saved Wi-Fi Passwords in Windows 10 using CMD Command Prompt

  • Open the command prompt. In the Windows 10 search box type 'run' and hit enter. In the 'Run' dialog box type 'cmd' and hit enter.
  • Now in the command prompt enter the following command and hit enter.
netsh wlan show profile
  • This command will show the list of all saved Wi-Fi networks in Windows 10.

  • Now enter the following command in the command prompt.
netsh wlan show profile “Wi-Fi SSID” key=clear 
  • Make sure to replace the "Wi-Fi SSID" with your Wi-Fi network's name. Repeat this command to find the saved Wi-Fi passwords of all the networks in Windows 10.
  • After executing the above command scroll down to 'Security settings' and check the 'Key content'. The key content holds your saved Wi-Fi network password. Note it down and use it on other devices to connect.
Find Saved Wi-Fi Passwords in Windows 10 cmd

So this is how you can find saved Wi-Fi passwords of all the connected networks in Windows 10. If you liked the trick then do take two minutes to share it.

How to Secure Your Public Wi-Fi Connection

It’s virtually impossible to conceive a day without access to Wi-Fi. There is a widespread belief that Internet accessibility is just as necessary as food, water, and the air that we breathe. Given the ubiquity of IoT hardware and software, it’s hard to dispel that notion. Truth be told, life goes on without the Internet albeit at a much slower pace.

tips to secure public wifi

The information we can access on our smartphones, tablets, phablets, PCs and smart devices is leaps and bounds ahead of erstwhile resources like the World Book Encyclopedia, Time Magazine, or the conventional telephone invented by Alexander Graham Bell. Today’s technology is the foundation stone upon which tomorrow’s innovation is being built. For that reason, Wi-Fi forms the bedrock of everything that is yet to come. Therein lies the challenge: Safety and security on the World Wide Web.

What Steps Can You Take to Enhance the Security of Your Public Internet Connectivity?

Everybody knows about basic steps that can be taken to improve your safety and security when using public Wi-Fi connections. For example, if you must use public Wi-Fi, try and sit with your back against the wall so that nobody else can read over your shoulder. The last thing you want is somebody seeing your username/password information, and logging in pretending to be you. Identity theft is a big problem, and sometimes people don’t recover from the damage that is caused.

It is probably best never to log into your online bank account in a public place when Wi-Fi is unencrypted. There are simply too many bad actors operating in cyberspace for you to attempt such a foolhardy move. Certain public Wi-Fi spots offer passwords to users, and this is a little safer than no password access although still ill-advised for personal transactions.

➜ Steps to Guard Your Wi-Fi Against Malicious Activities


1. Update Windows/Mac Regularly

Whether you’re running Windows or Mac, be sure to update your software and always stay updated. Part of the reason there are software updates, to begin with, is that new and improved code is being written to patch vulnerabilities in the software. Whenever you get a prompt to update your software – do it, don’t delay. Just make sure that automatic updates are enabled. If this option is enabled then updates will be auto-installed on your Mac or Windows PC.

2. Change Network Sharing Settings

Your Internet settings allow you to choose between public and private networks. Within this arena, there are things known as resource sharing (Wi-Fi printers, cloud accessibility etc.). You don’t want to turn on file and printer sharing, and to turn on network discovery when you’re using a public Wi-Fi network. From your control panel on Windows PCs or other devices simply access the advanced sharing settings and be sure to turn those public profile elements off. If you’re not visible, you can’t be hacked.

3. Use a Good VPN

Best Online Reviews (a leading review site for online security systems) recommends using a VPN (virtual private network) to mask your computer’s IP address and all traffic flowing from your device. Unsecured networks are as safe as houses when you use a high-quality VPN service. Since nobody knows where the traffic flow is coming from when you use a VPN from your computer, it doesn’t matter whether you are in a public Wi-Fi network or an encrypted Wi-Fi network. The best virtual private networks do not keep logs of customer activity.

4. Use 2-Factor Authentication Wherever Possible

If you must use public Wi-Fi and you are going to be conducting personal transactions, ensure that your browser and the security settings you have in place are up to date. If possible, try to access websites that require 2-factor authentication – email and smartphone verification to validate your ID.
If you have antivirus software and firewall protection enabled on your device, keep it active over public Wi-Fi networks. These serve as an additional security barrier against malicious actors.

5. Check for HTTPS

The web address you use in your browser should begin with HTTPS. The ‘S’ at the end stands for secure and it means that you have a secure web address in your browser. When communications are encrypted, you are at lower risk of being hacked. There are programs that you can install – freeware – that allow you to access secure socket layer websites regardless of the browser you’re using. All popular websites like Facebook, Google, Twitter use https. If you don’t see https in the address bar then it is a fake copy of these popular websites.

6. Use Your Personal Wi-Fi Hotspot While Traveling

Today’s PCs, notebooks, and modern laptops can easily pick up Wi-Fi hotspots. If you have a service contract with an Internet provider, rather use your Wi-Fi hotspot when you’re traveling. It is fully encrypted, and it won’t put any additional strain on your phone or your contract. You’re simply piggybacking off the signal that your phone is receiving from the cell tower.

It is always better to carry your personal Wi-Fi hotspot with you instead of using free public Wi-Fi connections. However, if a public Wi-Fi offers some sort of security then it is also not advisable to use them blindly. If you want to connect to public Wi-Fi connections safely then use a VPN and good quality antivirus software. These two programs if installed on your computer will make the Wi-Fi connection much safer. A VPN will hide your identity and encrypt your internet traffic while the antivirus will protect your PC from malicious attacks.

Windows 10 Cumulative Updates Aren't Installing: How to Fix?

A Windows 10 Cumulative Update is a collection of more than one updates. These cumulative updates contain all the new and previously released fixes. The good thing about these cumulative updates is that they don't duplicate any installed update. When a new update package is available for Windows 10 then only those files will be downloaded that aren't installed.

Windows 10 users have been facing a serious issue with these cumulative updates. Most of them weren't able to install a single Windows 10 quality update since December 2017. Even if you download the package from Microsoft update catalog and install it manually then it will not install at any cost.

I remember Microsoft released some dangerous Windows 10 updates in the previous month including KB4056892 (16299.192), KB4074588, and KB4058258 (16299.214)KB4056892 broke my Windows 10 PC and dropped the system in an unbootable state. The computer started but was unable to go past the Windows 10 logo. It returned an error stating "Your PC didn't start correctly" every time I switched it on. These cumulative updates returned error codes which are 0x80073715, 0x80070bc2, and 0x80070422. However, a Microsoft patch was released later.

So, what could be the problem with these cumulative updates? I don't have an exact answer for this but running the Windows update troubleshooter notified me a serious error known as 'Windows Update Database Corruption Error'. To repair the database I tried the DISM tool and the System File Checker (SFC /scannow) tool. But none of these tools fixed the problem. Then I decided to do a clean install of Windows 10 which worked with one cumulative update only. Even a clean install didn't fix the problem.

The only solution to this Windows update problem is to clean install Windows 10 without reusing the old 'System Reserved' partition for a new and clean installation. During a second clean installation round, I deleted the C:\ drive partition and the 'System Reserved' partition. 

Windows 10 Cumulative Updates Aren't Installing: A Permanent Fix As Of Now

To prevent any data loss situation always make sure that you have multiple copies of your data stored on your computer. You can use external hard drives. We recommend WD My Passport Ultra.

  • To do a clean install of Windows 10 you should be having a bootable USB. 
  • Always check the partitioning style of your current Windows 10 installation before doing a clean install. If your computer is using a GPT partition style then making a bootable USB with MBR partitioning style would be illogical.
  • To check the partition style. Type the following command at the command prompt.
diskpart <hit enter>
list disk <hit enter>
If under the 'Gpt' field you don't see any * (asterisk) then your computer's partition style is MBR otherwise GPT.
  • Now after knowing the partition style go on creating a bootable Windows 10 USB. Read this article - create a bootable USB Windows 10 with MBR or GPT.
  • After creating the bootable USB restart your computer and go to BIOS settings. In BIOS change the boot order and select the USB to boot from. Exit the BIOS.
  • When the BIOS boots the USB it will ask you to press any key to load the Windows 10 installation files. That's it now go on installing the software.

  • During the setup, Windows will ask you where to install the new OS. This is the most important part.
  • Here the disk partitions are labeled 0, 1, 2 and not C:\, D:\, or E:\. So be careful while formatting the right partition.
  • To identify the C:\ partition in the Windows setup it is always better to note its size and free space before installation.
  • You can get the drive info by right clicking the C:\ drive partition and checking 'Properties' in 'My PC'.
  • This will help us identify which is drive C:\ partition by checking its size and free space. So be careful in this.
  • Now select the C:\ partition after identifying it and delete it. Also, delete the 'System Reserved' partition.
  • Now create a new C:\ partition with all the unallocated space (including the System partition space).
  • After creating the new C:\ partition there would be no 'System Reserved' partition. But don't worry Windows 10 will automatically create a new 'System Reserved' partition on installation.
  • Start the installation and wait till it finishes.
After complete installation, check for Windows updates and let Windows install updates automatically. After this clean install, I hope all the latest cumulative updates will install on your Windows 10 PC as they are working fine on mine.

Bandicam Not Opening In Windows 10: How To Fix

Bandicam is a screen recording software developed by Bandisoft company. Bandicam screen recording software is able to record computer screens with HD gameplay videos. Bandicam is a shareware software which lets you record 10 minutes of screen recording with a watermark. To use Bandicam without watermark one should buy the full version. The good thing about Bandicam is that it is easy to use and records high-quality videos with less size. The recorded videos will of high definition with low storage space size. Another good feature of Bandicam is that you can highlight anything on the screen while recording with its special on-screen highlighting tools. It is one of the best screen capture software.

But there is a problem with Bandicam that after installing it on a Windows 10 PC it won't open. When you double-click the program to open it then it runs for few seconds in the task manager then automatically closes. Reinstalling the software will not fix this problem on Windows 10. So, what could the problem be? In this tutorial, we will tell you how to fix the problem 'bandicam not starting'.

Bandicam Not Opening In Windows 10

Bandicam Not Opening In Windows 10: The Main Reason

The main reason behind 'bandicam won't open' is related to desktop or laptop computers that have a dedicated Nvidia graphics chip. If you have installed Nvidia GPU drivers along with the GeForce experience (Nvidia game optimizer) software then it will create a conflict between GeForce experience and Bandicam. This is the main reason why Bandicam won't open or even start on Windows 10 computer which has Nvidia next GPU.

Bandicam Not Opening In Windows 10: How To Fix?

  • Uninstall your Nvidia GPU drivers and restart the PC.
  • Now open Bandicam to check whether it is opening or not.
  • If it opens and you are able to record the screen then the problem has been fixed.
  • If it still doesn't work then uninstall Visual C++ redistributable packages from your computer by going to 'Control Panel>All Control Panel Items>Programs and Features'.
  • Now this time Bandicam will run definitely. The problem has been fixed.
  • Now you just have to download and install Nvidia GPU drivers.

How to Download and Install Correct Nvidia Driver

  • From the 'Product Type' select your Nvidia GPU type.
  • Then select the 'Product Series'. Suppose if I am downloading drivers for GeForce 900 series then I will select GeForce 900. I won't be selecting GeForce 900M because it is for notebooks. So select the right product series, because 900 and 900M series have a different number of Nvidia GPUs. 
  • Then in 'Product' select the right Nvidia chip.
  • Click 'Operating System'. A list will open and then click 'Show all Operating Systems'. This will show 32-bit and 64-bit operating systems. Select the right operating system architecture.
  • Select the language if you want to change it from English. Then click 'SEARCH'.
  • A download page will open. Click 'Download' to start downloading the driver.
  • Once the driver gets downloaded open it and it will ask you to extract the driver files. Extract the files in C:\ drive.
  • Now right click on 'This PC' and select 'Properties'. Then open 'Device Manager'. Here look for a device without any driver. The Nvidia GPU may be listed as '3D Video Controller'.
  • Right click on it and select 'Update driver'. Then click 'Browse my computer for driver software'.
  • Now click 'Browse' and select this directory below.
C:\NVIDIA\DisplayDriver\388.31\Win10_64\International\Display.Driver
  • Here do note that the 388.31 is the driver version and may be different if you have an older or a new Nvidia driver software package. Change this number with your Nvidia graphics software driver version which you have downloaded.
  • After selecting the directory click 'Next'. Wait till Windows 10 finish installing the Nvidia display driver.
  • You will be notified when the installation gets completed. It will take some time to install though.

Now you can use Bandicam and Nvidia gaming graphics without any conflict. So we have successfully fixed the problem of Bandicam not opening in Windows 10.

How and Why to Protect Your Eyes From Digital Eye Strain Caused by Blue Light

Digital Eye Strain sometimes referred to as Computer Vision Syndrome is a vision condition that results from continued looking on a computer screen without blinking your eyes. Due to the prolonged eye focusing on the computer screens, mobile phones screen, or tablet screens the focusing power of the eyes' lens gets impaired over time. If you heavily use computers and smartphones then you may experience eye problems like headaches, eye dryness, eye itchiness, sleeplessness, difficulty in getting up early in the morning, and burning sensation in the eyes.


All digital devices including computer monitors, smartphones, and tablet screens emit high energy blue light. Digital devices use blue light to brighten their screens thereby releasing high energy in form of blue light. Blue light has a short wavelength which means it has high energy and it is the only light ray after UV rays that can penetrate a human eye back to the retina.

Computer Vision Syndrome

However, not all blue light is bad for the eyes. Blue light between 380nm and 470nm is known as bad blue light while blue light between 470nm and 500nm is actually good for the eyes. This range of visible blue light is beneficial because it provides natural reflexes protecting eyes from light overexposure, and helps with the body’s circadian rhythms, and helps cognitive and memory function. But finally, too much of anything is not actually good for you.


Sun's Blue Light vs Blue Light Emitted By Digital Devices

You may be thinking that Sun also emits blue light then why it doesn't damage our eyes. The Sunlight is actually white light which consists of seven colors. These colors are collectively known as VIBGYOR (Violet, Indigo, Blue, Green, Yellow, Orange, and Red). These all colors make up the Sun's white light which also has blue light starting from 380nm. Besides having a bad blue light spectrum the Sun doesn't hurt our eyes much as compared to the digital devices.

The answer is simple, suppose you are playing cricket on a sunny day. As a fielder, you will see that all your teammates are standing at distant places on the field. So, in the cricket game, you just have to focus on the ball and your teammates. Most of the time a ball will be at different places and in the hands of different players. This distance can be more than 10 feet. So you are actually focussing on distant objects and the principle says that when you focus on a distant object your eye muscles will do it easily without getting strained.

Also, your eyes are constantly changing objects, as a result, the Sun's blue light. And because of dust particles and a large number of objects around us the Sun's blue light gets highly scattered. So the Sun's blue light has almost no effect on our eyes if it isn't a very hot day or you are not wandering in a desert while reading an offline or bookmarked version this article.

But the blue light emitted from the computer screens and smartphones is not the same as of the Sun's light. Blue light from the smartphone screen will not scatter just like the Sunlight does. And more amount of it will enter your eyes because the focusing distance is just mere inches and your eyes keep on focussing same object (like text) for a long time. As a result, your eye muscles will have to work harder to focus on the screen that is few inches away. This results in eye problems like dry eyes, itchy eyes, headaches, insomnia (difficulty in sleeping), and difficulty in waking up early in the morning.

So that was enough science to teach you the bad effects of blue light. Now we will see how can we block the blue light emitted by our computer screens, smartphones, and tablets.

How to Block Blue Light on Android

Android nearly holds 87.5% percent of the global smartphone market share. So, Android smartphones are more responsible for damaging our eyes by emitting blue light. You can download blue light filter apps from the Google Play Store. When you use your tablet or smartphone in the night then enable the filter to prevent blue light from damaging your eyes and disturbing the wake-sleep pattern of your body. Blue light makes the brain more active so if your eyes consume it at night then you will have trouble in sleeping. Here's a good article for using and installing a blue light filter on android.

Some smartphone manufacturers like Xiaomi and Huawei provide their own light filters as a part of the phone's OS. You can find this option in the display settings. For Xiaomi go to 'Settings>PERSONAL>Display>Reading mode'. For Huawei go to 'Settings>Display>Eye comfort'.

How to Block Blue Light on Windows 10

Windows 10 has a built-in blue light filter. This setting is known as 'Night light'. Go to 'Settings>System>Display'. Under 'Brightness and color' click 'Night light settings'. Then click 'Turn on now'. Adjust the color temperature that suits your eyes.

How to Block Blue Light on Mac OS

Even Apple's Mac OS has this built-in functionality and you can use it to protect your eyes. On Mac, this feature is known as 'Night Shift'. To open night shift on Mac, follow the steps below.
  • From the Apple menu, launch System Preferences.
  • Click on Displays.
  • Click on the Night Shift tab.

Adjust the color temperature between less warm and more warm. Set the color temperature to that value which doesn't hurt your eyes. I think slight warmer colors will be best for screen viewing.

Tips to Prevent Digital Eye Strain

A blue light filter is not enough to prevent the Digital Eye Strain. Besides using the filter you may feel pain or dryness in the eyes. So below are some tips to prevent the Digital Eye Strain or the Computer Vision Syndrome.
  • The top of the computer screen should be at the eye-level to make the viewing angle between 20 and 40 degrees. It should not be greater than 35 degrees. Avoid tilting the monitor screen.
  • Reduce the screen brightness when working for long hours.
  • Use the 20-20-20 rule. This means make your eyes focus on an object for 20 seconds which is 20 feet away every 20 minutes.
  • Keep your eyes blinking. Blinking the eyes will prevent dryness and overexposure to blue light. Blinking will force the eyes to refocus the objects.
  • Relax your eyes for at least 5 minutes every day by closing your eyes. Then make a clockwise circle by slowly rotating your eyes. The perform the same exercise in an anti-clockwise direction.
  • Walk out in Sunlight for at least 10 minutes and focus on distant objects.

Digital Eye Strain is a common problem that affects a large number of people worldwide. At present, it is not possible to imagine a world without our computers and smartphones. And prolonged screen viewing will definitely work out our eyes in a negative way. So take the responsibility of saving your eyes today from Computer Vision Syndrome and also let others know about it. 

Please share the article if you like it.