This Domain Name Is Up for Sale
Contact Us

How To Properly Uninstall Intel HD Graphics Driver On Notebooks

Intel HD Graphics are the integrated graphics in Intel core processors. Besides having the dedicated graphics processor(GPU) the Intel HD graphics is the primary display adapter. You can’t use the dedicated GPU as your notebook’s primary display adapter because it is not meant for this purpose. While uninstalling the Intel HD graphics driver 3000, 4000, 4200, 4400 and 5000 the notebook’s screen turns off and you don’t see anything. So it is difficult to know whether the driver has been completely uninstalled or not so that you can restart your notebook. But this can be easily solved by following the steps given below.

intel hd graphics logo


  • Go to Control Panel and uninstall the Intel HD graphics driver.
  • When you click ‘Next’ the notebook screen will automatically turn off however the notebook is still powered on and the driver is uninstalling.
  • Now check the hard drive indicator on your notebook. It is a tiny green light that blinks fast when the hard drive performs read write operations.
  • This tiny hard drive indicator light will keep blinking fast while the driver uninstalls.
  • When the light stops blinking it means the Intel HD graphics driver has been uninstalled.
  • Now its time to restart your notebook to let the changes take effect.
  • Since you are not seeing anything on the notebook’s screen, simply press ‘Tab’ two times and hit ‘Enter’ to restart the notebook pc.
  • Install the newer version of the driver if available.

Note: If the laptop’s screen turns off then do not panic and do not turn off the laptop/notebook by unnecessary means like removing the battery. Because the uninstallation process will abort and you will lose your data. If you do this you may end up with a screen with no video signal.

The Intel HD graphics driver needs to be removed first if you are installing a newer version of the display driver.  I tried a newer version of Intel HD graphics driver that is 1.5.49.0, but it is giving me colour flickering and screen flickering problems that is the brightness and contrast of the notebook’s screen automatically increases for a short time after the screen saver is aborted, then the screen comes to its original settings. So this is the right way to uninstall Intel HD Graphics driver even when the screen turns off.

How To Play Subway Surfers On Samsung Galaxy Y S5360

Subway Surfers is an endless running mobile game developed by Kiloo and SYBO games. The game is simple to play, a character named Jake runs on tracks to collect coins and save himself from the cop. Currently the game is only available for ARMv7 phones and above. ARMv7 is an android CPU architecture. Phones like galaxy y S5360 has ARMv6 architecture that's why we can't run subway surfers on galaxy y. But in this tutorial I am going to show you how you can play subway surfers on galaxy y without rooting your phone. You should be thankful to xda-developers for modding the subway surfers app and making it work on galaxy y.

Play Subway Surfers On Samsung Galaxy Y S5360 

  • Download Subway Surfers APK For Galaxy Y ARMv6
  • Install it, if the installation is blocked go to 'Settings>Applications>Unknown sources'. Then again install it.
  • Now do not open the game till yet after installation, because if you do so the game will lag heavily and it can't be played smoothly.
  • Open task manager and tap the 'RAM' tab, then tap the 'Clear memory' button. Now subway surfers will run smooth.
  • Now open the game and start playing subway surfers.
  • There would be no background music because it is a modded app.
Screenshots


How To Play Tekken 3 Game On PC/Laptop With Joystick

If you are a fan of classic playstation ps1/psx games then you may be willing to play them on your windows pc. Playstation ps1/psx games can be played on pc or laptop by using a playstation ps1/psx emulator. If you have Tekken 3 game disc then you can also play them in the emulator. If you have a USB joystick then you can enjoy ps1 games even more because of the same experience as you feel on a Playstation. But this is not the limit you can even connect your ps3 controller to your pc/laptop which comes with a USB cable to play games, but you need to install drivers for this. In this tutorial you will learn to play tekken 3 ps1/psx game on windows computer/laptop with epsxe emulator and a usb joystick.

Requirements

  • ePSXe emulator for windows Download
  • Playstation PS1/PSX cds or roms.
  • Two usb joysticks for two players or a ps2 controller with usb adapter or a ps3 controller with usb cable.We are using USB joysticks with rumble motors which lest us feel vibrations during gameplay.
  • Download Tekken 3 ISO Rom from internet.
  • Windows 7 or Windows 8 PC/Laptop.


Play Tekken 3 Game On Computer/Laptops With ePSXe Emulator

Note: This is a PC tutorial for Tekken 3 if you want to play it on your android phones then see this article

Configure Video Plugin

  • Open ePSXe and goto Config>Video. From the drop down list select “P.E.Op.S. Soft Driver 1.18”. Then click Configure. Here you will see video controls. Select “Fullscreen Mode” to run the games in fullscreen other wise choose “Window mode” to run it in a small window. Also you can specify your resolution. Also choose Color depth to 32 bit. Then click OK,then OK.
epsxe settings

epsxe video plugin

Configure BIOS

  • To configure bios goto Config>Bios.A prompt box will open. Click “Select” and locate the bios file SCPH1001.bin. You can find this file in ePSXe>bios>SCPH1001.bin. Locate this file and select it then click OK.

Configure Memory Cards

  • Memory cards are in ePSXe>memcards folder. To configure memory cards goto Config>Memory Cards. A prompt box will open,you will see two different memory cards location here. Click select and choose each memory card in different slots.

Settings To Setup USB Joysticks

  • Connect your USB joystick or ps3 controller to pc and install its driver. When it is ready to use you will see a notification in the system tray that your device is ready to use. Do not disconnect it now.
  • Open ePSXe and click “Config”. Then select “Game Pad”. Then click "Port 1" and then select "Pad 1". A gamepad setting wizard will open with a dualshock controller with all button specifications. From the drop down list select “SCPH-1200 DualShock”.
  • Now this is time to configure the buttons and analog stick of your pc joystick. The default buttons are set to keyboard. We need to put pc joystick buttons in this setting wizard instead of keyboard keys. Below is the image of joystick before setting the keys.
  • To assign the buttons first click the buttons with mouse then press the buttons of your joystick. Assign buttons exactly according to the controller layout. Below is the image of the gamepad after setting it up completely. Assign buttons as shown in the image below.
epsxe joystick configuration

  • Now we have to enable vibrations. You will see several options just next to the controller setup. Click “Type” below the “Rumble” option and select “DX joy1”. Under “Big Motor” select “Constant” and under “Small Motor” select “Sine”. Then click OK.
  • If you have another controller then connect it and repeat the above process for it.But this time goto Config>Game Pad>Port 2>Pad 2. Now setup buttons,six axis controller and the motors for the vibration for the second gamepad.Click OK. For gamepad 2 under “Rumble” select “DX joy2” and motor settings is same.
  • Now click “File” and select “Run ISO”. Then locate the ps1 rom bin/iso/img file select it and click open. If you have an original playstation game cd then insert it in cd/dvd drive then click “File” in ePSXe and select “Run CDROM”. Now enjoy Tekken 3 game with a joystick on your PC.

Note : The USB joystick can be used to play any emualtor games like nes, snes, CPS1, sega genesis and neogeo.

ScreenShots Of Tekken 3 Game On Windows PC


Tekken 3 On Windows 7

tekken 3 on pc/laptop

Hope you like the post. Please give 2 minutes to share if you like it. Now read Play Tekken 3 On Android

How To Connect Two Computers/Laptops Via LAN Cable For File Transfer

LAN or Ethernet cable is a fast way to transfer data between two computers or two laptops or a laptop and a computer. LAN cables can transfer data from one computer to other at speeds more than 50 MBps. This is much faster than USB 3.0 because USB 3.0 works fast only with faster storage devices. Suppose you have bought a new laptop/notebook and most of your data is stored on your older desktop's hard drive. Now you want to transfer the data from old PC hard drive to new laptop/notebook hard disk. Then you can connect both systems via LAN cable and transfer files at super high speeds upto 70 MBps depending on hard drive rpm. But connecting the cable is not enough, you have to make several settings. I am going to teach you how to connect two computers with a LAN or Ethernet cable and transfer data at high speeds.

lan cable cat6

Requirements

  • Buy a LAN or Ethernet cable with Cat5e or Cat6 standard.
Note : Cat6 is faster than Cat5e. If you have 1000 T-Base Ethernet controller than you can get speeds upto 125 MBps. With Cat5e LAN cable the speed is upto 70 MBps.

Connect Two Computers/Laptops Via LAN Cable For High Speed File Transfer In Windows 7

  • Switch on both the systems. Connect the Cat6 cable to the LAN port on both computers.
  • On your old computer go to 'Control Panel>Network and Sharing Center'. Click 'Changed advanced sharing settings'.
  • Here choose 'Turn on network discovery' and 'Turn on file and printer sharing'. Click 'Save changes'.
  • Now share the drive in which your data is stored. Right click on that drive. Click 'Sharing>Advanced sharing>Share this folder>OK'.
  • Now on your new laptop/notebook repeat the steps 2 & 3 only to turn on network discovery.
  • Now open My Computer in new laptop and click 'Network' on the left pane. Your old computer will be visible in your laptop.


  • Double click to open it and enter the username and password of your desktop computer.

  • Now the shared drive will be seen here. Double click to open it. Copy all the files at once and paste them in the new laptop's hard drive.

  • You can use the same procedure to copy files from notebook to desktop hard drive.

This tutorial will save your time because with a LAN cable you can easily transfer 11GB data in just 3 minutes. Also it will be helpful when you buy new desktops or upgrade the hard drive. See how to upgrade laptop hard drive

How To Replace Or Upgrade Hard Drive On ASUS X550 Series Notebooks

ASUS X550 is a X series of Asus notebooks. These notebooks are light weight and have U series of Intel Core processors. The Asus X550C notebooks are designed to consume low power, they stand in the middle of laptops and notebooks, because the X550 notebooks have similar performance to that of ultrabooks. The ASUS X550C notebooks feature Intel Core i3, Core i5 and Core i7 all belonging to the ULV(Ultra Low Voltage) Ivy Bridge processor family. The hard drive range is between 500GB and 1TB. If you find 500 GB is less for your data storage then you can upgrade the hard disk in minutes, replace a defective HDD or even upgrade with a SSD(Solid State Drive). In this tutorial I am going to show you how you can upgrade or replace a hard drive on ASUS X550 notebooks.

List Of Supported Notebooks

  • Asus X550CC : All models like XO029D, XO072D, XO055H
  • Asus X550CA : All models
  • Asus X550CL : All Models
  • X550LN : All Notebooks
  • X550VC : All Notebooks
Requirements

  • Replacement Hard Drive, a notebook/laptop SATA hard drive.
  • Screw driver.
  • Backup data from existing hard drive to some other storage device like external HDD.
  • To backup data from notebook to desktop computer Read This Tutorial.
WARNING: Before doing anything to your notebook read this tutorial carefully. I will not be responsible for any permanent damages. Read the tutorial first then decide whether you want to use it or not.

Replace Or Upgrade Hard Drive On ASUS X550 Notebooks

  • Remove the battery first before doing anything. Now gently turn the notebook upside down so its bottom part is visible and open the 2 screws as shown in image below.


  • Gently pull the cover back and put it aside. The silver container with black circles is your notebook’s hard drive caddy which contains the HDD.

WARNING:
1. Before touching it touch the metal screw driver to ground yourself and open the screws shown in the image below.
2. Make sure that the screws won’t get inside the notebook otherwise the motherboard will be permanently damaged due to short circuiting. See the image below.

  • Now gently slide the HDD towards left as shown in image below with two parallel arrows to disconnect it from notebook’s SATA connector. Gently pull the hard drive caddy up.

asus x550cc internal hard drive removed

  • Now you will see 4 screws in the HDD caddy on two sides, two screws on each side. Unscrew these screws to remove the Hard Drive from its caddy.


  • Now secure the HDD at a safe place. Install the new hard drive or SSD in the caddy. Make sure the SATA connectors should be in same position as they was in the older HDD, otherwise when you connect it, it won’t connect and damage or break the SATA connector on the notebook’s motherboard if you do it forcefully.
  • After fixing the hard drive in the caddy and double checking everything, install it on the notebook. Then gently slide towards your right to connect it to the SATA connector. Fasten the screws.
asus hdd caddy

  • Put the back cover on and fasten the screws. Install the battery.
  • Start the machine and press F2, you will see the information about new HDD in BIOS. This means the upgrade/replacement was successful.
  • If the Hard drive is new then you have to install Windows OS/MAC which would you like.
  • After installing Windows OS its time to restore your data from old HDD to new one. If you have backed up the data in flash drives or external hard drives then you know how to restore it.
  • Otherwise if you backed up your data on desktop hard drive then use LAN cable to connect your notebook to desktop and transfer all the backup files at high speed, I have given the tutorial link above.
You have successfully upgraded/replaced the hard drive on  ASUS X550 Notebooks

Arctic Silver 5 Thermal Paste Review

Arctic Silver 5 is thermal compound for CPU and GPU. Thermal compound helps in transferring the heat from the CPU cores to the heatsink by filling up the microscopic valleys between processor cores and heatsink. Without the use of thermal paste a processor will always run hot, that will reduce its life. You can think yourself the CPU manufacturer Intel ships its own thermal paste with boxed Intel CPUs, now you can think how important is the thermal paste for the CPU and GPU. Intel's stock Thermal Interface Material is not available on online stores, so we have only one option left is to buy aftermarket thermal compounds. Currently Arctic Silver is considered to be the best thermal paste for CPU and GPU chip doesn't matter if it is of desktop's or laptop's. In this tutorial I going to review the Arctic Silver 5 thermal paste and tell you about it pros and you will be able to decide whether to buy it or not.


arctic silver 5 3.5 grams


Arctic Silver 5 Thermal Compound Review

1. Less Viscous: Unlike other cheap quality silicone thermal compounds. AS5 is less viscous. It has a sticky nature. Once applied between the CPU and the heatsink it creates an excellent thermal seal that increases the heat transfer. It easily spreads over the entire surface of the processor after the heatsink is installed.

2. Excellent Heat Conductor: It contains 99.9% pure silver which is a good conductor of heat.

3. Cooling Efficiency: Take two situations here. First one is you are running the CPU at 100% load, like playing a game without using Arctic Silver 5, then suppose the temperature is 60 degree Celcius. Then after applying Arctic Silver 5 the temperature at 100% load will be around 48 degree Celcius, which is 12 degree less than the previous situation around 20% overall loss in temperature. This test is done on Intel Core 2 Duo processor. You get different temperatures with different CPUs. But Arctic Silver 5 claims 3-12 degree Centigrade lower CPU temperature at 100% load as compared to standard thermal compounds. This claim proved true in my case where I used it for Intel Core 2 Duo.

4. Long Term Stability: After applying AS5 during the CPU's first use, the paste thins out to fill the microscopic valleys and ensure the best contact between the heatsink and the CPU cores. Then the paste thickens slightly over the next 50 to 200 hours of use to its final consistency designed for long term stability. It doesn't separate or spill, it stays right where it was applied.


When To Use Arctic Silver 5

  • If your processor is running very hot or your computer or laptop shuts down automatically due to overheating.
  • If you haven't upgraded the thermal paste for years.
  • If you want to extend the life of CPU.
  • If you are a gamer then this is highly recommended for your CPU and GPU to protect them from overheating and even burning. It can be used with Intel and AMD processors without any problem. 
  • If you are using a laptop or notebook whose processor and GPU heats up very much. Notebook CPUs and GPUs are more prone to overheating, Arctic Silver 5 can reduce this problem.

Arctic Silver 5 Cons

It can cause problems in the motherboard or CPU if it comes in contact between two electrical paths because it is slightly capacitive. This is your fault if you do not apply it correctly.

Should You Buy It

Arctic Silver 5 is worth buy if you want your computer's processor temperature come down by 13% at full load. The difference will be between 3-12 degrees, depending on the type of CPU.
Read How To Apply Arctic Silver 5

List Of All Games For The Amazon Fire TV

Amazon Fire TV is a digital media player and a micro-console which is developed by Amazon.com to stream audio and videos on a HDTV via the internet. It was launched in the US on 2 April 2014 at a price of $99 dollars. With Amazon Fire TV we can play games with a game controller which is priced at $39.99. The bundled cost of Fire TV with the game controller is $139. It runs on Mojito V3 the android based Kindle Fire OS. Games that runs on android 4.4.2 kitkat can also run on it. Few major specs of Amazon Fire TV includes a 1.7 GHz quad core qualcomm krait 300 CPU, Adreno 320 GPU, 8 GB internal storage, 2 GB RAM and 1080p HD display. It is designed to compete with Apple TV and ROKU. It is not a gaming console.
 

amazon fire tv and its back panel

List Of All Games(Paid/Free) For Amazon Fire TV


Amazon Fire TV List For Free Games


  • Asphalt 8: Airborne
  • Deer Hunter 2014
  • Hill Climb Racing
  • Riptide GP2
  • BINGO Blitz
  • Reaper
  • Hungry Shark Evolution
  • Stickman downhill - Motocross
  • Big Win Slots
  • Into the Dead
  • PBA Bowling Challenge
  • Badland
  • Snailbow
  • Fibbage
  • Vendetta Online
  • Concussion Boxing
  • ARC Squadron: Redux
  • Brick Break Blitz
  • You Don’t Know Jack Party
  • Despicable Me: Minion Rush
  • The Walking Dead: Season One (first episode free)
  • Zen Pinball HD
  • Dead on Arrival 2
  • Voodoo Whisperer
  • Dead System
  • CLARC lite
  • Shadow Fight 2
  • Haunted Past
  • Stickman Base Jumper
  • Dead Trigger 2
  • Crystal Picnic
Amazon Fire TV Games List For $0.99


  • Monsters University
  • Pocket Rally
  • GraveStompers: Kid Zombies Save Eradication
  • Motorbike
  • Quiet, Please!
  • Beyond Ynth HD
  • Naught 2
  • Grandpa and the Zombies
  • Endless Skater
  • Ski Safari
  • Polar Bowler 1st Frame
  • Grow
  • Puddle
  • Micronytes Director’s Cut
  • Recursion
  • Dream Flight
  • A Ride into the Mountains
  • Super Daddio 2
  • Super Mega Worm
  • Quiet Christmas
  • Melee Man
  • Rabbids Big Bang
  • Quell
  • Cannon Ballers
  • League of Evil
  • Gravity Guy
  • Buddy & Me
  • Range Man
Amazon Fire TV Games For More Than $1.00

  • Mystery Case Files: Return to Ravenhearst ($1.99)
  • Fantastic 4 in A Row 2 ($1.99)
  • Vacation Vexation ($1.99)
  • FIST OF AWESOME ($1.99)
  • Atlantis Sky Patrol ($1.99)
  • Aces of the Luftwaffe Premium ($1.99)
  • EVAC ($1.99)
  • Alpha Wave ($1.00)
  • Sci-Fighters ($1.29)
  • Experiment ($1.31)
  • Ascent Of Kings ($1.49)
  • Kung Fu FIGHT! ($1.49)
  • Sonic the Hedgehog ($2.99)
  • Sonic The Hedgehog 2 ($2.99)
  • Doom & Destiny ($2.99)
  • Rayman Fiesta Run ($2.99)
  • Quell Memento ($2.99)
  • Radiant ($1.99)
  • Tank Riders 2 ($1.99)
  • Mini Golf Mundo ($1.99)
  • Mystery Castle HD (5 Episodes, $9.95)
  • Fractal Combat X ($1.99)
  • Striker Soccer Euro 2012 Pro ($1.87)
  • Quell Reflect ($1.99)
  • Truck Monsters ($1.99)
  • Syder Arcade HD ($1.99)
  • Grand Truckismo ($1.99)
  • Ninja Hero Cats Premium ($2.44)
  • Coaster Crazy Deluxe ($2.49)
  • Monster RPG 2 ($2.91)
  • Sonic CD ($2.99)
  • Prince of Persia: The Shadow and the Flame ($2.99)
  • Double Dragon Trilogy ($2.99)
  • King Oddball ($2.99)
  • Canabalt HD ($2.99)
  • No Brakes Valet ($2.99)
  • Dark Incursion ($2.99)
  • Homeland Strike Force Part One ($2.99)
  • Hard Lines ($2.99)
  • Trouserheart ($2.99)
  • Time Surfer ($3.00)
  • Save the Puppies Premium ($3.99)
  • The Cave ($4.99)
  • Tetris ($4.99)
  • Wraithborne ($4.99)
  • Virtua Tennis Challenge ($4.99)
  • Sonic the Hedgehog 4: Episode I ($3.99)
  • Bit Brawlers ($3.99)
  • Hero of Many ($3.99)
  • Burn Zombie Burn ($4.96)
  • The Game of Life ($4.99)
  • BombSquad ($5.00)
  • Aftermath XHD ($5.99)
  • Ground Effect Pro XHD ($5.99)
  • Farm Invasion USA Premium ($5.99)
  • Gene Effect ($6.78)
  • AirFighters Pro ($4.99)
  • Clarc ($4.99)
  • Anomaly 2 ($4.99)
  • Twin Robots ($4.99)
  • Terraria ($4.99)
  • Sonic the Hedgehog 2: Episode II ($4.99)
  • Sev Zero ($6.99)
  • Deus Ex: The Fall ($6.99)
  • NBA 2K14 ($7.99)
  • Modern Combat 4: Zero Hour ($6.99)
  • Electronic Super Joy ($7.99)
  • Crazy Taxi ($4.99)
  • Minecraft - Pocket Edition ($6.99)
  • RPG Alphadia Genesis ($9.99)
Overtime more games will be added to the Amazon Fire TV, till then enjoy these games. That was the list of all the free and paid games for Amazon Fire TV.

How To Apply Arctic Silver 5 Thermal Paste To CPU And GPU

Arctic Silver 5 is a thermal compound that is used to enhance the heat transfer from CPU core to the heatsink. Arctic silver 5 contains 99.9% pure silver which is a very good conductor of heat. It is not a silicone based thermal compound. The reason behind choosing arctic silver 5 is its efficiency to cool down the processor by 12% better than other thermal interface materials at 100% CPU load.

Arctic Silver 5 is a grey coloured, oily and sticky paste. By rubbing a tiny drop of it between two fingers you can see the silver in it. Arctic Silver 5 starts working whenever the cpu temperature increases. When the processor is idle you won’t notice any changes in temperature but when you play games then CPU usage will increase upto 100% at this stage you will notice a change in temperature, it will be 12% less than the previous temperatures. Most people see that there laptop or desktop CPUs are running hot, the reason is dried out thermal paste. The thermal paste should be changed once in every two years to extend the life expectancy of CPU and GPU.

arctic silver 5 thermal paste 3.5 gm

In this tutorial I am going to teach you how to apply Arctic Silver 5 to CPU and GPU. This tutorial is applicable for desktops but if you have knowledge about laptop/notebook disassembling then this tutorial will also work for them without any problem, but you have to take extra care while using this tutorial for your laptop/notebook’s CPU and GPU.

Requirements

  • Arctic Silver 5 thermal compound.
  • Cotton swabs and clean cotton cloth.
  • 70% Isopropyl Cleaner for cleaning the older dried out thermal paste.

Find Your Processor
First of all get to know about your processor’s make and model, whether it is of Intel or AMD. Because Arctic Silver 5 have different application instructions for different processors. Some use the vertical line method of applying thermal compound and others may use the horizontal line method, surface spread and middle dot. So follow the steps below.

  • Go to this link.
  • Choose your CPU make, either Intel or AMD.


  • After choosing the processor maker you will see the list of all CPUs. 
  • Locate your CPU and read the instructions carefully by clicking the ‘Application Method’ . It is both applicable for laptop and desktop processors.


  • I have Intel Core 2 Duo processor so I will be using the vertical line method.

Important Instructions

  • Before opening the computer cabinet disconnect the power cord.
  • Make a note of each wire that you disconnect from the motherboard because if you unable to find where to connect the wires then you will get yourself into trouble. Just write on paper about the all the wire connections in the motherboard. Do check the motherboard manual first carefully.
  • If your desktop is using an Intel heatsink then read the instructions carefully to how to remove it from CPU. You can find the instructions in motherboard manual or check Intel’s website.
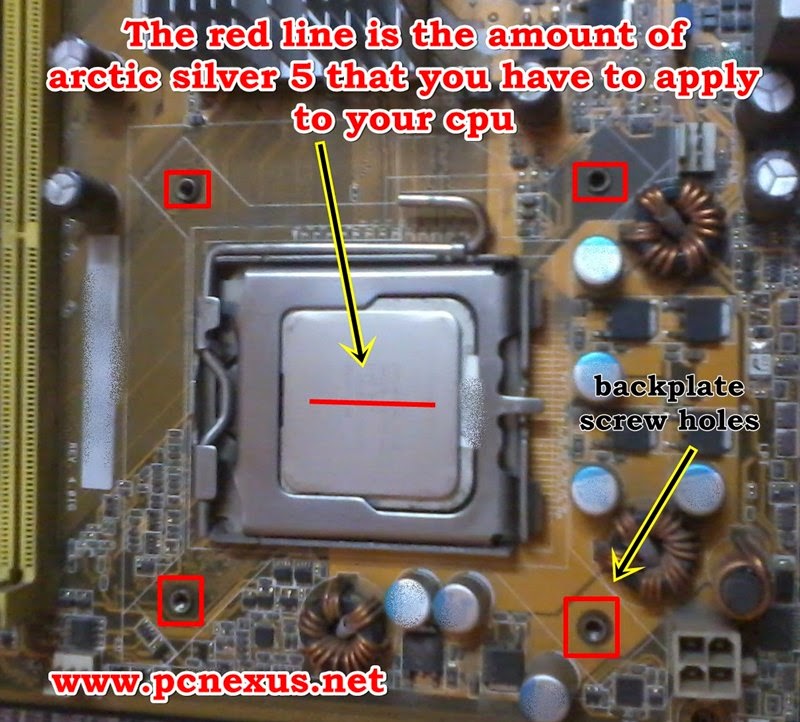
  • If your desktop’ motherboard is using a custom heatsink then it uses a “backplate” that is attached at the back of the motherboard right behind the CPU socket.

heatsink backplate

  • This backplate should not move while installing the heatsink because it has 4 screw holes in which the heatsink would be fixed. 
  • I placed the motherboard over a book so the back plate won’t move and when I install the heat sink the back plate won’t fall down because the heatsink has springs in its four screws. 
  • We have to press these screws two at a time to fix them in the back plate holes before screwing them.
  • Watch some videos on YouTube about how to install and uninstall a custom heatsink with back plate.

Warning: Whatever you are doing is at your own risk. I will not be responsible for any damages to your computer.

How To Apply Arctic Silver 5 Thermal Paste On CPU

  • I am assuming that you have read the instructions to apply arctic silver 5 on its official website. I have Intel Core 2 Duo so I will be using the vertical line method.
  • You have already opened the cabinet and disconnected all the wires from the motherboard. Also remove the button cell on the motherboard.
  • In my case I removed the motherboard from the cabinet and placed it on a book so the back plate won’t move here and there. You can do the same if you have a custom heatsink, if you have Intel’s heatsink then no need to remove the motherboard out of the cabinet.
  • Remove the heatsink and place it a side. I am assuming that you have watched some videos on YouTube about how to remove it.
  • Now you can see the CPU on which older thermal compound is still present.
  • Take a cotton swab and gently clean the older thermal paste from the CPU and bottom of the heatsink. Clean it thoroughly.
  • Apply some Isopropyl cleaner with a cotton swab to clean the top of CPU and bottom of heatsink. Make sure the cleaning liquid should not spill on processor circuits. Use clean cotton cloth to dry the cleaning liquid.
  • Now the processor will shine like new.
  • Now just drip the Arctic Silver 5 thermal paste on top of CPU in form of thin vertical line ( application is CPU dependent, as you have read earlier). Don’t apply too much paste otherwise it will come on motherboard circuits and may damage it. See the image below.

arctic silver 5 apply on cpu

  • Now place the heatsink above the processor and press it gently so that the thermal paste spread on the entire surface of the processor. Don’t press it too hard.


  • Now twist the heatsink 1 or 2 degrees in clockwise and anti clockwise just 2 to 3 times. Now at this stage do not pull the heatsink above otherwise the thermal paste seal will be destroyed.
  • Now just srew the heatsink with the back plate. Or if it is Intel’s then just fixed it, I think you have read the instructions.
  • While screwing make sure heatsink won’t move here and there.
  • Connect all the wires to the motherboard and before starting the PC double check that you have made right connections.
  • Start the PC and monitor the temperature with Specyy Hardware monitor. Download Specyy.

Observation And Result
Before applying arctic silver 5 the CPU temperature while playing games at 95-100% load was 61 degrees celcius. After applying Arctic Silver 5 the temperature for the same condition at 95-100% load is 50 degree Celsius. While playing some games a process named ‘rundll32.exe’ starts automatically, it makes high CPU usage. After starting the game kill this process in task manager to cool down the processor even more. Now the max CPU temperature remains between 45-50 degree celcius even while playing games and previously it was crossing 60 degrees. So you can see there is a 10 degree drop in temperature after applying Arctic Silver 5 thermal paste.

How To Apply Arctic Silver 5 Thermal Paste To Desktop Motherboard GPU
This tutorial is applicable for the older motherboards which are using a Intel GMA GPU. This procedure is not applicable for Intel Core processors because they have Integrated Graphics in the CPU chip.

  • The Intel GMA GPU uses an aluminium sink fixed on the motherboard with two clips. It is easier to remove. See the image below.


  • Remove the GPU heatsink and clean older thermal paste as I taught you above.
  • See the image below. The black line is where you have to apply Arctic Silver 5 a very thin line.

arctic silver 5 on laptop gpu

  • After applying the Arctic Silver 5 thermal compound press the heatsink gently.
  • Re-install the GPU heatsink.
  • You have done it.

Where To buy Arctic Silver 5 In USA
In USA you can order arctic silver 5 via newegg.com or amazon.com. Check the list of all retailers and resellers of Arctic Silver 5 in USA.

Now you have successfully applied Arctic Silver 5 to your desktop’s motherboard CPU and GPU.

List Of All Indicator Icons In Samsung Galaxy S5

Samsung Galaxy S5 is the best ever smartphone from Samsung which runs on android 4.4.2 KitKat OS. With Galaxy S5 you have lot more to learn about its hardware and software features. Its software features are so vast that it would take even few days to quickly learn the all tips and tricks. The most important thing that catches eye of every smartphone user is the indicator icons that appear in the status bar. This indicator icons tell us about the services activated on your galaxy S5 or even tell something that is not correct or a problem that your phone is having. You are familiar with most indicator icons like bluetooth, Wi-Fi and GPS, but Galaxy S5 has some new indicator icons about that you have never heard before.

galaxy s5 all indiacator icons of status bar

So I have prepared a list of all the indicator icons on Galaxy S5 that appear in the status bar. This tutorial is for any model of Galaxy S5 like International, AT&T, Verizon, Sprint and T-Mobile. There are a total of 26 indicator icons.

List Of All Indicator Icons In Samsung Galaxy S5

  • : UMTS network connected
  • : Bluetooth activated
  • : GPS activated
  • : Call in progress
  • : Missed call
  • : Web sync enabled
  • : Connected to computer or USB OTG storage.
  • : New text or multimedia message.
  • : Alarm activated
  • : Mute mode.
  • : Vibration mode.
  • : Flight mode activated.
  • : Battery power level.
  • air gesture icon galaxy s5 : Air gesture feature enabled. This icon is like a hand.
  • : EDGE network enabled.
  • : Error occured or caution required.
  • : No signal or not connected to network.
  • : Roaming icon.
  • : Signal strength.
  • : GPRS service activated.
  • : HSPA+ service enabled.
  • : HSDPA activated.
  • : Connected to 4G/LTE network.
  • : No SIM card inserted.
  • : This is eye icon which means Smart screen feature enabled.
  • : Wi-Fi is ON.
Now if any indicator icons comes up in the status bar then you don't need to worry. Just see this list, find the icon and feel relaxed.