This Domain Name Is Up for Sale
Contact Us

Backup Windows Phone 8 Apps Without Installation

Creating a backup of your useful windows phone 8 apps relieves you of the work of again downloading and reinstalling. App backup is necessary if you have much apps installed on your phone. You can set a backup of your favorite windows phone 8 apps before installing them. Backup of apps can be done either on pc or the windows phone itself, so you decide where you want to store the backup.

Backup Windows Phone 8 Apps Without Installation

There is only one way to backup windows phone 8 apps without installing them and that is downloading them as xap files from the windows phone apps store. You can directly download the apps to your pc or the phone.

  • Just go to 'http://www.windowsphone.com/en-us/store/'.
  • Search for your favorite apps.
  • Scroll down the page completely.
  • Click 'Download and install manually'.
  • The app file will be downloaded to your computer or phone as xap file.
  • Now you can save the apps for backup either on your pc or phone's SD card.
  • The good thing is that you have backed up the apps before installing them on your windows phone 8.
If you don't know how to install .XAP files on your windows phone 8 then check this tutorial.

Manually Install Windows Phone 8 Apps (.Xap Files) From SD Card

Windows phone 8 apps can be downloaded directly to computer or the phone's SD card, check here. You can install windows phone apps from SD card. First download the apps manually to your computer, check the tutorial in above link. Then move all the xap files to your windows phone 8 SD card. Now follow the tutorial below.

Manually Install Windows Phone 8 Apps (.Xap Files) From SD Card

  • Tap 'Start', then tap 'Store' and then tap 'SD card'.
  • Select the apps (.xap files) that you want to install and click 'Install'.
  • You are done.

Remove Browser Hijacker With AdwCleaner

A browser hijacker is a malware that hacks every browser installed on your windows pc. A browser hijacker virus basically sets the default homepage to its own page. Every time you open the browser you will be redirected to that malware's page. You can't remove these browser hijacker viruses and malwares by resetting the browser. A browser hijacker malware can come to your pc through malicious websites and malicious softwares that you download from the internet. The virus code is incorporated in these malicious softwares and when you install these on your pc these malwares and viruses also get installed, thereby hijacking each and every browser installed on your computer.

A browser hijacker automatically sets the browser's homepage to its own and it cannot be changed by the user. These viruses has only one target and that is to get more hits and traffic from users for the customers who paid for these viruses to increase their websites' advertising revenue. So if you find recent changes in your web browser that can't be reversed then your browser is hijacked.

Some Popular Browser Hijacker Malware


  • Conduit Search : Conduit search offers browser toolbars as addons which can be easily installed by the user. It automatically modifies the browser's homepage and may trap you by luring you. It can be easily removed by just uninstalling the addon from the browser.
  • Babylon Toolbar : Babylon toolbar is also a browser hijacker malware that does the same thing as conduit. It can be removed by just removing the toolbar addon.
  • qvo6.com : It is the most dangerous browser hijacking virus that cannot be deleted without a malware removal tool. Its appearance is just like Google's homepage, so most people won't detect it as a virus and will always think that they are using Google. It can steal your secret info and may act as a spyware.
Remove Browser Hijacker
  • If you have found recent changes to your web browser that can't be reversed then you are a victim of these viruses.
  • To remove browser hijacker malware you need to download AdwCleaner for windows.
  • Download AdwCleaner here.
  • Launch the AdwCleaner malware removal tool.
  • Click 'Scan'. It will scan your system for malwares.


  • On complete scan click 'Clean' to remove browser hijacker malware.
  • Restart your computer, now check all your browsers. They should be malware free.

How To Reinstall Deleted Purchased Apps On Windows Phone 8

This tutorial will teach you to reinstall deleted windows phone 8 apps that you have purchased before from the windows phone apps store. You can anytime delete apps from your windows phone 8, but deleting them also removes the game data and associated folders. So first backup these app data folders on sdcard and later copy them again in the phone. The best way to backup apps on windows phone 8 is to download them as xap files directly to your sd card. Later you can install them from sdcard.

However if you have accidently deleted the purchased apps from your phone then don't worry you can reinstall all the deleted purchased apps without buying them again.

Reinstall Deleted Purchased Apps On Windows Phone 8

  • Click 'Start' and tap 'Store'.
  • Now tap search and find the app that you purchased earlier and want to reinstall.
  • Now you will see the app and a 'buy' button below the app screenshot.
  • Don't worry this tie you don't need to pay the money for that same app.

angry birds paid

  • Tap 'buy'. On confirmation you will see a message that you have already purchased this app.
  • Now tap install to reinstall that app again.

4 Ways To Update Microsoft Xbox 360 Gaming Console

Microsoft Xbox 360 is a superb gaming console that let us play some legendary games like the Halo franchise. Xbox 360 periodically gets system updates for new features and enhanced performance. You can update your Xbox 360 gaming console by connecting it to Xbox Live and the console will update automatically to the latest version. In this tutorial I will teach you to update your Xbox 360 gaming console.

4 Ways To Update Xbox 360 Gaming Console

xbox 360

1.Update Xbox 360 Via Xbox Live

  • Press the Guide button on the controller, and go to Settings>System Settings.
  • Then select ‘Network Settings’.
  • Then select Wired Network or the name of your wireless network, if you are asked to do so.
  • Choose ‘Test Xbox Live Connection’.
  • If an update prompt appears then select ‘Yes’ to update your Xbox 360.
2.Install From Game Disc

New Xbox 360 game discs includes the latest software update for your console. So you can install the Xbox 360 update from the game disc itself. When you insert the game disc you will be prompted to update the system. However you can choose not to update Xbox 360 if you are in a hurry to play the games. But you will see an update prompt every time you insert the game disc. So you can update the console whenever you want.

3.Download And Install Xbox 360 Update From A USB Drive

If your internet connection is not compatible with the Xbox standard then you can download the official Xbox 360 update and then install it from a USB flash drive.

  • Download the XBox 360 update file here.
  • Unzip and copy this update file directly to a USB flash drive.
  • Make sure that the USB drive shouldn’t contain any other file and should have FAT file system.
  • Now connect this USB drive to your Xbox 360 console.
  • Restart the console. You will be prompted to update the system. Select ‘Yes’ to apply the update.
4. Install Xbox 360 Update From CD/DVD

If you do not have a USB flash drive then you can install the update by first burning it to CD/DVD then applying the update. But make sure to download the CD/DVD update if you are going to CD or DVD. Do not use the USB file because it may make the disc unreadable to your Xbox 360.

  • Download the update file here.
  • Unzip the file on your desktop.
  • Insert a blank CD/DVD into the CD/DVD writer drive of your computer.
  • Then copy the update file to this blank CD/DVD.
  • Now click Write (burn) files to disc.
  • When the writing process completes eject the disc from the drive.
  • Now insert the disc in to your Xbox 360 console and restart the system.
  • You will be automatically prompted to update the Xbox 360 software. Click ‘Yes’ to update.
Installation procedure number 2, 3 and 4 are an alternative to Xbox Live update and is a manual procedure to update your Xbox 360 console to the latest update (26th Aug 2013). If Xbox live fails to update the console then your Xbox 360 may encounter Kinect sensor problems (flashing green or red sensor light), or dashboard themes not appearing. You can fix these problems by manually updating your Xbox 360 console.

How To Set Master Password On Mozilla Firefox Browser

Setting a Master Password on a browser like Mozilla Firefox is recommended if you share your personal computer with others. A master password prevents unauthorized access to your saved passwords and certificates that are saved by the Mozilla Firefox browser. You have seen many times that when you login with your credentials on websites like Facebook, Google, Yahoo then the browser asks you to ‘Remember password’. If you click this button then the user name and password will be saved in the browser and whenever you visit that website again you don’t need to enter your login details again because Firefox will automatically do it for you. Every time the page is reloaded you will need to enter your master password to automatically fill user name and password field.

But saving passwords in the browsers is not safe if you share your computer with others, because they can automatically login into your accounts and steal your info. To stop this from happening you can use a ‘Master Password’. Mozilla Firefox will ask you to enter the master password every time if you login with your saved passwords. It is the best way to defend your saved password security on a shared computer. So I will teach you how to set a master password on Firefox browser.

How To Set Master Password On Mozilla Firefox Browser

  • Tap the orange Firefox button on the top left corner of the browser window.
  • Hover mouse pointer on ‘Option’ and click Options.
  • The options dialog box will open. Click the ‘Security’ tab and put a check mark against ‘Use a master password’.
master paswword


  • After setting it click ‘OK’, then again ‘OK’ and then ‘OK’ to close the options dialog box.
  • Now go to any website where you want to login. These websites can be Facebook, Twitter or Google.
  • Now enter your login details and click ‘Sign In’ or ‘Log In’. A popup will open on top left to ‘Remember Password’. Click it and enter your master password to save it.

  • Now whenever you visit that particular website you will be asked to enter the master password to login on that website automatically.
  • After you enter the master password the login details will be automatically filled by the Firefox browser and you just have to click the ‘Sign In’ or ‘Log In’ button.
Now you have successfully set up master password on Mozilla Firefox Browser.

UC Browser 9.2 For Android Now Supports Useful Addons

UC Browser 9.2 is the latest version of the UC browser for android. The us browser 9.2 comes with bug fixes, improved performance and a newly feature that is added support to addons. UC browser now supports useful addons that will ease your browsing on android. In this tutorial I will teach you to install and use UC browser 9.2 addons. There are 14 addons available for UC browser 9.2 out of which some of are pre-installed.

UC Browser 9.2 Addons Usage And Installation

To download UC browser addons click the dotted plus sign on top right corner next to search bar. A list of addons will open with a black background but this is not the complete list. Click the plus sign to add and download more addons. When you click the plus sign the addons page will open. You can see all the addons available here. To download and install any addon click the install button in front of the addon The addon will start downloading. After downloading, a popup will open in UC browser to install it for a short time. Also you can access the downloaded addon from notification slider and install it from there. Repeat the process to install all addons. Now I will teach you how to use these addons.

How To Use UC Browser 9.2 Addons

All addons can be accessed by clicking the dotted plus sign on top right corner next to the search bar.

uc browser all addons

1.Share : This addon can be used to share the link of any web page. When you are on a web page just click the share addon and share the link via bluetooth, wifi direct, messages, email, gmail or whatsapp.

2.Speed Mode : When speed mode is enabled then the websites load in a single line view just like opera mini. The web page is highly compressed by UC web servers to save data. In addons menu click 'speed mode' to enable it.

3.QR Scanner : UC web has a built in addon known as QR scanner which can be used to scan 2D QR codes. If you use this then you don't need to install another QR scanner app.

4.Clipboard : The clipboard keeps the log of all the text sentences that you have copied and pasted in the UC browser's search bar. Click the clipboard addon to see all the list of copied and pasted text.

5.Screenshot : Screenshot addon can be used to capture the browser screen. Click this addon to take the screenshot. Adjust the box manually to capture the screen and click cut, or click fullscreen to capture the full browser screen.

6.Save Page : Use this addon to save the web page as html and later read it offline.

7.Auto Reload : The auto reload addon will reload the web page every 25 seconds. 25 seconds is set by default but you canchange it. The time limit in seconds can be set between 5-999 seconds. Click the auto reload addon to open timer settings. Enter your time limit and click 'refresh'. To stop it click the grey reload icon that appears on your phone's screen.


8.Web to PDF : With web to pdf UC web addon you can download webpages as pdf files and later can print them on your computer. This is best way to save webpages as pdf files on android.


9.Facebook Uploader : This addon can be used to upload multiple photos at once on facebook. Just click on facebook uploader addon and login with your facebook account.

10.Unzip : Unzip addon is used to unzip rar and zip files stored on your phone or sd card. To use this addon click the menu button of your phone and click 'downloads'. Then click 'File Manager' tab then select 'RAR files'. Choose your zip or rar file to be extracted. Click on that rar file and choose unzip. In folder option choose the folder where you want to extract and click Ok.


11.Adblock : Adblock addon for UC web browser blocks popups and ads. Click adblock addon and enable 'Switch' and 'Powerful ad blocking'.


12.Auto Pager : When auto pager addon is enabled then there's no need to click "Next Page" any more, you can scroll pages smoothly and seamlessly. Check Auto Pager in addons menu to enable it.

13.QR Generator : This UC web browser addon is used to generate the QR code of the webpage that you are visiting. But this addon has some issues as it is not working on Samsung devices. It will be fixed soon if it is not working on your android device.

14.Translator : The translator addon can be used to translate a webpage from one language to another. Simply click the translator addond and choose your language. Use google translate for best results. To use this addon any page click 'Translator' in addons menu and choose your favourite language to translate.


Uninstall And Disable An Addon

To disable or uninstall an addon simply click the gear icon next to + icon in addons list, see the image below. To uninstall or disable any addon click the three vertical dots and choose disable or uninstall. To re-enable the addon choose 'enable' from the list.


Performance Results

1.No addon slows down the browser's performance.
2.Addons can be used simultaneously but depends on android system RAM.
3.It contains some very useful addons that are very easy to use and doesn't use much system resources.

Google Testing Its New Homepage Design With App Launcher Like Navigational Menus

These days Google is testing its new homepage design which will feature navigational menus displayed in an app container or app drawer just like on any android phone. The new homepage design is very fast and easy to navigate. As the navigational menus will now be displayed as app launcher with their respective logos, so it would be easy to find Google products with just a one click of a button. The app launcher will contain all Google services. You have to just scroll down within the app container to explore more services and click 'Even more' at the bottom of the container to explore even more about Google products.

The new Google homepage is loading faster than its previous version and it will work best with chrome browser. However this beta homepage can be seen only in chrome browser. Other browsers like Mozilla Firefox, opera, safari and internet explorer are still displaying the older version. The chrome browser is displaying the new Google homepage for a short time because it is in alpha testing phase and is not yet implemented completely.

The new Google homepage will greatly support 'ease of access' and is highly similar to accessing apps on an android smartphone. The app launcher style included in new Google's homepage will serve the purpose of easy access because it is very convenient and fast to access Google services by their name and logo instead of just clicking on some hyperlinks. Have a look on the new app launcher styled navigation menus below.

google new homepage look


The new Google homepage will also feature a new Google logo with light colors and improved page loading time. To view the new Google homepage you have to wait sometime until it comes out of testing phase.

iOS 7 : Use AirDrop To Share Files, Videos And Photos On Iphone

AirDrop is a Wi-Fi ad-hoc service in Apple's OS X and iOS operating systems, introduced in version Mac OS X Lion in 2011. Using AirDrop, users can share files with other supported  iOS devices running iOS 7 or later through a Wi-Fi network with any configuration and without the need of mass storage devices. AirDrop is the newest feature added in iOS 7 and is a great tool to share files, photos and videos wirelessly with an ad-hoc Wi-Fi network. AirDrop can be used with any app that supports it and it is available in sharing options on your iPhone.

airdrop ios 7

How Does AirDrop On iOS 7 Works

  • AirDrop for iOS 7 allows you to share files, photos, and videos through ad-hoc Wi-Fi network and bluetooth with other iOS 7 devices.
  • Its working is similar to Wi-Fi direct in android.
  • You can only send and receive files from iphone or ipad devices and cannot use it with a mac computer and iphone device. So it is not cross platform.
  • You can't share all files with AirDrop regardless of its extension.
  • AirDrop does not require the sharing devices be on the same Wi-Fi network.
How To Use AirDrop On iOS 7

  • Turn on AirDrop from the all new control center on iOS 7.

airdrop in control center ios7

  • Tap on AirDrop and choose the visibility to 'Everyone' or "Contacts' only. If you are sending files to persons that are not in your contacts then choose 'Everyone', otherwise your iphone will not be visible on their iOS 7 devices.

airdrop ios7 visibilty

  • Now ask all your sharing partners to turn on AirDrop on their respective iPhones and iPads and set the visibility to 'Everyone' in order to be discoverable by the sender's iPhone.
  • Now move to any file, photos or videos and click the 'Share' button. If you are sharing photos then the details of the other iPhones will be available below the photos who have enabled AirDrop.
  • Now sender have to choose the devices one by one to share the files or photos.
  • An AirDrop notification will appear on receiver's screen. The file will be sent when other users tap 'Accept' button on their iOS 7 devices.
  • Now you have learnt to use AirDrop on iOS 7.
Unfortunately not all iOS 7 devices supports AirDrop. Only iPhone 5, iPhone 5c, iPad 4, iPad mini, iPod touch 5 supports it.

AirDrop Supported Apps

AirDrop is supported only for a limited apps on iOS 7. The list is given below.
  • Notes
  • Contacts (send a business card to another user)
  • Photos with previews before accepting it
  • Passbook
  • Safari
  • Maps
  • Podcasts
  • Voice Memos
The only problem with AirDrop on iOS is that not all apps support it and it can't be used between a mac computer and iPhone device. We can hope that iPhone developers should improve this feature by making airdrop cross platform.

iOS 7 : How To Change Siri Voice Gender (Male Or Female Voice)

If you own an apple iphone be it iphone 4, iphone 4s or iphone 5 then you will be familiar with siri voice assistant. If you are not familiar with apple's Siri on iOS 7 then let me tell you that Siri is an intelligent personal assistant which works as an application on Apple's iphone. Siri uses a natural language UI to answer questions, give recommendations and perform actions on requests given by the user. Basically Siri's voice is set to a female assistant by default. So if you want to change the Siri voice to a male voice or a female voice then I will teach you how you can do it in this post.

If you are a guy then you might not be interested in Siri's male voice because 'Guy like Guy' doesn't actually always makes sense, and same case applies with girls having iphone devices. Guy like girly voice and Girl like a guy's voice on Siri in iOS 7.

How To Change Siri Voice Gender To a Male Or Female Voice In IOS 7

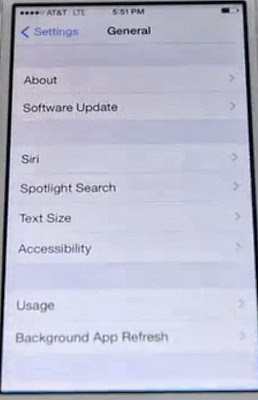
  • Open Settings>General.

apple siri


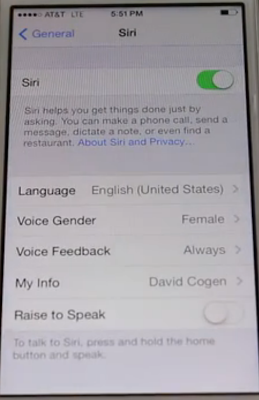
  • Tap Siri. Make sure that it is turned on. If not then slide the slider to enable it. It will turn green.

change siri voice gender
  • Tap Voice Gender.
  • Choose Male or Female.
  • Finally hold home button and speak to Siri to confirm the change.
You have now successfully changed the voice gender in iOS 7 on your iphone 4, iphone 4s, iphone 5 or ipad devices

Root Verizon LG G2 On Android 4.2.2 Jellybean

LG G2 is the latest android smartphone from LG Electronics. This is a powerful android smartphone which comes with android 4.2.2 jellybean pre-installed. This android smartphone is a tough competitor to Samsung galaxy S4 and Sony Xperia Z. LG G2 is also known LG Optimus G or LG Optimus G Pro. The LG G2 has a powerful set of hardware including its 2.26 GHz quad core krait processor coupled with 2 GB RAM. The biggest plus point of this android smartphone is its 5.2 inch capacitive touchscreen with a resolution of 1920x1080 pixels with 424 PPI (Pixels Per Inch) density. So you if you have you have the Verizon version of the LG G2 then you may be looking to root it.

LG G2 logo

Rooting your Verizon LG G2 will make your smartphone even more powerful by gaining root access. You can overclock your LG G2's cpu and gpu to increase the performance. Also you can install custom roms and launchers that will modify the UI of your phone. After rooting your phone you can install apps that require root access on your phone. In this tutorial I will teach you how you can root your Verizon LG G2.

Pre-Requisites


  • Backup entire data stored on your phone's memory. Backup all important files to your computer from your smartphone.
  • Use android assistant or androzip to backup android apps apk installed on your phone.
  • Use SMSBackup&Restore to backup sms messages on your phone. The messages can be backed up on sdcard, do not backup messages on phone's storage.
  • Download and install android sdk for windows.
  • Enable USB debugging on your LG G2 by going to “settings > applications > development > usb debugging”.
  • Charge your phone completely.
  • This rooting tutorial can only be applied on on the Verizon version of the LG G2. If you try this rooting tutorial on any other version of this phone then you will end up with a bricked phone. So do not attempt to use this tutorial except the Verizon version.
  • Rooting your phone will void the warranty and you will no longer be able to claim the warranty during the warranty period. But you can restore warranty by unrooting the LG G2 again.
Warning : This tutorial can only be applied on Verizon LG G2. The rooting tutorial may fail during operation and your phone may be bricked. So we can't be held liable if something goes wrong with your phone. You can decide whether you want to root or not to root your LG G2. You can check the rooting tutorial for the AT&T version of LG G2 here.

Root Verizon LG G2 On Android 4.2.2 Jellybean

  • Download and install the drivers for your Verizon LG G2 here
  • Connect your phone to pc via usb cable. Now goto "C:\Program Files\Android SDK Tools\sdk\platform tools".
  • Press shift key and click the right mouse button and choose 'Open command window here'.
  • Now type "adb get-serialno" or enter "adb devices". You will see serial number of your phone which means adb is running correctly.
  • Now download the LG G2 root package (VRoot 1.7.0.3825) for windows here.
  • Install this root package on your computer and click the green button to start the rooting process. See the image below.

LG G2 root package

  • Your phone will reboot.
  • After this download Superuser app on your smartphone from google play.
Congratulations you have successfully rooted your Verizon LG G2 on android 4.2.2 Jellybean.

Root AT&T LG G2 On Android 4.2.2 Jellybean

LG G2 is the latest android smartphone from LG Electronics. This is a powerful android smartphone which comes with android 4.2.2 jellybean pre-installed. This android smartphone is a tough competitor to Samsung galaxy S4 and Sony Xperia Z. LG G2 is also known LG Optimus G or LG Optimus G Pro. The LG G2 has a powerful set of hardware including its 2.26 GHz quad core krait processor coupled with 2 GB RAM. The biggest plus point of this android smartphone is its 5.2 inch capacitive touchscreen with a resolution of 1920x1080 pixels with 424 PPI (Pixels Per Inch) density. So you if you have you have the AT&T version of the LG G2 then you may be looking to root it.

LG G2 logo

Rooting your AT&T LG G2 will make your smartphone even more powerful by gaining root access. You can overclock your LG G2's cpu and gpu to increase the performance. Also you can install custom roms and launchers that will modify the UI of your phone. After rooting your phone you can install apps that require root access on your phone. In this tutorial I will teach you how you can root your AT&T LG G2.

Pre-Requisites


  • Backup entire data stored on your phone's memory. Backup all important files to your computer from your smartphone.
  • Use android assistant or androzip to backup android apps apk installed on your phone.
  • Use SMSBackup&Restore to backup sms messages on your phone. The messages can be backed up on sdcard, do not backup messages on phone's storage.
  • Download and install android sdk for windows.
  • Enable USB debugging on your LG G2 by going to “settings > applications > development > usb debugging”.
  • Charge your phone completely.
  • This rooting tutorial can only be applied on on the AT&T version of the LG G2. If you try this rooting tutorial on any other version of this phone then you will end up with a bricked phone. So do not attempt to use this tutorial except the AT&T version.
  • Rooting your phone will void the warranty and you will no longer be able to claim the warranty during the warranty period. But you can restore warranty by unrooting the LG G2 again.
Warning : This tutorial can only be applied on AT&T LG G2. The rooting tutorial may fail during operation and your phone may be bricked. So we can't be held liable if something goes wrong with your phone. You can decide whether you want to root or not to root your LG G2.

Root AT&T LG G2 On Android 4.2.2 Jellybean

  • Download and install the drivers for your AT&T LG G2 here.
  • Connect your phone to pc via usb cable. Now goto "C:\Program Files\Android SDK Tools\sdk\platform tools".
  • Press shift key and click the right mouse button and choose 'Open command window here'.
  • Now type "adb get-serialno". You will see serial number of your phone which means adb is running correctly.
  • Now download the LG G2 root package (VRoot 1.7.0.3825) for windows here.
  • Install this root package on your computer and click the green button to start the rooting process. See the image below.

LG G2 root package

  • Your phone will reboot.
  • After this download Superuser app on your smartphone from google play.
Congratulations you have successfully rooted your AT&T LG G2 on android 4.2.2 Jellybean.

Tata Photon Plus Prepaid Review 2013 : Buy It Or Not

Hello friends today I am going to review TATA photon plus prepaid broadband dongle which gives download speeds of 3.1 Mbps and upload speeds upto 1.8 Mbps. Tata photon plus is a broadband service owned by Tata Tele Services and is famous mostly all over India due to its impressive internet speeds. In this post I will tell you about Tata photon plus prepaid service. After reading this post you can easily decide whether you should buy Tata photon plus or not. Basically Tata photon plus is available in two flavors, prepaid and postpaid connection. So I am going to review only the prepaid one, don't worry because both types of connections have similar internet speeds but only difference is the billing cycle which highly depends on your internet usage.


Why To Buy Tata Photon Plus

You should buy Tata photon plus if you want a high speed internet connection at affordable prices. Below are some points that will clear your doubts.

1.Download Speed : Tata photon plus offer download speeds upto 3.1 Mbps, so you can download files at a fast rate. In google chrome browser you can get download speed of more than 200 KB/s which is more than 1.6 Mbps, which is best among all the broadband internet service providers in India. The download speed highly depends on the coverage and the building in which you stay.

2.Low Price : The Tata photon plus prepaid kit is available at a price of 1299 INR in which you get a prepaid kit and the mobile broadband device. The price is also affordable. But you have to pay additional money for the internet data, this is known as FRC. There are five FRC available, their prices are 125, 300 ,350, 2501, 5000. These plans are only for new subscribers.

3.Fully Supports Wi-Fi Hotspots : You can share your tata photon plus internet with other laptops, tablets and smartphones having wifi functionality. To see how you can turn your tata photon plus in a wifi hotspot see this tutorial.

4.Roaming Free : Tata photon plus has free roaming across India and you don't need to pay extra when you browse out of your circle.

5.Non Tata Photon Regions : If by chance you enter in a non Tata photon region then the services won't stop but you will be able to browse the internet at a speed of 153 Kbps. In your circle it will operate on photon plus mode.

Where to Buy

To buy a Tata photon plus prepaid connection visit any Tata indicom store and submit your ID proof with a photograph and fill the prepaid application form and submit it. Don't forget to mention your mobile number and email id in the application form. The service will be activated exactly in 3 days. On activation you will receive a message on your mobile phone. After receiving the message from Tata Docomo dial 1800-266-121 from your mobile phone and enter the photon number when asked. Photon number can be found on activation kit, it is a 10 digit number and can be seen in front of  'MDN'. Verify your details with the customer care executive. After verification Tata photon plus will be activated within half hour.

How To Setup Tata Photon Plus On Windows 7 And Windows 8

tata photon plus prepaid

  • Simply connect the device to any USB port of your pc or laptop. The setup will automatically open. Run the tata photon setup.exe.
  • After installation the dialer program will open. Click activate to activate your device. Don not enter any pin and click 'OK'. Activate the device without pin. PIN is not needed at all. Activation will take few seconds, do not interrupt the process. After this you will get a message 'Activation successful'.
  • Now click connect to connect to the internet. After connection is made the default browser will open automatically and you can start browsing now.

Tata Photon Plus Speed Test

Tata photon plus speeds vary in day and night and also depends upon the area and structure of the building you are staying in. I tested Tata photon plus prepaid in same area at two different locations and the speed was half in first location as compared to second location. Below are details of Tata photon plus on speedtest.net in daylight. It is slight slow because of low coverage but I got speed upto 2.66 Mbps in night at other place in same area where coverage is good.


Data Plans

Data plans are available as unlimited and basic data plans. See the details below.

Unlimited Data Plans


In unlimited plans the speed will be 3.1 Mbps till the defined data speed after that it will become 153 Kbps. For example if you recharge with 710 INR for 2 GB then you will get 3.1 Mbps speed for the 2 GB data after 2 GB you can browse unlimited data at 153 Kbps only.

Basic Data Plans


tata photon plus data plans

My Account

In My Account you can see the data usgae and can recharge it online anytime you want. To check the usage details click 'My Account' in Tata photon plus dialer. You will be redirected to your account details. Here you can see the data remaining in your account. Click 'Register / Login to My Account' to register for a Tata photon account.


Conclusion

Tata photon plus is the best high speed broadband service currently available in India. The customer care service is also very good. The prepaid plans are very good and are divided into two categories, unlimited data plans and basic data plans. The minimum rechargeable amount starts from only 99 INR and you can get 15 % extra data every time you recharge your account online. So its a worth buy. If you face any problems do let me know via comments.