Ever noticed your data just disappearing even when you’re barely using your phone? I’ve had the same frustration — one minute I’m scrolling Instagram, and the next, my data pack is almost gone.
That’s when I discovered a simple Android trick: setting Wi-Fi and mobile data as metered connections.
It basically tells your phone to chill with the background data, stop auto updates, and save both battery and data. If you’re on a limited plan (like most of us students are), learning how to set Wi-Fi and mobile data as metered connections on Android is a smart move.
Here’s why it’s worth doing and how to set it up.

Step-by-step Guide to Set Wi-Fi And Mobile Data As Metered Connections On Android
Alright, now that you know why this feature is so useful, let’s get to the actual setup. The process is super simple — you don’t need any third-party app or tech skills.
Just a few taps in your Android settings, and you’re good to go. Here’s how to set both Wi-Fi and mobile data as metered connections the easy way.
- First, connect your Android phone to the Wi-Fi network that you want to set as metered.
- Next, open your phone’s Settings, then go to Connections > Wi-Fi. Tap the small settings icon (⚙️) next to the Wi-Fi network you’re currently connected to.

Navigating to the Wi-Fi settings menu on an Android device. - Scroll down a bit and tap on View more. You’ll see an option called Metered network — tap it, and then choose Treat as metered. That’s it! Your Wi-Fi connection is now marked as metered.

Enabling the 'Treat as metered' option for a Wi-Fi network. - To do the same for mobile data, head back to Settings and go to Connections > Data usage. Tap on Data saver, then hit Turn on now to activate it. This helps reduce background data usage while you’re on mobile data.
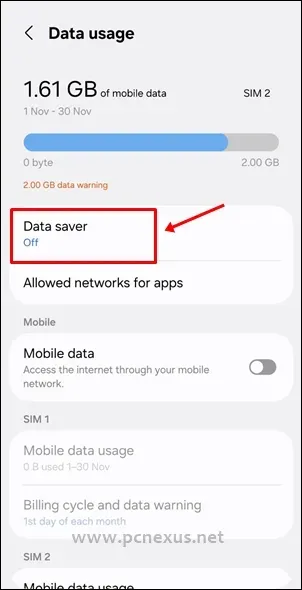
Configuring mobile data usage to be treated as a metered connection. - If there are some apps you always want to stay connected — like WhatsApp or Maps — tap on Apps that can always use data. From the list that appears, turn on the switch next to the apps you don’t want restricted. Just remember, these apps will keep using data even when Data Saver is on, so pick carefully.


Expert Tip: If you use a wired internet connection at your home, this post about getting wired internet connection (ethernet) on your Android phone will be useful.
Top Reasons for Setting Wi-Fi and Mobile Data on Android as Metered Connections
Here are the top reasons for setting up your Wi-Fi and mobile data on Android as metered.
1. Save Mobile Data
Android automatically limits background usage when a network is marked as metered. That means apps won’t quietly eat up your data while you’re not even using them. Perfect for keeping your plan from running out too soon.
2. Stop Automatic App Updates
We’ve all had that moment when the Play Store decides to update a dozen apps right when your data is low. Setting your connection as metered stops that — updates will wait until you’re on a proper Wi-Fi network or approve them yourself.
3. Save Battery Life
Fewer background downloads mean fewer syncs and less power usage. My phone actually lasts longer through the day since I started using this setting — it’s a small tweak with a noticeable difference. Also check: How to Extend Battery Life On Samsung Android Smartphones.
4. Control Syncs and Backups
Apps like Google Photos, Drive, or Dropbox love to upload stuff in the background. When your connection is metered, they’ll hold off until you decide. It’s a great way to avoid unwanted uploads or cloud backups eating up your data.
5. Avoid Extra Data Charges
If your carrier slaps you with charges for exceeding your limit, this setting can save you from surprise bills. It’s also handy when you’re on roaming or using your phone as a hotspot.
6. Improve Network Speed
Once background tasks are paused, the apps you’re actively using — like YouTube or Spotify — get more bandwidth. It makes your connection feel faster and smoother overall.
Is your Android still clinging to a weak signal? You can actually map and fix those dead zones yourself using Samsung Connectivity Labs.
Check out our quick guide to boosting your home signal: Fix Wi‑Fi Dead Zones with Samsung Connectivity Labs.
Android Wi-Fi Priority: Does Android Prefer Metered or Unmetered Wi-Fi? (Real World Test)
If you've ever noticed your smartphone clinging to a weak signal while a stronger one sits nearby, you’ve likely wondered about the logic behind Android's connection choices.
Does the OS prioritize raw speed, or is it more concerned with your data cap? We conducted a hands-on test to see how Android handles conflicting Wi-Fi signals in a typical home environment. The results were conclusive: Android consistently prioritizes unmetered networks over metered ones, even if they're (metered networks) faster.
Hands-On Testing: 5GHz vs. 2.4GHz Selection
To observe the OS logic in a controlled setting, we configured two separate bands on a single access point. By manipulating the "Metered" toggle—a setting usually reserved for hotspots—we created a conflict between performance and data usage:
- 5GHz (Metered): This offered high-speed throughput and low latency, but was manually set to "Metered" in the network's advanced settings.
- 2.4GHz (Unmetered): This offered lower speeds and higher congestion, but remained set to the default "Unmetered" status.
If you're facing slow Wi-Fi speed issues then I recommend reading: Why Your Wi-Fi Is So Slow (9 Fixes That Actually Work Fast)
The Results: Data Savings Over Speed
The behavior was immediate. Even though the 5GHz band provided a vastly superior connection for 4K streaming and downloads, the Android device always defaulted to the 2.4GHz unmetered network.
This happens because Android is hardwired to protect users from unexpected data charges. In the eyes of the OS, a "Metered" network—regardless of its actual speed—is a restricted resource.
As outlined in the official Android Wi-Fi network selection guidelines, the system is designed to prefer an "Unmetered" connection over almost any other factor.
This creates a "safe" environment for high-data background tasks. By defaulting to unmetered bands, Android can handle system updates, Google Photos syncing, and app refreshes automatically without the risk of hitting you with surprise overage fees.
The Takeaway: If your phone keeps switching to a slower Wi-Fi signal or refusing to stay on your 5GHz band, check your network settings. Android will sacrifice your performance every time if it believes the alternative connection is "free" data.
Frequently Asked Questions (FAQ)
Q1. How do you turn off a metered connection on Android?
If you’ve set your Wi-Fi or mobile data as metered and want to go back, it’s super simple.
- Head to Settings > Connections > Wi-Fi.
- Tap the 'Settings' icon next to your Wi-Fi network's name.
- Tap 'View more' and then tap 'Metered network' option.
- Now either select 'Detect automatically' or 'Treat as unmetered.'
Q2. Which is better: metered or unmetered Wi-Fi?
It really depends on how you use your internet. If you have unlimited Wi-Fi at home, keeping it unmetered is the best choice — your apps can update, sync, and back up without limits. But if you’re using a limited data plan, hotspot, or prepaid Wi-Fi, setting it as metered helps you save data and prevent surprise overages. Think of it as giving your phone a little “data discipline.”
Q3. How can I check if my network is metered?
To find out, go to Settings > Connections > Wi-Fi. Here, under your Wi-Fi name you will see 'Metered' if the connection has been set as metered connection. If you do not see anything like that then the connection is 'Unmetered' or set to 'Detect automatically.'
Wrapping It Up
So yeah, that’s pretty much all it takes! Setting your Wi-Fi and mobile data as metered connections on Android is one of those small things that actually make a big difference.
Ever since I started using it, I’ve noticed fewer random app updates, slower battery drain, and way less background data being used.
If you are using multiple networks, you might also want to learn how to configure Android Dual SIM Manager to get even more precise control over your data usage.
It’s honestly one of those “why didn’t I do this earlier?” moments. If you’re someone who’s always running low on data or just wants more control over how your phone behaves, give this a try — it’s quick, easy, and genuinely helpful.


My phone was consuming 5G data in background. Due to fast speed my internet pack was getting exhausted quickly. I followed the instructions from this guide and set the mobile internet as metered. Now phone is not wasting data, thank you so much.
ReplyDeleteYou're welcome Priya. I am glad to hear that this post helped you and thank you for sharing your experience.
Delete