Samsung's One UI now comes with some built-in features that ease your Android experience. From taking screenshots to recording your phone's screen, extracting text from images and photos, erasing objects from your images and photos, checking notification history, there's a lot more features that many Samsung users aren't aware of.
So, in this article we are presenting 10 handy tips and tricks for Samsung One UI 7 that you can learn to make your Galaxy smartphone easier to use, boost your productivity, and get the most out of its hidden features. Kindly read the complete article to know the One UI 7 tips and tricks that we are sharing.
10 Handy Samsung One UI 7 Tips, Tricks & Hidden Features
Here are the top 10 Android tips and tricks for the Samsung One UI 7 that will make your Android experience more productive and intuitive. These Samsung One UI 7 tips and tricks should work on One UI 6 and One UI 8.
1. How to Take Screenshots Without Pressing Buttons On One UI 7
Taking screenshots is a very common practice on an Android phone. In the early days of Samsung Galaxy smartphones, screenshots can only be captured by pressing a combination of buttons. But as Samsung One UI evolved over time, it removed the need to press buttons to take screenshots. You can now tap the screenshot option in the 'Quick Settings' panel to take a screenshot. Let's see the step-by-step guide below to take screenshots on your Samsung Galaxy device without pressing any button.
- Swipe down on your phone's screen from the top. You may need to swipe twice unless you see the 'Take screenshot' option.

- Once you see the 'Take screenshot' option, tap it to capture the screenshot.
- You can find that captured screenshot in your phone's Samsung Gallery app. Also check: how to take a long screenshot on Android.
2. How to Use Screen Recording On Your Samsung Galaxy Smartphone
Recording your Samsung Android phone's screen gets very useful when you need to make a tutorial, recording your Android gaming videos, or record a series of steps to troubleshoot Android system. The good news is that you don't have to download a third-party Android screen recording app because the feature is built-in into many Samsung Android smartphones.
However, Samsung's official screen recording feature is not available on all Samsung phones. If you have a Samsung phone that runs on an Exynos chipset, there are high chances that it would have the screen recording feature built-in. Follow the steps below to use the screen recorder on your Samsung Android smartphone.
- Swipe down on your phone's screen from the top. You may need to swipe twice unless you see the 'Screen recorder' option.
- Once you see the 'Screen recorder' option, tap it, a dialog box will open on your phone's screen.

- Under 'Record sound', you can either select 'None', 'Media', 'Media and mic.' If you select 'None' then no sound will be recorded, if you select 'Media' then phone's internal sound will be recorded (such as video's audio and Android system sounds) and if you select 'Media and mic' then you will be able to record your voice along with the phone's internal sound.

- If you wish to show your screen taps and touches in the recorded video, enable 'Show taps and touches.'
- Finally, tap 'Start recording' to start the screen recording on your Samsung Android phone.
- Once the screen recording starts, you will see a control panel with four controls, see the image below.

- With the annotation tool (pencil) you can select anything on the screen by drawing any shape. The color of the annotation tool is customizable. Once you tap the annotation tool, you also see the color, tap the color to change it. To remove the annotation, use the undo button or tap the pencil icon again.

- If you wish to record yourself along with the screen recording, tap the 'selfie recorder' button to open the front camera. A selfie recorder will open as an screen overlay that you can drag and drop almost anywhere on the screen.

- Use the 'Pause' and 'Stop' buttons to pause or stop the screen recording when required.
- You can check the recorded video in your Samsung Gallery app. If you wish you can also use the built-in Samsung video editor to edit your video.
3. Use Extra Dim For Night Time Viewing
During night-time viewing, we use the dark mode to avoid unnecessary strain on our eyes due to the screen's light. However, watching videos or movies on your phone in a dark room may strain your eyes, even if dark mode is enabled and the screen brightness is set to minimum. In this case, you can use the 'Extra dim' feature to lower your Samsung phone's screen brightness beyond the minimum possible level. Here's how to enable to the 'Extra dim' feature on your Samsung Galaxy Android smartphone.
- Go to Settings > Accessibility > Vision enhancements > Colours and clarity > Extra dim.

- Once you the tap the 'Extra dim' option, you will see its customization options.
- Tap the 'Off' button to enable the 'Extra dim' feature. Once enabled, your phone's screen brightness will get lowered even more than the minimum possible level.

- Check the 'Intensity' level and slide it towards left to decrease the brightness and towards right to increase. You can experiment on this and find the correct intensity level for the 'Extra dim' feature.
- You can also find the 'Extra dim' shortcut in the 'Quick Settings' panel. For this enable the option 'Extra dim shortcut' and then you will see it in the 'Quick Settings' panel.

4. Increase or Decrease Camera LED Torch's Brightness
We all know that we can use our phone's camera's LED flash as torch. When Android was pretty new, this feature was only available via third-party Android apps. But as Android evolved over time, the feature to use camera flash as LED torch started coming as an inbuilt utility. However, on almost every Android phone the brightness of the camera LED torch can't be increased or decreased, but in Samsung One UI 7 we can customize the brightness as follows:
- Access the 'Quick Settings' panel on your Samsung phone and look for the 'Torch' button. Tap it to enable the LED torch.

- Long tap the 'Torch' button. You will now see the 'Brightness' option with five levels.

- After selecting the required brightness level for your LED flash torch, tap 'Done.'
- The camera LED torch will now work at your set brightness level. You can anytime increase or decrease the LED torch's brightness as required. Also check: how to enable battery protection on Samsung Android smartphones.
5. Use Screen Colour Filters To Avoid Eye Strain
To reduce eye strain, we can use the dark mode or the 'Extra dim' features. However, these two features do not apply any color filter on the phone's screen to ease the viewing. Samsung One UI provides a built-in option to apply color filters on your phone's screen for easy viewing and without straining your eyes. You can follow the steps below to apply color filter on the phone's screen.
- Go to Settings > Accessibility > Vision enhancements > Colour filter.


- Tap and enable 'Colour filter shortcut' to show the colour filter shortcut in the 'Quick Settings' panel.
- Under 'Opacity' select the colour filter opacity from 20% to 60%.

- Scroll down and select the colour for your screen's colour filter. There are a total of 12 colours which can be used as a colour filter for your phone's screen.
- After making the colour filter customizations, tap the 'Off' button to enable the colour filter. You can also access this shortcut from the 'Quick Settings' panel to enable or disable it.
Also Read: Add recycle bin shortcut to home screen in One UI
6. How to Extract Text From Images In Samsung One UI 7
The feature to extract text from images is not available on all Samsung phones. It is one of the best hidden features in Samsung One UI 7. However, you can see this feature on high-end Samsung phones and Samsung phones housing the Exynos chipsets, such as Galaxy M35 5G and Galaxy M36 5G for example. If your Samsung phone supports it then you will see a yellow 'T' icon on every image that has text in it. Follow the steps below to use this feature.
Extract Text From Images Saved In The Gallery App
In this part we are not using the phone's camera to read the text from images. Samsung doesn't market the extract text from images as OCR (Optical Character Recognition) feature, however it works similar to the OCR feature. So, let's see how to extract text from images stored in your Samsung Gallery app, see below.
- Open Samsung Gallery app and open any image that has text in it.
- When you open the image having text, you will see a yellow 'T' Optical Character Recognition (OCR) button in the bottom right corner. Tap the yellow 'T' icon and the app will start identifying the text within the image.

- Within a few seconds you will see that multiple pieces of text in your image get highlighted within a localized box with three options: 'Scan', 'Add to note', and 'Copy all.'

- Long tap on the text and you will see two blue markers on the text block. Now drag these blue markers over the text to select it. Once you finish selecting the text, you will see option an option to 'Copy' or 'Share' the selected text.
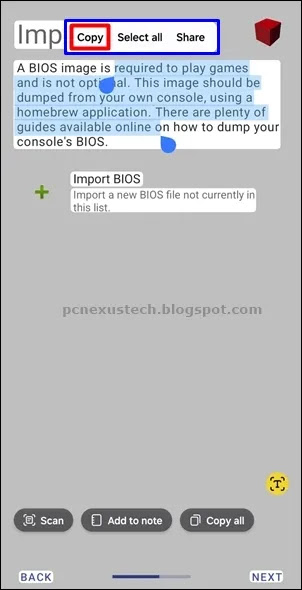
- Tap 'Copy all' to copy the entire text to clipboard or tap 'Add to note' to add the copied text in a new note in Samsung notes app.
- Once you tap 'Copy' the text will be copied to Android's clipboard and is ready to be pasted in any app such as WhatsApp chat, text messages, Facebook etc.
- You can also use the 'Share' option to share the copied text directly to any app or Samsung notes app.
Note: The accuracy of the copied text depends on how well the text is visible in the image. You may still see some errors in the copied text but you can correct them as required. The extract text from images hidden feature is a very useful feature in the Samsung One UI 7.
Extract Text From Images Using Phone's Camera
If you wish to extract text from images using your phone's camera in real time then follow the steps below.
- Open your Samsung phone's camera and point the camera on any object having the text. Once you point the camera on the text, you will see the yellow 'T' Optical Character Recognition (OCR) in the bottom right corner.

- Once you tap the yellow 'T' icon the phone will start scanning the text. Once it finishes scanning, it will display three options: 'Scan', 'Add to note', and 'Copy all.' For some text documents you may only see the 'Scan' option. In this case long tap the text on the screen and select it using the blue markers.

- Tap 'Copy all' to copy the entire text to clipboard or tap 'Add to note' to add the copied text in a new note in Samsung notes app.
- You can save the note on your phone and copy the text whenever required.
7. How to Hide Apps In Samsung Home and Apps Screen
If you do not wish to show several apps on your One UI's home and apps screen then hiding them would be ideal. Hiding the apps on home screen ensures that no one access them if they do not know about how to unhide them. You do not need to install a third-party app to hide apps as the feature is built-in right into Samsung One UI 7. Let's see below how to hide apps in Samsung Android phones.
- Go to Settings > Home screen.

- Scroll down to find 'Hide apps on Home and Apps screens.'

- You will see a list of Android apps that you can hide from the home and apps screen. Tap to select all the apps that you wish to hide and tap 'Done.'

- Once you tap 'Done' the apps will be hidden.
- To unhide the apps, go to 'Settings > Home screen' and again tap 'Hide apps on Home and Apps screens.'
- Here, you will see all the apps that you hid earlier under the 'Hidden apps' section. Tap the apps in the 'Hidden apps' section to remove them from this section. Do this for all the apps that you want to unhide and finally tap 'Done.'
- Once you tap 'Done' the apps will be visible again in your home and apps screen.
8. How to Create Stickers From Photos or Images In Samsung One UI 7
Samsung One UI 7 has a hidden feature that lets you create a sticker from any image or photo. Again, this premium looking feature is not available on all Samsung Android smartphones. Here's how to create stickers from any photo or image on your Samsung phone.
- Open your Samsung Gallery and then open the image or photo or your choice.
- Long tap the desired object in your image or photo unless you see an animation on that object.
- Release the tap and then you will see three options: 'Copy', 'Share' and 'Save as sticker.'

- Tap 'Save as sticker' to save the image object as a sticker. You can now use this sticker in apps like WhatsApp and Facebook for Android.
- To use the sticker in your WhatsApp chats you can open a new chat and then tap the text field to open the Samsung keyboard.
- Tap the 'smiley' icon on your Samsung keyboard and then tap the 'Custom stickers' button to access your stickers that you have created using the Samsung Gallery app.

- Tap the custom sticker to send it in your WhatsApp chats.
Note: The custom stickers can only be accessed in the Samsung Keyboard. If you are using Google keyboard then the custom stickers will not be visible in it.
9. Use Object Eraser For Your Photos and Images In Samsung One UI 7

Some Samsung Android smartphones do come with the object eraser feature. Using the object eraser feature, you can remove unwanted objects and people from your photos and images. The object erasure feature is not available on low-end Samsung Android smartphones. However, if your phone supports it then you can read this awesome tutorial: Easily Remove People or Objects from Photos with Samsung Object Eraser
10. Access Notification History In Samsung One UI 7
Android’s Notification History is a built-in feature that records all your recent alerts, even if you dismiss them. It can be helpful in many everyday situations:
- Recover dismissed alerts – Easily check OTPs, messages, or reminders you cleared too quickly.
- Catch silent or hidden notifications – See alerts that didn’t make a sound or vanished quickly.
- Monitor app behaviour – Identify apps that send too many or spammy notifications.
- Enhance security – Spot suspicious or unknown app activity.
- Boost productivity – Use it as a reference for missed calls, events, or updates.
To access notification history on your Samsung Android phone go to: Settings > Notifications > Advanced settings > Notification history. Here, you can see the notification history for recent notifications and notifications from the past 24 hours. Also check: how to extend battery life on Samsung Android phones.
Final Thoughts
Samsung One UI 7 comes with plenty of hidden features, hacks and tricks that can make using your phone easier and more fun. From customizing your screen to creating stickers or managing notifications, these tips help you get the most out of your device. Spend some time exploring One UI 7 tips and tricks, and you’ll likely discover even more ways to make your Samsung Galaxy phone truly yours. Also, you can try these tips and tricks on your One UI 6 and One UI 8. If you do like this article then I kindly request you to share it with your friends and family members who may be using a Samsung Android smartphone.


%20Games%20on%20Android%20and%20PC.webp)


No comments:
Post a Comment