The Sony PlayStation 2 (PS2) was a legendary gaming console that redefined an entire generation of gaming. A direct successor to the iconic PS1 console, the PS2 was greatly praised for its graphics that were ahead of its time. Thanks to its Emotion Engine CPU, Graphics Synthesizer GPU, and massive game library, the PS2 sold over 155 million units.
Want to play PS2 games on your Android in 2026? Whether you are a Tekken fan, a Need for Speed admirer, or an RPG pro, you can enjoy all these gaming titles on your phone. With PS2 emulators like NetherSX2 and AetherSX2, you can run classic PlayStation 2 games directly on your Android phone. So, let’s see this post and relive the PlayStation 2 gaming era with pure nostalgia.
Top 10 PS2 Games of All Time
If you ever owned a Sony PS2 console, you’ll remember how these titles made gaming unforgettable. Playing them again on Android emulators is like traveling back in time.
- Grand Theft Auto: San Andreas – The open world gaming masterpiece with CJ as the protagonist. GTA San Andreas is still remembered for its storyline, gameplay, unforgettable cheats and being the most successful PS2 game.
- God of War PS2 – Relive Kratos’ brutal mythological battles with jaw-dropping combat.
- Metal Gear Solid 3 Snake Eater PS2 – Tactical espionage action at its finest.
- Shadow of the Colossus – An emotional masterpiece where you battle gigantic beasts.
- Final Fantasy X – One of the most beloved RPGs with breathtaking storytelling.
- Resident Evil 4 – The survival-horror experience that redefined the genre.
- Tekken 5 – Fast-paced fighting action that still holds up today.
- Gran Turismo 4 – The ultimate racing simulator of its era.
- Devil May Cry 3 – Stylish action and intense gameplay that fans still adore.
- NFS Most Wanted 2005 – High-speed racing, defeating blacklist rivals, and owning super cars, all filled with pure entertainment.
Playing these on Android is not just gaming—it’s reliving your childhood. Every mission, every soundtrack, every victory screen pulls you back into the golden age of PS2 gaming.
Requirements to Play Sony PS2 Games on Android
Here are the requirements below to play PS2 games on Android.
- A high-end Android Smartphone.
- PS2 BIOS (SCPH10000.bin) file.
- PS2 ROMs (ISO) or discs that you own.
- A PS2 emulator for Android such AetherSX2, NetherSX2 or Play PS2 emulator Android.
- There's absolutely no need to root your Android phone.
Sony PlayStation 2 emulators are legal, but PS2 ROMs, ISOs, and BIOS files found online are not. Most hosting sites distribute them without permission, which is copyright infringement; this is why many sites are legally taken down.
To stay safe, dump your own PS2 discs and extract the BIOS from a console you own. If you don't own a PS2, ensure downloading these files is legal in your country. While developers rarely target individuals for personal use, it still remains a copyright violation.
Warning: searching for a PS2 games Android download on these websites can expose your device to malware, spyware, and ransomware. Never download software that claims to download ROMs for you, as it is likely malicious. Proceed at your own risk.
What Is The Best PS2 Emulator For Android
If you’re ready to bring the PS2 library to your Android device, you’ll run into a few emulator options. Not all of them are worth your time, but three names stand out: AetherSX2, NetherSX2, and Play!.

- NetherSX2 – Right now, this is the most reliable PS2 emulator for Android. It doesn’t show ads, runs smoothly on modern phones, and is actively updated by its developers. Many gamers see it as the natural successor to AetherSX2, offering the same solid performance with continued improvements.
- AetherSX2 – Once the most popular PS2 emulator on Android. It delivered excellent compatibility and speed but is no longer being developed. If you still find an official build, it’s worth keeping, though NetherSX2 has now taken the spotlight.
- Play! – A completely different emulator project. It’s still in development and has lower compatibility compared to the others, but it’s fun to test and can run some titles decently. A good secondary option if you want to experiment. You can use this PS2 emulator for Android if you have a high-end smartphone and don’t want to spend time customizing the settings.
Verdict: For the best overall experience, go with NetherSX2. Keep AetherSX2 if you already have it, and try Play! only if you’re curious about alternatives or want to follow its development.
How To Play Sony PlayStation [PS2] Games With Play! PS2 Emulator For Android
In this section, we will learn to play PS2 games on Android using the Play! emulator for Android. The Play! emulator is easy to use and must be used if you have high-end Android smartphone.
- Using the file manager on your Android phone, create a folder named 'PS2.'
- Now create two subfolders inside the 'PS2' folder as 'PS2 BIOS' and 'PS2 Games.'
- Copy the PS2 BIOS SCPH10000.bin file to the 'PS2 BIOS' folder and copy the PS2 ROMs or ISO to the 'PS2 Games' folder.
- Download and install the Play! PS2 emulator for Android from the Google Play store.
- After installation, open the emulator and tap the menu button in the top left corner.

- Once the menu opens, tap 'Add Folder' option.

- Now your phone's file manager will open, locate the 'PS2 Games' folder and tap to open it. Finally, tap 'USE THIS FOLDER' to select it.

- A popup will open asking you to grant file storage access to the Play! emulator. Tap 'Allow' to proceed. This will add the PS2 games ISOs within the emulator.

- Tap the game to start playing it. You do not have to customize any settings. Just start playing once you add the games to the emulator.

New Games Not Visible In Play! PS2 Emulator After Adding: How To Fix
It is possible that you may not see your PS2 games in the emulator even if you copy them to the 'PS2 Games' folder. If you face this issue then the fix is just simple. Open the Play! emulator and tap the 'Menu' button in the top left corner and then tap Settings. Then tap 'UI Settings' and then select and tap 'Rescan Storage.' Tapping the 'Rescan Storage' option will scan for new games that you've added in the 'PS2 Games' folder and will add the games to your emulator.
How To Play Sony PlayStation [PS2] Games With NetherSX2 For Android
NetherSX2 is currently the best Android PS2 emulator as it even works smoothly on mid-range Android smartphones. The Play! PS2 emulator is not for mid-range phones as its hardware requirements are high. So, if you do not own a high-end smartphone then NetherSX2 will be your best choice. Also, NetherSX2 lets you configure and tweak the gaming performance for optimal gaming experience. Let's see how to Play PS2 games on phone.
- Download and install the NetherSX2 PS2 emulator for Android. This emulator is not available on Google Play Store so, you have to sideload it as an APK.
Note:Your phone may block the installation due to security reasons. You can grant permission to the file manager on your phone to install APKs and later revoke it. Also, if you are using a Samsung Android phone then you have to disable the 'Auto Blocker' temporarily. Once the app gets installed, enable the 'Auto Blocker' again.
- After installation, open NetherSX2 and tap the 'NEXT' button on the welcome screen.
- Read the FAQ section if you wish and then again tap 'NEXT.'
- In this step, you will see the 'Settings' page. Do not modify any settings here. Just make sure that 'Optimal/Safe Defaults' are selected, then tap 'Next' to proceed.

- Now in this step you have to import the PS2 BIOS file SCPH10000.bin. Tap the 'Import BIOS' button and locate the BIOS file from 'PS2 > PS2 BIOS' on your phone's internal storage. Tap the BIOS file to select and then tap 'Done' to import it in NetherSX2.

- Once the imported BIOS file appears in NetherSX2, tap it to select and then tap 'NEXT' to proceed.

- In this step, we have to select the PS2 games directory that we have created on our phone's internal storage as PS2 > PS2 Games. Tap the '+' plus icon to select a game directory.

- Once you locate your PS2 game ROMs directory, tap 'USE THIS FOLDER' to import it in NetherSX2. A popup will open asking you to allow NetherSX2 to access files in your PS2 Games folder, tap 'ALLOW' to proceed.

- Once the game directory is visible in NetherSX2, tap 'NEXT' to proceed further.

- The initial setup has been completed, tap 'FINISH' to close it.
- You will be able to see your PS2 games once you tap 'FINISH.' Tap any game of your choice to start playing it.

- At any time you can choose to rotate your phone's screen to play the PS2 games on your Android in full screen.

Note: If you're using a mid range Android smartphone then the PS2 games will lag and won't run smoothly. This is something we can't control as PS2 games are heavy and need a high-end smartphone for good gaming experience. However, some games will work fine even on mid-range Android smartphones if you enable the 'Frame limiter-' option, but game's cut scenes may still stutter.
To enable the 'Frame Limiter' option tap the 'Pause' button in the top right corner while the game is running then tap 'Toggle Frame Limiter' to enable it.

Expert Tip: If you do not see all your PS2 games in NetherSX2 then tap the 'Menu' button in the top left corner and tap 'Scan For New Games' and then tap 'Rescan All Games.' Your PS2 games should now be visible in the emulator.

If you also wish to play Sony PS1 games on Android, check this: How to Play Sony PlayStation [PS1/PSX] Games on Android
How to Save a Game State In NetherSX2
Saving a PS2 game state becomes essential when you do not wish to play the games for long hours. Once you save a game state, you can then continue exactly from where you left and saved the game. To save the PS2 game state on NetherSX2, you can follow the steps below.
- While the game is running, tap the 'Pause' button in the top right corner and then tap 'Save State' option.
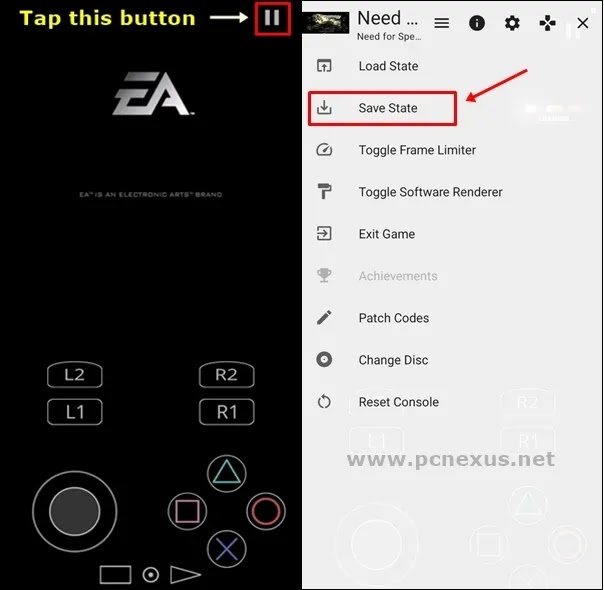
- You can now see multiple save state slots. A total of 10 save states are available. Tap any slot to save your PS2 game state immediately.

- You can long tap any save state slot and tap 'Delete State' if you wish to delete a save state.
If you wish to play old Java (.JAR) mobile games on Android, you can easily relive classic keypad-era gaming using a Java emulator with simple setup and smooth performance.
How to Play Old Java (.Jar) Games on Android – Complete Safe Guide
How to Load a Game State In NetherSX2
Loading a saved game state on NetherSX2 lets you play your favourite PS2 games from the point where you left and saved it. You can load a saved game state by following the steps given below.
- While the game is running, tap the 'Pause' button in the top right corner and then tap 'Load State' option.

- You will now see all the PS2 save states here.

- Tap the desired saved state to load it and start playing from where you left the game.
If you wish to play Super Nintendo games on Android, check this: SNES Emulator Setup Guide: How to Play SNES Games on Android, Windows, Mac & Linux
How to Connect a PS3/PS4/PS5 Game Controller/Joystick To NetherSX2
NetherSX2 supports both wireless and wired gamepads. You can use any Bluetooth enabled joystick such as from a PS3, PS4 or even a PS5 to enjoy the PS2 games on your Android phone.
Warning: We do not recommend connecting a generic USB wired gamepad to your phone as it will drain your phone's battery and may damage it. Always use a Bluetooth enabled gamepad as Bluetooth is energy efficient and won't damage your phone's battery.
Let's now see, how to connect a gamepad to NetherSX2 below.
- Connect your wireless game controller via Bluetooth to your Android phone.
- Once the gamepad is connected, open NetherSX2 and tap the menu button in the top left corner and tap 'Controller Settings.'

- In the 'Controller Settings' swipe to the left and tap 'Controller Port 1.'

- In 'Controller Type', make sure 'DualShock 2' is selected.

- Now tap 'Automatic Mapping', a popup will open asking you to select your connected gamepad.

- Once you select the gamepad, the gamepad buttons will be auto-mapped in NetherSX2. However, for non-PlayStation controllers some buttons may not be mapped and you have to map them manually.

- Tap the button which didn't get mapped. A popup will open asking you to register a button from your gamepad. Press the button on your gamepad map it with the button in NetherSX2. Repeat this process for all the buttons you want to configure.

Note: If you wish you can also connect a gaming keyboard if you do not have a gamepad. However, automatic mapping will not work for your gaming keyboard. You have to assign buttons manually. To register a keyboard's button in NetherSX2, you have to press it twice.
How to Import/Export NetherSX2 App Data
Exporting NetherSX2 app data would be beneficial if you wish to transfer it on a different phone. If you backup the emulator's data then you will be able to fully restore it on a different Android phone or tablet.
The backup also gets important in a situation where you accidentally uninstall the emulator app. In that case, if you have the full backup then you can restore it.
The backup contains app settings, saved game states, PS2 memory card files and BIOS files. So, let's see how to import/export NethersSX2 app data below.
- Open NetherSX2 emulator app on your phone/tablet and tap the 'Menu' button in the top right corner.
- Tap the option 'Transfer Data' to proceed.

- To make a backup on your phone tap 'EXPORT' and then select a folder on your phone's internal storage.

- The app will ask you for permission for file storage access on your phone. Tap 'ALLOW' to proceed.

- You can now select what app data you wish to backup: BIOS, cover images, game settings, memory cards and save states. Keep all files checked if you want to backup all data.

- Once the backup is complete, you can open the save location on your phone's storage and see that all files would be there. You can save this folder on a different phone also as then you can import NetherSX2 app data from it.
How to Import NetherSX2 App Data
Let's say that you have reinstalled the NetherSX2 app on your phone or installed it on a different Android phone and want the same app settings and configuration.
In this case, we just have to import the app data and restore it to get the same settings across multiple devices. Here's how you can import NetherSX2 app data.
- Open NetherSX2 emulator app on your phone/tablet and tap the 'Menu' button in the top right corner.
- Tap the option 'Transfer Data' to proceed.
- To restore app data, tap 'IMPORT' and then select the backup folder on your phone's internal storage where you stored the app data files.
- The app will ask you for permission for file storage access on your phone. Tap 'ALLOW' to proceed.
- You can now select what app data you wish to import: BIOS, cover images, game settings, memory cards and save states. Keep all files checked if you want to import all data. Finally, tap 'IMPORT' to complete this.
- Now your PS2 emulator's app data has been imported and you can start using it without making any change in settings.
Watch The Video For PlayStation PS2 Games on Android
Here's a wuick video that shows how original PS2 games runs on Android on a mid range Android phone with the NetherSX2 PS2 emulator for Android.
Final Words
I hope you enjoyed this article to play PS2 games on android. Gaming in the past was blissful, and the PS2 console was a perfect fit for that era, some 25 years ago. Since then, gaming has changed a lot. Today, games are more focused on graphics rather than the gameplay experience and storyline.
You can still find many PS2 games that hold credibility for being actual games, offering a solid mix of engaging gameplay, compelling storylines, and great graphics. If you wish to relive the PS2 gaming era, this article is definitely for you. It will surely remind you of your childhood gaming days.
If you enjoyed this article, kindly share it with your friends and family. And if you have any questions or suggestions, please consider posting a comment below.


%20Games%20on%20Android%20and%20PC.webp)


No comments:
Post a Comment