This Domain Name Is Up for Sale
Contact Us

How To Take Screenshots On Firefox OS

Firefox OS is a Linux- kernel based OS for smartphones being developed by Mozilla. It was first released in April 2013. The current release is v1.3.0. Firefox OS supports ARM and x86 platforms. Firefox OS is written in HTML5, Javascript, CSS and C++. Gaia is the user interface used in Firefox OS.The Gaia UI/UX includes a lock screen, home screen, phone dialer, contacts app, text messaging app, camera and gallery app. This OS contains all the necessary apps that a smartphone should have like Facebook, twitter, Pinterest.

In this tutorial I am going to teach you to take screenshots on Firefox OS. Taking screenshots are necessary as they are useful in capturing necessary information displayed on screen. Also they can be used as a step by step problem recorder or a tutorial.

How To Take Screenshots On Firefox OS

  • Press the Home button and the Power button at the same time to capture the screenshot.
  • A notification will appear and the screenshot will be saved in gallery.
firefox os home screen

How To Resolve Google Play Store Error 941

Google Play Store is a vast collection of android apps. We spend most of the time in downloading apps from this store. But sometimes you may see an error message in play store that indicates that the app can’t be downloaded due to some issues. The error message returns an error code which is a three digit number. These errors prevent download and installation of android apps on your android smart phone from Google Play Store.
google play store error 941

In this tutorial I am going to teach you how to resolve play store error 941. The error 941 can occur on any android version including gingerbread 2.3, ICS 4.0, android jellybean 4.1, android kitkat and probably android L. This error is not handset dependent and can occur on any android phone from Samsung, LG, Motorola, Sony, ASUS or HTC. But don’t worry I am going to tell you a permanent fix for Google play error 941 and I have previously managed to fix and resolve the error 927 that helped many users fixing the problem.

How To Resolve Google Play Store Error 941

This error is basically caused by following reasons. To fix this error fix the problems given below.

1. Data Connection : Internet data connection of your smartphone can cause this error to come up on your phone’s screen while downloading apps from play store. It happens if suddenly the data network disconnects. So make sure that your phone’s internet connection is in working state. If error occurs then restart your phone’s internet connection.

2. Clear Phone’s & App Cache : If your phone’s cache is full then this can cause this error. Because there is no much space left for play store’s new cache that needs to be stored on your phone. You have to clear the application junk files and cache. Use clean master app for this purpose. Also you should clear app cache of two apps ‘Google Play Services’ and ‘Play Store’. Go to ‘Settings>Apps>Downloaded’. Here find the above two apps open them and tap ‘Clear Data’. It will reset app to default state and clear all errors.

clear app data

Note: If ‘Clear Data’ button is unavailable in Google Play Services then go to ‘Settings>Security>Device administrators’. Uncheck android device manager then clear its cache. After clearing cache enable android device manager.

3. Keep Google Play App Updated : Keep the app updated to its latest version. The play store app automatically downloads its latest update in background when data connection is enabled. So let this app to update itself by enabling mobile data network and eave the phone idle for ten minutes. Just open the app and it will be updated.

After following the above given fixes you will be able to resolve Google play store error 941. If you any queries then feel free to ask via comments.

How To Setup Smart Connect For Sony Xperia M

Smart Connect for Sony Xperia smartphones is a wonderful app to launch automatic events when any accessory is connected to the phone. On connecting the accessory the even or app is automatically launched. This accessory can be anything like wireless speakers, headset, headphones, Bluetooth, charger and USB devices like flash drives and keyboards. The Smart Connect is an inbuilt system app and can be found on almost every Sony Xperia smartphone that runs on android 4.1 or above.

smart connect

A question may arise that why you should use this app. Well this app can activate other apps when a specific accessory is connected. For example when you connect the headset the Walkman app automatically opens and music starts playing. You connect a flash drive/pen drive to your Xperia and file explorer opens own its own. So Smart Connect can be configured to launch automated events on connecting an accessory. This tutorial is on Xperia M but can be applied on Xperia Z, Xperia M2, Xperia T2, Xperia SP and others.

How To Setup Smart Connect For Sony Xperia M

  • Open Smart Connect app. There will be two tabs ‘Devices’ and ‘Events’.
  • ‘Devices’ tab shows all the accessories supported by your phone like charger, headset, headphones, USB devices and Bluetooth.
  • ‘Events’ shows the list of all events that are configured on your Xperia android. Default events are ‘Night’, ‘Music on the go’, and ‘Music at home’.
  • Tap the ‘+’ sign to create an event. 
  • Tap ‘Add device’. Select ‘Headset’.
  • If you want to give a specific time period then tap ‘Add time’. Enter your time period under ‘Between’ then press ‘Done’. When the time limit is selected then the Smart Connect will only work in between that time period. To make it work every time you connect headset, just skip the ‘Add time’ option.
  • Tap the arrow right below to move to next step. Here choose ‘Add start action’ then tap ‘Play tracks’. Then choose ‘Play’.
  • Now select ‘Add end action’ then tap ‘Play tracks’ and choose ‘Pause’.
  • Move on to next step by again tapping the arrow in below right corner.
  • Enter ‘Event name’ click ‘Finish’.
  • The created event will be visible in ‘Events’ tab.
Now whenever you connect a headset to your Xperia M then it will automatically launch that event and music will start playing on its own. On disconnecting the headset music will be paused.

Another Event For USB Device
For this you will need an OTG cable and a USB keyboard. Connect the keyboard to the phone and follow the steps below.

  • Open Smart Connect and tap ‘USB Keyboard’. Then select ‘Create new event’.
smart connect configure    

  • Now you know how to create an event. Just in ‘Add start action’ choose ‘Start application’ and select your favorite application. In this case I chose Quick Office for typing and editing work.
  • Rest the process is same for creating the event.
Now whenever I connect a USB keyboard via OTG to Xperia M QuickOffice app will be automatically launched.

Other Start Action
You can perform following automated start actions on connecting an accessory.

  • Go to Home scree.
  • Open webpage.
  • Start shortcut.
  • Play tracks
  • Bluetooth audio connect
  • Sound mode
  • Volumes
  • Direct call
  • Post on Facebook
  • Send text message
  • Bluetooth
  • Data traffic
  • Wi-Fi and Wi-Fi hotspot
  • Brightness
  • Screen mirroring
  • Read current time
  • Read text messages
You have successfully learnt to setup Smart Connect on Sony Xperia M.

Sony Xperia M Tips And Tricks

Sony Xperia M is a mid range android smartphone with a 1 GHz dual core processor and 1 GB RAM. The phone is well built and is light weight. It has 5 MP auto focus camera which can take microscopic images when forced to focus on tiny objects. It runs on android 4.1.2 Jellybean but is upgradable to android 4.3 Jellybean. The phone is quiet good for gaming at an entry level, it can play real racing 3 without lags and glitches. If you want to read it full review please go HERE.

In this post I am going to tell you some tips and tricks of SONY Xperia M C1904 and C1905

Xperia M hero black

Sony Xperia M Tips, Tricks And Hidden Secret Codes

1. Take Screenshots In Sony Xperia M : There are two ways to take screenshots on Sony Xperia M C1904/C1905.

  • Long press and hold the power button. Release the button when a popup opens. Tap 'Take screenshot'. The screenshot will be captured immediately. By default they are stored in  'Internal storage>Pictures>Screenshots'.
  • Second way of taking screenshots on Xperia M is by pressing the power button and volume down button simultaneously for 2 seconds.
2. Access Shortcuts In Notification Panel : In notification panel you can access shortcuts to Wi-Fi, Bluetooth, mobile data and sound profiles like ring, silent or vibrate. Also you can quickly access phone settings here.

3. View Recent Apps : These apps are that you have recently closed. To see the recent apps list tap the two rectangles next to the home button to open recent apps. Slide from left to right to remove the recent app from the list.

4. Explore Files : You can view files on internal storage of Xperia M, SDcard and USB storage by using a pre-installed app 'File Commander' The File Commander app performs all basic file operations like cut, copy, paste and move files from internal storage to sdcard. It can also explore pen drives.

5. Quickly Uninstall Apps : To uninstall apps quickly just slide from extreme left to right in app drawer to open side panel. Select 'Uninstall' and tap the apps with red cross mark one by one to uninstall.

uninstall apps

6. Arrange Apps In Various Orders : You can arrange apps in alphabetical and random order. Just open the side panel once again as you did in 5th step. Now choose 'Own', 'Alphabetical'. Also you can view apps by 'Most used' or 'Installed'. When you select 'Most used' only most used apps will be shown in app drawer and if you select 'Installed' only installed apps will be shown. See the image above.

7. Unlock Developer Options : To unlock developer options go to 'Settings>System>About phone'. Now tap on 'Build number' few times to unlock developer options in Sony Xperia M.

8. View Data Usage Of Apps : Apps keep running in background and consume data when data is enabled. You can see which app is using more data. Suspicious apps download/upload more data on your phone. If you find such apps then you can uninstall them and save your mobile data. To view data usage of apps go to 'Settings>Wireless & Networks>Data usage'.

9. Change Themes : To change themes on your Sony Xperia M go to 'Settings>Device>Personalization>Themes>Choose Theme>Apply'. You can download more themes from Sony Select. Tap the + sign on top right to download themes from Sony Select.

xperia themes

10. Change Homescreen Wallpaper : On the homescreen long press the screen and tap wallpapers. A list of Xperia wallpapers will open. Tap any wallpapers to apply it instantly. Slide from left to right. To select wallpapers from 'Albums' tap the 'Album', choose the wallpaper, apply crop to set it. To choose live wallpapers tap 'Live Wallpapers'. Open any Live Wallpaper tap 'Set Wallpaper'. Alternatively you can go to 'Settings>Personalization'. Here you can access themes, wallpapers and lock screen wallpapers at same place.

11. Change Phone Ringtone : To change ringtone on your Xperia M go to 'Settings>Device>Personalization>Call settings>Phone ringtone>Choose ringtone'.

12. Change Notification Ringtone : To change notification ringtone on Xperia M go to 'Settings>Sound>SYSTEM>Notification sound'.

13. Enable Auto Rotate Screen : To enable auto rotate screen move to 'Settings>Display>Auto-rotate screen'.

14. Change Font Size : To change font size on Xperia M open 'Settings>Display>Font size'. You can set font size to small, normal, large or extra large.

15. Change LED Light Effects : Xperia M has a LED notification light which blinks in different colors whenever you receive notifications. You can set different LED colors for messages, calls, whatsapp notifications and alarms. To change LED light effects go to 'Settings>Display>Light Effects'. Enable notifications by turning the slider towards right.

Now below Unread SMS tap 'White' and choose your favourite color. There are following colors available white, turquoise, yellow, green, red, blue and purple. Similarly change LED light effects for missed call, incoming calls, SMS & alarm. Different LED colors will help to identify the type of notification. For example if you have set yellow LED for SMS then when SMS arrives you will know that your phone has received a SMS by just looking at the LED color.

16. Enable xLOUD : xLOUD is a feature of the phone's internal speaker only found in Sony Xperia smartphones. xLOUD enhances the loudness of internal speaker. To enable xLOUD go to 'Settings>Device>Sound>xLOUD'.

17. Enable Clear Phase : Clear phase is similar to 5.1 surround sound output on android phone. Clear phase automatically sets the best quality of sound while playing music. To enable it go to 'Settings>Device>Sound>Clear phase'.

18. Enable Auto Brightness/Light Sensor : When auto brightness is enabled then the light sensor on your Xperia M will automatically adjust screen brightness according to the light received in the light sensor. The screen brightness increases when light intensity is high. To enable light sensor/auto brightness in Xperia M move to 'Settings>Display>Brightness>Adapt to lightning conditions'.

19. Enable Stamina Mode: Xperia M has a special battery feature called 'Stamina mode'. In stamina mode the background processes are restricted from running when the phone's screen is off which increases the battery life backup and phone's standby. You can anytime put the phone in stamina mode to increase battery lifetime. To enable stamina mode go to 'Settings>Device>Power Management>STAMINA Mode'. Read How To Setup Stamina Mode On Xperia M.

20. Enable Low Battery Mode : In low battery mode auto-sync, Bluetooth, GPS, Wi-Fi, Mobile data, Vibrate on touch and xLOUD are set to off to extend battery lifetime. If you always keep them off then there is no need to enable low battery mode on Xperia M. If you wish to enable it move to 'Settings>Device>Power Management>Low-battery mode>Activate'. Now tap Low-battery mode to open it tap activation and set the battery level according to your usage.

21. Show Battery Percentage In Status Bar : To show battery percentage in status bar next to battery icon on your Xperia M go to 'Settings>Device>Power Management>Status bar information'.

22. Hide System Apps : You can hide system app in Xperia M by disabling them. By disabling an app you are restricting it from running. When an app is disabled it also gets hidden from app drawer. To hide apps go to 'Settings>Apps'. Now slide the screen towards left and go to 'All tab'. This is the list of all android apps on your Xperia M. Select any app and tap 'Disable'. Downloaded apps can't be disabled. If the system app is updated and you disable it then it will return to factory version and updates will be uninstalled.

To re-enable or unhide apps go to 'Disabled' tab in same menu next to 'All' tab. In disabled tab tap any app and choose 'Enable'. Alternatively open play store and find that disabled app then tap 'Enable'.

23. Enable Magnification Gesture : When magnification gesture is enabled then you can zoom anywhere on the phone's screen by triple tapping. To enable magnification gestures go to 'Settings>Accessibility>System>Magnification gestures'. Turn the slider on top right towards right to enable it.

24. Enable Large Text : You can enable large text on your Xperia M if you have problem seeing the default text. To enable it go to 'Settings>System>Accessibility>System>Large text'. Put a check mark on it.

25. Enable Automatic Date & Time : When automatic date and time is enabled then you do not need to set the time again when the battery is removed. TO enable auto date and time go to 'Settings>System>Date & time'. Here enable 'Automatic date & time' and also check 'Automatic time zone'. You can use 24-hour format id required.

26. Change Keyboard Skin : Xperia M keyboard has three skins to choose from. First one is white keyboard, second is black keyboard and third is black and white keyboard. To change keyboard skins go to 'Settings>Personal>Language & Input'. Under keyboard and INPUT METHODS you will find Xperia TM  keyboard. Tap the 'Settings' icon in front of it. Now tap 'Keyboard skins' and slide left or right to choose the skin and tap 'Select' to apply the keyboard skin.

keyboard skins

27. Backup Android Apps With Data : On your Xperia M you can backup android apps with data and later you can restore them on your phone. To do this read Backup Android Apps With Data On Xperia M.

28. Change Phone Language : To change the phone's language go to 'Settings>Personal>Language & input>Language'. Change language and tap OK.

29. See Owner Name On Lock Screen : You can show your name on the lock screen of Xperia M with contact number or email address, in case if its lost then someone may return it to you. Please read this tutorial.

30. Setup VoIP Or Internet Calling On Xperia M : You can make VoIP calls via internet on Xperia M. For this you need a SIP account. You can call via 3G network. Read Setup VoIP Or Internet Calling On Xperia M

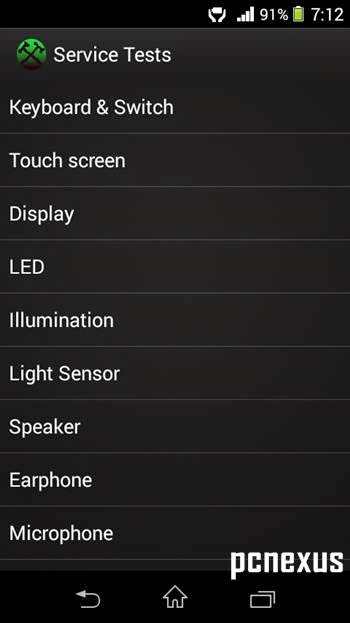
31. Xperia M Secret Codes : Currently I am telling you two secret codes of Xperia M, out of which one is extremely useful which is the service test code. The service test code can let you test the entire hardware of your phone to check whether the phone has a hardware fault or not. Other code is retail mode.

  • Service Test Code For Xperia M : Open the dialer and enter this code *#*#7378423#*#*. The service menu will open. Tap 'Service Tests'. You will find many options here like touchscreen, display, LED, Illumination, Light Sensor, Speaker, Earphone, Microphone, Camera, Front Camera, Bluetooth, WLAN, GPS, Compass, Accelerometer, Proximity Sensor, RTC, Total Call Time, Battery Check, NFC, Flash LED etc. Tap on any option to test it. If test is successful then your phone is in perfect condition without hardware faults.
       service tests on xperia m

  • Retail Mode Code : Well this code is not much useful and if activated it can delete all your photos, videos and other media stored on the phone's storage. Retail mode is used by retailers to show the phone's features by means of a retail video. This code once activated voids the warranty. So use it at your own risk. The retail mode code is *#*#73556673#*#* 
retail mode on xperia m

That were 31 tips and tricks for Sony Xperia M C1904 and C1905. However this is not the complete list of tips and tricks. This is the end of part one. More tips and tricks for Xperia M will be coming in Part 2. 

If you liked the article you can give two minutes to share it.

Win Avast Mobile Security And Antivirus Lifetime License [190 Years] On Android

Avast is celebrating 100 Million downloads of its mobile security and antivirus. On this occasion they are giving some goodies like free one year license for the android mobile security and avast teddy bears only for 1000 lucky winners. There are two methods of entering the contest. One is by Twitter and other one is by Facebook. Both these methods of registration have different rewards. The avast Facebook quiz contest also includes a bumper prize in which a lucky winner will get 190 years of free premium protection on their android device and the winner can unlock all the premium features of avast anti theft. 190 years are equal to 100 Million minutes that is why avast is celebrating its 100 Million downloads. To enter the contest follow the steps below.

avast mobile security

For Twitter

  • First of all follow avast avast on twitter. Go to this link.
  • Now go to this link and retweet the post from your twitter account.
  • The first 1000 people to follow and RT will receive a 1-year license of avast Premium Mobile Security.
  • Voucher codes will be distributed from @avast_antivirus within 10 days via Direct Message.
  • If you are lucky then you can win avast stuff for free.
For Facebook

  • Like Avast Facebook Page.
  • Enter Quiz Contest.
  • Make sure grant access to avast from your Facebook account.
  • Answer all the questions and answer a bonus question to win a teddy bear.
  • One lucky winner will receive free avast mobile security license for 190 years that is more than a lifetime.
  • Hurry the contest will close soon.

Use Night Mode App To Reduce Screen Brightness On Android Below Normal Levels

Android smartphones have a brightness level that can't be taken beyond a certain level for very low screen brightness. The light coming from the phone's screen is harmful for eyes specially in night. The night reading is also difficult because of high intensity screen brightness. No matter whether the brightness level is set to minimum it will still hurt your eyes if you look at the screen in night. But don't worry there is an app named 'Night Mode' which can override the android phone's brightness and can set it to ultra low level. You can turn the screen almost black. This app actually acts as a screen dimmer by applying a black filter in front of the screen as a result brightness is greatly reduced which is eyes friendly. So what are you waiting for install this app and stop hurting because this app acts as eyes protector.

Reduce Screen Brightness Below Normal Levels On Android With Night Mode

  • Download and install Night Mode App for android from here.
  • Open the app. Set your brightness level. Tap start to activate night mode.
  • The screen brightness will be greatly reduced.
  • Tap 'Stop' to exit the app and return to normal screen brightness.
       night mode android


How To Show Owner Name And Contact Information On Lock Screen Of Android

Android smartphones  have built in functions for remote wipe, remote lock and locate when lost. Google has released android device manager which is inbuilt app for remote lock, wipe and locate. Samsung phones have Samsung Dive service through which you can do the same when your phone is lost and for Sony Xperia smartphones there is My Xperia service. But these services are only useful when the internet data, location services, GPS and background data(in android 2.3) are always enabled on your phone. If any of the service is off on your phone then these tracking apps won’t even work. The easiest way to get back your lost android phone is to prove that you are the owner of that lost phone. You can simply do this by showing your name and an alternate contact number, or email on the phone’s lock screen. After seeing your name and phone number there are chances that someone who finds your phone may return it you.

How To Show Owner Name And Contact Information On Lock Screen Of Android

  • To show owner name go to ‘Settings>Personal>Security>Owner info’.
  • Now put a check mark on ‘Show owner info on lock screen’.
  • Now enter your name and mobile phone number in this format “Owner: Your Name [Contact Number]”. If you mostly travel outside your country then make sure to add the ISD code before your phone number.
  • Make sure the contact number should be a different one. It could be your other phone’s number or your relatives number on which the person can contact if he finds your lost android phone.
  • After entering the info tap back button.
owner name on android lockscreen

Now if a righteous person finds your phone then there are chances that you will get it back.

Important Notes

  • This post doesn’t guarantee that you will get back your lost android phone even after placing owner info on the lock screen. It depends on the person whether he/she wants to return your phone or not.
  • Always secure your phone with a pattern lock, PIN or password to prevent unauthorized access.
  • Services like Samsung dive and My Xperia can also allow you to show owner info after remote lock, but it is only useful if internet data is enabled and Samsung account and My Xperia are fully setup.
  • If you have a Samsung phone then you can avail its phone tracker service which is even better unless your phone is factory reset by the person who gets it. X-Alert for Xperia does the same work for Sony Xperia smartphones.

How To Hibernate A Desktop Computer In Windows 7

In hibernation a Windows PC/Laptop saves its entire work on hard disk before shutting down. The next time you switch it on it will resume from where you left it. Hibernating a laptop is easy because the option is readily available in the start menu, but in desktop computers the hibernate option may not available in the start menu. So it’s tricky to do for the desktop. Hibernation is required when you are doing some important work on your PC like installing a software, a windows update  and suddenly power goes off or there is low power. So in this situation you can hibernate your desktop computer to save the entire work on hard disk and later resume it from where you left. This tutorial applies to Windows 7 and Windows 8.


How To Hibernate A Desktop Computer In Windows 7/Windows 8

  • Open Start Menu and type ‘Hibernate’ in search.
  • Click ‘Change what the power buttons do’.
  • In ‘When I press the power button’ select ‘Hibernate’.
hibernate a desktop computer in windows 7

  • Now anytime long press the power button of your desktop computer and the PC will automatically go into hibernation mode.
  • When you start it again you can resume Windows.
If hibernation is disabled on your PC then open command prompt as administrator. You can do this by typing ‘CMD’ in start menu search, then right click on cmd and select ‘Run as administrator’. Type the following command.

powercfg –h on

And hit enter. Restart your PC for changes to take effect.

How To Get Avast Antivirus Premium Free For 90 Days On Android

Avast Mobile antivirus is the leading mobile security and antivirus app for android smartphones. This is the first android antivirus that can take complete control of your android phone if it is rooted. If your phone is rooted and avast antivirus premium is installed on it then it will be more secure than non-rooted android smartphones running some other antivirus apps. Currently avast mobile is free to download in play store but it also offers in-app purchases from where you can buy the premium version for $14 per year. The premium version of avast mobile includes following.

  • Perimeter GeoFencing: The phone performs specified actions when it leaves the set perimeter.
  • App Lock: You can lock unlimited number of apps in premium version.
  • Increase Access Security: Locks the device and takes the picture of the person who attempts to unlock it after three unsuccessful attempts.
  • Detect Ads In Apps: Automatically detects ads in apps and provide all info about their tracking system.
The best feature about avast antivirus premium is the avast anti-theft which has some marvelous features that other antivirus apps fail to provide. Some notable features include the following.

  • Take Picture Of Thief From Front Camera: When your phone is lost then you can take picture of person having your phone from the phone’s front camera by sending a remote sms with a command. You would need an avast account for this.
  • Record Audio: You can send a command to record audio on your lost device.
  • Fetch Call Logs.
  • Force Your Lost Phone To Make A Call.
  • Track With GPS.
However these are just few features but this is not the complete list. There are many Remote SMS commands that can take control over your lost android phone. In the next post I will write avast mobile security review.

Well the above information is enough to tell you how good is avast android antivirus with such premium features. And the good news is that I am going to teach you how to get avast antivirus premium free virus protection for 90 days on android. For the next 3 months you will use all the premium features of avast mobile for free. The procedure is official and avast is itself giving free license for 90 if you invite 15 friends via SMS. If you invite 5 friends via SMS then you will get 30 days free license key.

How To Get Avast Antivirus Premium Free For 90 Days On Android

  • Download and install avast security for android from here.
  • Open it tap menu and select ‘Earn a free Premium license’.
  • Make sure internet data is ON. Now tap ‘Invite’ and select 5 friends from your phonebook and send them SMS. Please note that carrier charges are applicable.
avast antivirus premium free for android

  • After sending the messages a popup will open tap ‘Claim Your License’.

  • Return to Avast home and the free license will turn to premium.

  • Repeat this process further two times to get the license extension upto 90 days for that you have to SMS another 10 friends and bear the SMS carrier charges. It your choice. However the premium upgrade may only show 30 days, but your subscription will be valid for maximum 90 days.
  • After the trial period you can stick to avast free mobile security.
You have successfully got avast security antivirus premium free on android for 90 days

SONY Movies 7.2.A.0.4 Update Rolled Out: Download APK

SONY has recently rolled out Movies 7.2.A.0.4 app update for its Xperia smartphones. The app notification first appeared on Xperia Z1 but other Xperia smartphones has started receiving this update. The Movies 7.2.A.0.4 app update includes improved design and layout of Details page. This app can now show related content from Video Unlimited on cast, crew and Details page. This app update like the previous one will show update notifications in the notifications bar. You can lookup video details in Gracenote with this app.

Movies 7.2.A.0.4

The navigation is simple and you can view videos stored in different folders. Camera videos have a separate option to access in the main menu. While playing the video we can select the desired scene by just going to ‘Menu>Scene selection’.


To download the Movies 7.2.A.0.4 for your Xperia smartphone go to “Update Centre” and tap refresh. The update notification will appear, tap the arrow to download and install this Sony Media App. If you haven’t received the OTA update then you can download the APK file from PCNEXUS. The app size is just 18.7 MB.

SONY Movies 7.2.A.0.4 Download APK

Note: Features like Video Unlimited, Redeeming Prepaid Credit and Store are handset dependent.

Update AT&T Motorola Moto X To Android 4.4.4 Kitkat 212.44.26 Firmware

Good News, AT&T  has released the latest android 4.4.4 KitKat update for the Motorola Moto X via OTA. The update has now started rolling out and most Moto X users has started seeing the update notification on their phones. The new android 4.4.4 KitKat update for Moto X has a build number 212.44.26. This latest update comes with various software enhancements and improvements including low power profile, stability fixes, framework and security fixes which includes OpenSSL update. You should make note that after updating your Moto X to android 4.4.4 KitKat 212.44.26 you can’t downgrade it to previous versions.

AT&T Moto X android 4.4.4

What’s New In Android 4.4.4 KitKat 212.44.26 For Motorola Moto X

  • Improved image quality with better exposure consistency. You can now capture good photos in low light from front camera and with realistic flash coloring from the rear camera.
  • Ability to pause video recording with a pause/resume button on viewfinder.
  • Updated phone dialer app with new colorful layout for overall better user experience.
Pre-Requisites

  • This tutorial is only for AT&T Moto X and should not be applied on other models.
  • This tutorial is not valid if your phone is rooted and running a custom rom.
  • If you haven’t received the OTA update on your Moto X then don’t worry because I am also providing the manual method to update AT&T Motorola Moto X to latest android 4.4.4 KitKat 212.44.26 firmware.
Update AT&T Motorola Moto X To Android 4.4.4 KitKat 212.44.26 Firmware

  • If you received the OTA notification on your phone then tap it and select “Download”.
  • After downloading the software tap “Install now”.
  • After upgrade the phone will automatically reboot with a build number of 212.44.26.
  • If you do not see the notification. Go to “Settings>About phone>System updates” and tap Download and repeat steps 1-3.
Manually Update AT&T Moto X To Android 4.4.4 KitKat 212.44.26 Firmware
Now I will teach you to manually update your Moto X to latest android 4.4.4 KitKat 212.44.26. But follow steps below prior to upgrade.

  • Backup all data stored on your phone including your photos, videos, contacts, Whatsapp database and other accounts. Backup app data with helium app.
  • This tutorial can not be applied if your phone is running a custom rom. Also rooted Moto X phones may not take this update or may brick if forced anyways.
  • You can’t downgrade your Moto X to previous versions after installing this update.
  • This manual update will not void your phone’s warranty.
  • So lets start.
Tutorial For Upgrade

  • Download the android 4.4.4 KitKat 212.44.26 update file from here
  • Either directly download it to your phone’s sdcard or to computer then later transfer it to your phone via USB cable.
  • Now put the update file on your Moto X’s sdcard.
  • Turn off your phone and reboot your Moto X in recovery mode. To boot your Moto X in recovery mode switch it off then press and hold POWER and VOL DOWN KEY for few seconds.
  • Now scroll to Recovery by pressing VOL DOWN KEY and press VOL UP KEY to select.
  • The phone will display an android with exclamation mark.
  • Now press and hold VOL UP KEY for 10-15 seconds. Now while holding the VOL UP KEY tap and release the POWER key. Now you have entered recovery mode.
  • Now select ‘Apply update from SD card’ and pick the update file.
  • The upgrade process will take few minutes. After upgrade reboot your phone.
You have successfully updated your AT&T Motorola Moto X to android 4.4.4 KitKat 212.44.26 firmware by using OTA and manual update method.

When PC Fails to Boot, Try These Methods to Recover Your Data

You no longer have to fret over the issues when your PC fails to boot and causes data inaccessibility, as you can fix whatever issues are there on your own, without using any of the external tools alleging to be the only rescuer. You, with the help of internal system utilities and devotion of a fraction of your precious time, can fix issues causing boot failure. Once you get into your PC successfully, make sure you implement reliable security measures and do go for data backup without failure.

Overview
If your PC fails to boot and you need to fix the culprit at the earliest to avoid damages to the data, you do not need to go for external means to get into its hard drive and rescue data. Instead, you can use Windows bootable DVD (for Windows 7 and 8) and do the fixes required.

System Restore Options
In fact, system repairing is the very first step users should begin with in such scenarios. However, if your PC boots, but sticks to a point every time, and then throws errors, this might be due to malware infections. Create a system restore point using repair disc and get the issues resolved.


Screenshot 1: System Recovery Options

As you can see in the screenshot 1, the Command Prompt option is provided at the last, which enables you perform multiple operations, such as drive partitioning with the command DISKPART and scanning as well as repairing disk using the command chkdsk. Therefore, you do not need to fuss over if your PC is not able to boot. Run the command chkdsk and it may fix the issues.
In case you fail to retrieve the data, you may try the alternative, i.e. restore the system partition (i.e. primary partition) and secondary partitions from the backup image you created recently. With this, you restore all the files that have been lost or deleted after creating the backup image.

Note: You cannot restore image after replacing the failing hard drive with a new one.

Windows 7 USB/DVD Download Tool
Installing Windows with a USB flash drive is faster as compared to that with a bootable DVD. Though Windows does not allow creating bootable flash drive, Microsoft provides free Windows 7 USB/DVD Download Tool that enables creating a bootable flash drive with Windows’ ISO image or recovery.


Screenshot 2: Windows 7USB/DVD Download Tool

In case you do not have the Windows ISO image file, you can create it free with Windows boot CD/DVD using an ISO creator. Since Windows allows you create a password recovery disk, you need to have different discs for both 32-bit and 64-bit versions of Windows because you cannot use single disc on both its versions.

Stellar Phoenix Windows Data Recovery Boot Disc
Stellar Phoenix Windows Data Recovery Pro is commercial data recovery software for PCs that comes handy with system startup disc or boot disc. Using this boot disc, you can get into your PC when it fails to boot from the primary volume. In other words, Stellar Phoenix Windows Data Recovery Boot Disc enables you retrieve all your data that is no longer accessible due to system crash.

Stellar Phoenix Windows Data Recovery

Using this rescue disc, simply boot your system, and then it will run the software and enable you recover data in a way that you follow to recover data on a working system. In events like system crash, boot partition failure, and all such issues causing boot failure on Windows system, this boot disc enables data recovery easily and in a reliable manner.

Using Ubuntu Linux
Linux, as you know, is one of the securest computer operating systems and the most important thing is, it is Free! Ubuntu Linux is preferred amongst various Linux operating systems, as it acquires lesser drive space as well as its other systems requirements are steeper as compared to others, typically Slax. Thus, if you are looking for an OS that is secure, runs faster, and is free of cost, then Ubuntu Linux is a wise pick.

Screenshot 4: Windows drive mounted on Ubuntu

In case the file system or Master Boot Record of your Windows hard drive is corrupt and causing boot failure, you can connect it to your Linux based system and it most likely will be able to read that drive. If it does, recover all your data to an external drive, and then format that drive clean.

Data Recovery Software
Data recovery from the hard drive is not possible with recovery software, in case your PC fails to boot from the primary volume. However, you can go for data recovery using hard disk recovery software if you have multiple hard drives attached to your PC and you occasionally boot form the other one. For this, simply install and run the recovery software on the second drive and select the earlier one for data recovery.

While recovering data from the Windows hard drive, make sure that you do not save it on the same drive, as it overwrites the drive space and minimizes the odds for efficient recovery. Moreover, do ensure for reliability of the recovery software; better will be if you prefer using an authorized data recovery tool. You can surf the Internet and find such a tool. If you fail to do so, use recommended recovery tools. Consult the experts for the right help and for productive results of recovery.

About the author
Frank is an avid contributor and tech blogger, who has written over hundreds of useful posts that helped user in recovering their useful data. 

Update Verizon Galaxy S5 To Official Android 4.4.2 KitKat VRU1ANE9 Firmware

Users of Samsung Verizon Galaxy S5 in USA has received android 4.4.2 KitKat VRU1ANE9. Its an OTA update, so you have received the notification but if you haven't received the notification then do not worry because you can update it manually by using ODIN.


Before You Start

  • This tutorial can only be applied on Verizon Galaxy S5 SM-G900V. Other users please stay away if you do not want to brick your phone.
  • After update the root access will be revoked.
  • The custom recovery will reset to stock.
  • The custom rom installed on your Verizon Galaxy S5 will return to stock.
  • Use Helium app to backup android apps data so that later you can restore it.
  • Backup contacts, photos, videos and other important data.
  • Battery should be charged to at least 60%.
  • Use this tutorial at your own risk.
Downloads

Update Verizon Samsung Galaxy S5 SM-G900V To Official VRU1ANE9 Android 4.4.2 Kitkat Firmware

  • Download and install Samsung USB drivers.
  • Download the G900VVRU1ANE9 firmware and extract it on desktop. It contains a file with .md5 extension.
  • Enable USB debugging on your Galaxy S5 from developer options menu.
  • Open odin.exe on your computer.
  • Switch off your tablet and reboot it in download mode by pressing 'Home', 'Volume down' and 'Power key' at the same time until your phone vibrates. Press the volume up button to enter into odin mode.
  • Now connect tablet to PC via USB cable.
  • Let odin recognize your tab. When it is recognized by odin the field under <ID:COM> in odin will turn blue and you will see a message "<ID:0/016> Added!!".This means that your Galaxy S5 is recognized and is ready to be flashed.
update verizon galaxy s5 to android 4.4.2 kitkat VRU1ANE9

  • Make sure that only "Auto Reboot", and "F.Reset Time" options should be checked.
  • Now check 'PDA' or 'AP' and click it and select the firmware file from the desktop. Wait for few seconds till ODIN finishes some checks.
  • Click 'Start' to initiate the flashing process.
  •  When the process is completed odin will return a message 'PASS'. When your phone first boots to home screen then disconnect it from PC.
Problems After Updating Verizon Galaxy S5 SM-G900V
If your phone does not boot post the splash screen then it might be stuck in a boot loop. So to resolve this reboot the phone into recovery mode by pressing the volume up, home key and power button at the same time.

  • The device will automatically boot in recovery mode. You can move up and down by pressing volume up and down buttons. Now select “wipe data/factory reset”.
  • The device will be wiped and factory reset. Then go back and select “wipe cache partition”.
  • After wiping cache partition go back and select “reboot system now”.
You have successfully updated your Verizon Galaxy S5 SM-G900V to G900VVRU1ANE9 android 4.4.2 KitKat firmware.

Update T-Mobile Galaxy Note 3 N900T To Android 4.4.2 KitKat N900TUVUDNF4 Firmware

The T-Mobile Galaxy Note 3 SM-N900T has received the latest android 4.4.2 Kitkat N900TUVUDNF4 update in the USA. If you haven't received the update then you can flash it manually using Odin.

android 4.4.2 t-mobile note 3

Pre-Requisites

  • This tutorial Can be applied only on T-Mobile Galaxy Note 3 SM-N900T.
  • If your device is rooted then you will lose root access and device status will be set to official.
  • Backup all the data stored on your phone to your PC.
  • Enable USB debugging from 'Developer options'.
  • If your phone gets bricked then we can't be held liable.

Download Android 4.4.2 KitKat N900TUVUDNF4
Download the Android 4.4.2 KitKat N900TUVUDNF4  Update.

Tools & Drivers
Flash T-Mobile Galaxy Note 3 SCH-I605 With Android 4.4.2 KitKat N900TUVUDNF4 OTA Firmware

  • Download odin and required rom for your T-Mobile Galaxy Note 3.
  • Install Samsung USB drivers for android phones, because odin will not work without usb drivers.
  • Extract the odin zip and the rom zip in a single folder.
  • Now start odin by clicking odin.exe. Do not configure any setting of odin.
  • Do not connect your galaxy device till yet.
  • Now switch off the phone and enter into download mode(odin mode). You can enter into download mode by pressing home, power key and volume down key at the same time. Keep pressing until you see a warning to install custom rom. When warning appears press the 'volume up' button to enter download mode or odin mode. You will see a picture like this below.
odin mode

  • Now connect Galaxy Note 3 SM-N900T to pc via usb cable while odin is still running. When you connect the tablet in download mode to odin then the field under the "ID:COM" in odin will turn blue and show you the connection ID. Also in message you will see "<ID:0/016> Added!!". This means that your Galaxy Note 3 SM-N900T is now ready for flashing android kitkat 4.4.2.
flash Galaxy Note 3 SCH-I605 Android 4.4.2 KitKat N900TUVUDNF4 via odin

  • Now put a check in front of "PDA" then click "PDA" in odin and browse the android kitkat 4.4.2 rom file which you have downloaded its format is md5 this is the rom which is to be installed in your Samsung Galaxy Note 3 N900T and will replace the old rom.
  • Now click "Start". You will see progress in the progress bar above ID:COM.
  • After completion your Galaxy Note 3 will auto reboot and start with latest android 4.4 N900TUVUDNF4 firmware.
Odin Troubleshooting

  • If odin gets stuck in the middle then disconnect your phone and close odin.
  • End the odin process in the windows task manager and relaunch it.
  • Remove your phone's battery, then put it back and reboot it into download mode and repeat the manual update procedure.
  • If odin gives you error like "parameter is incorrect" then double check the file loaded in PDA and also check USB drivers are upto date.
Problems After Updating Galaxy Note 3 SM-N900T To Android 4.4.2 KitKat N900TUVUDNF4
If after updating the phone you are getting some problems in T-Mobile Galaxy Note 3 like lags, boot loop or the phone hangs or halts the try the following steps.

  • Make sure to remove sdcard before doing this as this can accidently wipe data from the sdcard.
  • Turn off the phone and reboot into recovery mode by pressing the home,volume up and power buttons at the same time.
  • Do not release the buttons unless you see android system recovery.
  • Now move down by pressing volume down key and select "wipe data/factory reset". Press the home button to select this option. Your device will be factory reset.
  • Now go back and select "wipe cache partition".
  • Now again go back and select "reboot system now".
  • You are done.
Now you have installed the N900TUVUDNF4 kitkat update for T-Mobile Galaxy Note 3 SM-N900T manually. If you have any problem while installing the update then feel free to ask.

How To Enable And Setup Stamina Mode On Sony Xperia M

Sony’s Stamina Mode is a built in battery power saver feature found in Xperia range of smartphones like Xperia M, Xperia Z LTE, Xperia T2 Ultra and Xperia Z2. The stamina mode increases battery life of Sony Xperia smartphones by disabling most apps when the phone’s screen goes off.

Battery life is crucial for every smartphone user and with stamina mode the battery life of Sony Xperia M is greatly increased. When stamina mode is enabled then most android applications in background are restricted from running and synchronizing data when the phone’s screen is turned off. However you will still receive phone calls, sms messages, mms messages and Whatsapp notifications if mobile data is enabled. This inbuilt battery saver actually reduces the number of apps that can run when the phone is in standby. Only useful apps are allowed to run like phone app, message app, Whatsapp and some apps like antivirus apps.

In this tutorial I am going to teach you about setting up stamina mode on Xperia M to get maximum battery life and performance. You can apply this tutorial to any Xperia smartphone that supports this inbuilt battery saver feature.

How To Enable And Setup Stamina Mode On Sony Xperia M

  • Open ‘Settings>Device>Power management’.
  • Enable Stamina mode by tapping the button next to it, so that it will turn blue or some other color depending on the theme.
  • You will see an icon before network signals a battery between two hands.


Configure Stamina Mode

1. Automatic Activation: Automatic activation feature automatically enables stamina mode when the battery percentage reaches a certain level say 50%. The battery level is user defined at which stamina mode is activated own its own. Tap ‘Stamina mode’. To set battery percentage level tap ‘Activation’ and set your desired battery level. When the battery power is below this defined level the stamina mode will automatically activate. To show battery percentage enable ‘Status bar information’ from the same menu.


2. Allow Apps To Run In Standby: You can choose which apps to run in standby when stamina mode is activated. Most apps are inactive in this mode. For example if you are downloading a file with a browser then the downloading process will be restricted when phone’s screen is turned off and your file will not be downloaded so you should add that browser app as an exception in white list. In Stamina Mode Whatsapp is not restricted. Follow the steps below.

  • Below ‘Activation’ tap ‘Add applications’.
  • Find the app. Put a check mark on it.
  • Now that app will run and will not be restricted in stamina mode.


If you liked the article please take two minutes to share it.

How To Take Voice Guided Selfie From Rear Camera On Android

Selfies are really popular today. Everybody loves to take their own selfie with their smartphones having a front camera. Selfie is a photo that is captured by ourselves without the help of anyone by using an  android smartphone. Most android smartphones does not have a front facing camera, so you may be thinking that how is it possible to take selfies without front camera. In this tutorial I am going to teach you how to take selfies from the rear camera of your android phone by using an android app. This app has voice guided facility which will tell you how to move the camera, in which direction to move the phone whether left or right, whether to take the camera away or closer to your face to take the best selfie shot.

voice guided selfie on android

How To Take Selfie From Rear Camera On Android

  • Download Smart Selfie from play store and install it.
  • Open it and tap ‘No’.
  • Now ‘Current Settings’ will open. Tap ‘Change’.
  • Change the number of faces by sliding the slider towards right.
  • Scroll down and increase volume to 100%.
  • Tap ‘OK’.
  • Now tap menu button of your android phone and choose ‘More’. Here tap ‘Preview Size’ and choose ‘480x320’.
  • Again go to ‘More>Focus Mode’ and choose ‘auto’.
  • Now restart app and face the rear camera to take your selfie.
  • The app will give you voice guided instructions like move phone camera to left, right or closer to your face.
  • Finally it will say hold the camera at a place and say cheese. That’s it, your selfie photo will be captured.
  • You can find your photos in the android album.
You have successfully learn to take selfies from the rear camera on your android smartphone.