This Domain Name Is Up for Sale
Contact Us

Easiest Way To Get Back Lost Android Smartphone

Android smartphones  have built in functions for remote wipe, remote lock and locate when lost. Google has released android device manager which is inbuilt app for remote lock, wipe and locate. Samsung phones have Samsung Dive service through which you can do the same when your phone is lost and for Sony Xperia smartphones there is My Xperia service. But these services are only useful when the internet data, location services, GPS and background data(in android 2.3) are always enabled on your phone. If any of the service is off on your phone then these tracking apps won’t even work. The easiest way to get back your lost android phone is to prove that you are the owner of that lost phone. You can simply do this by showing your name and an alternate contact number, or email on the phone’s lock screen. After seeing your name and phone number there are chances that someone who finds your phone may return it you.

Easiest Way To Get Back Lost Android Smartphone By Showing Owner Name On Lock Screen

  • To show owner name go to ‘Settings>Personal>Security>Owner info’.
  • Now put a check mark on ‘Show owner info on lock screen’.
  • Now enter your name and mobile phone number in this format “Owner: Your Name [Contact Number]”. If you mostly travel outside your country then make sure to add the ISD code before your phone number.
  • Make sure the contact number should be a different one. It could be your other phone’s number or your relatives number on which the person can contact if he finds your lost android phone.
  • After entering the info tap back button.
owner name on android lockscreen

Now if a righteous person finds your phone then there are chances that you will get it back.

Important Notes

  • This post doesn’t guarantee that you will get back your lost android phone even after placing owner info on the lock screen. It depends on the person whether he/she wants to return your phone or not.
  • Always secure your phone with a pattern lock, PIN or password to prevent unauthorized access.
  • Services like Samsung dive and My Xperia can also allow you to show owner info after remote lock, but it is only useful if internet data is enabled and Samsung account and My Xperia are fully setup.
  • If you have a Samsung phone then you can avail its phone tracker service which is even better unless your phone is factory reset by the person who gets it. X-Alert for Xperia does the same work for Sony Xperia smartphones.

Set Animated GIF As Live Wallpaper On Android

When animated GIF wallpapers are used as homescreen wallpapers on android then they act like static wallpapers and you do not see any animation. Android does not allow the animated GIF to be used as animated homescreen wallpapers because android supports only two types of wallpapers static and live wallpapers. Static wallpapers are just photos or images, an android LWP is animated which can respond to user input. That's why android treat GIF images as static wallpapers that's why they do not animate on homescreen.

In this tutorial I am going to teach you how to set animated GIF as Live wallpaper on android.

For this purpose we will use an android app 'AnimGIF LWP 2' which will convert GIF images into android Live Wallpapers and you can set them on homescreen.

Set Animated GIF Images As LWP On Android

  • Download and install this app.
  • Open the app and tap 'AnimGIF LWP 2'.

  • Tap 'Settings' then tap 'Select GIF files'.


  • Browse the images on your sdcard or internal storage. All GIF images should be in same folders.
  • You can select multiple images. Tap 'Use selected'.


  • 'Double tap change' should be checked.
  • Scroll down and find 'GIF framerate multiplier'. Tap it and increase value for fast animation on homescreen and decrease value for slower animation.
    

  • Scroll down and tap 'Image fitting mode'. Here select the option which best suits your phone's screen like 'center', 'stretch', 'Fit to screen', 'Fit vertically' or 'Fit best'.
    

  • Now tap back button and choose 'Set wallpaper'.
GIF As Live Wallpaper On Android

  • Its done.

Note: If you have selected multiple images then double tap on screen to change the wallpaper.

This is the best way to set your favourite animated images as LWP on android and this doesn't waste much battery because its a single app which is converting animated GIF into Live wallpaper.

If you liked the article please share it.

Download Sony Media Apps: Album 6.1.A.0.14 APK

Sony has its own media apps which let you manage photos, videos and music on your Sony Xperia smartphone. There are currently four Sony media apps including Album, Movies, Walkman and Playstation Mobile. These apps get timely updates from Sony in the update center. In this tutorial I will provide you links to download the latest Sony Album 6.1.A.0.14 apk and also I will teach you about how to use it.

Download Sony Album 6.1.A.0.14 APK

Sony Album 6.1.A.0.14 Tips

1. Increase/Decrease Thumbnails Size: When you open the album app then you will see image thumbnails. Just pinch zoom in or out to decrease or increase the image thumbnails size.


2. View Image Folders: Tap the album icon on top left to view more options. You can view all the folders in which photos are stored by tapping ‘Folders’.


3. Add Geotag: You can add geotag on any photo. Geotag specifies where the photo was taken. Open any photo tap the menu icon on top right and choose geotag. Choose location on GMaps and tap OK.

4. SenseMe Slide Show: SenseMe slide show allows you to run a slide show of your photos with a picture theme and background music.

senseme slideshow

  • Tap SenseMe slide show from menu.
  • In theme choose either Basic, Zoom & Grid, Spin & Flip or 3D frames.
  • In music choose either No music, Default music, A song/playlist from Walkman.
  • Now tap play button to start slideshow.

5. Basic Slideshow: For basic slideshow tap ‘Slideshow’ from menu.

6. Change Default Sharing Option: To change default sharing option long press the sharing icon and tap see all. Now choose the sharing option which you use the most like Bluetooth, Whatsapp or Email.


7. Edit Photos: Open any photo and tap the edit button to edit your photos.


8. Save Photos In Sony Cloud Storage: If you want to save photos in Sony Online Storage then tap the album icon and choose ‘Play Memories Online’.

9. Throw: With throw you can wirelessly beam your photos  on DLNA devices like TVs. To do this your phone and the TV should be connected to the same Wi-Fi network.

How To Save Or Convert Microsoft Office Word 2007 As PDF File

Converting a Microsoft Office Word 2007 Word document into PDF is necessary for extra security and to prevent any changes in file. Office 2007 provides a function in which you can directly save word documents to PDF files. PDF files are not easy to edit because they require some paid softwares on the other hand a word document is easily editable. In this tutorial I will teach you how you can save Office Word 2007 documents directly as PDF files in Microsoft Office 2007 without using any word to pdf converter software.

save or convert word to pdf

How To Save Or Convert Microsoft Office Word 2007 As PDF File

  • Download Microsoft Save as PDF add-in
  • Its only 933 KB to download. Install it.
  • Now open any word document in Office 2007.
  • Click 'File>Save As'. Click 'PDF or XPS'.
  • Enter a name for your file. Its done.
  • Use adobe pdf reader to open the file.

Download Smash Hit Android Game APK

Smash Hit is an android game developed by Mediocre. The game includes wonderful glass breaking physics and real time sounds. Smash Hit includes out of the world places in which we have to break glass objects in various dimensions by throwing balls. You can throw multiple balls to break glass objects by touching the screen on multiple points. Suppose if your phone supports 4 multi touch points then you can throw 4 balls at a time to break the glass objects.

Download Smash Hit APK Free

In the free version you can not continue the game from the last checkpoint. So just buy the game on play store for full enjoyment.

How To Play

  • Download and install the game.
  • Tap start. Now tap the screen to throw balls to break glass objects.
  • Break blue crystals to collect three balls.
smash hit apk download

  • Break 10 crystals in a row to collect multi-balls. Upto 5 multi-balls can be collected and thrown at once.
  • If you crash into any glass object you will lose 10 balls.
  • To continue from last checkpoint, start the game and slide towards left to select the checkpoint. Tap the checkpoint to start play the game from where you left it. It is only supported in paid version.

Adjust Graphics Quality
Tap options and select graphics quality to low, medium or high quality;

Other Games

Flash Verizon Galaxy Note 2 SCH-I605 With Official Android 4.4.2 KitKat VRUFND7 OTA Firmware

The Verizon Galaxy Note 2 SCH-I607 has received the latest android 4.4.2 VRUFND7 OTA update in the U.S. If you haven't received the OTA then you can flash it manually using Odin.


Pre-Requisites

  • This tutorial Can be applied only on Verizon Galaxy Note 2 SCH-I605.
  • If your device is rooted then you will lose root access and device status will be set to official.
  • Backup all the data stored on your phone to your PC.
  • Enable USB debugging from 'Developer options'.
  • If your phone gets bricked then we can't be held liable.

Download Android 4.4.2 KitKat VRUFND7
Download the Android 4.4.2 KitKat VRUFND7 OTA Update.

Tools & Drivers
Flash Verizon Galaxy Note 2 SCH-I605 With Android 4.4.2 KitKat VRUFND7 OTA Firmware


  • Download odin and required rom for your VZW Galaxy Note 2.
  • Install Samsung USB drivers for android phones, because odin will not work without usb drivers.
  • Extract the odin zip and the rom zip in a single folder.
  • Now start odin by clicking odin.exe. Do not configure any setting of odin.
  • Do not connect your galaxy device till yet.
  • Now switch off the phone and enter into download mode(odin mode). You can enter into download mode by pressing home, power key and volume down key at the same time. Keep pressing until you see a warning to install custom rom. When warning appears press the 'volume up' button to enter download mode or odin mode. You will see a picture like this below.
odin mode

  • Now connect Galaxy Note 2 SCH-I605 to pc via usb cable while odin is still running. When you connect the tablet in download mode to odin then the field under the "ID:COM" in odin will turn blue and show you the connection ID. Also in message you will see "<ID:0/016> Added!!". This means that your Galaxy Note 2 SCH-I605 is now ready for flashing android kitkat 4.4.2.
flash galaxy note 2 SCH-I605 Android 4.4.2 KitKat VRUFND7 via odin

  • Now put a check in front of "PDA" then click "PDA" in odin and browse the android kitkat 4.4.2 rom file which you have downloaded its format is md5 this is the rom which is to be installed in your Samsung Galaxy Note 2 I605 and will replace the old rom.
  • Now click "Start". You will see progress in the progress bar above ID:COM.
  • After completion your Galaxy Note 2 will auto reboot and start with latest android 4.4 VRUFND7 firmware.
Odin Troubleshooting


  • If odin gets stuck in the middle then disconnect your phone and close odin.
  • End the odin process in the windows task manager and relaunch it.
  • Remove your phone's battery, then put it back and reboot it into download mode and repeat the manual update procedure.
  • If odin gives you error like "parameter is incorrect" then double check the file loaded in PDA and also check USB drivers are upto date.
Problems After Updating Galaxy Note 2 SCH-I605 To Android 4.4.2 KitKat VRUFND7
If after updating the phone you are getting some problems in VZW Galaxy note 2 like lags, boot loop or the phone hangs or halts the try the following steps.

  • Make sure to remove sdcard before doing this as this can accidently wipe data from the sdcard.
  • Turn off the phone and reboot into recovery mode by pressing the home,volume up and power buttons at the same time.
  • Do not release the buttons unless you see android system recovery.
  • Now move down by pressing volume down key and select "wipe data/factory reset". Press the home button to select this option. Your device will be factory reset.
  • Now go back and select "wipe cache partition".
  • Now again go back and select "reboot system now".
  • You are done.
Now you have installed the VRUFND7 kitkat update for Verizon Galaxy Note 2 SCH-I605 manually. If you have any problem while installing the update then feel free to ask.

Flash Canadian Galaxy Note 2 I317M Black Edition To Android 4.4.2 KitKat I317MVLUDNF1

The Canadian Galaxy Note 2 I317M has received the latest android 4.4.2 I317MVLUDNF1 OTA update from various carriers including Rogers, Bell, Telus, Virgin Mobile, Kodoo and SaskTel. If you haven't received the OTA then you can flash it manually using Odin.


Pre-Requisites

  • This tutorial Can be applied only on Canadian Galaxy Note 2 I317M with carriers like Rogers, Bell, Telus, Virgin Mobile, Kodoo and SaskTel.
  • If your device is rooted then you will lose root access and device status will be set to official.
  • Backup all the data stored on your phone to your PC.
  • Enable USB debugging from 'Developer options'.
  • If your phone gets bricked then we can't be held liable.

Download Android 4.4.2 KitKat I317MVLUDNF1
Download the Android 4.4.2 KitKat I317MVLUDNF1 according to your carrier.

Tools & Drivers


Flash Canadian Galaxy Note 2 I317M Black Edition To Android 4.4.2 KitKat I317MVLUDNF1 Firmware


  • Download odin and required rom for your Black Edition Canadian Galaxy Note 2.
  • Install Samsung USB drivers for android phones, because odin will not work without usb drivers.
  • Extract the odin zip and the rom zip in a single folder.
  • Now start odin by clicking odin.exe. Do not configure any setting of odin.
  • Do not connect your galaxy device till yet.
  • Now switch off the phone and enter into download mode(odin mode). You can enter into download mode by pressing home, power key and volume down key at the same time. Keep pressing until you see a warning to install custom rom. When warning appears press the 'volume up' button to enter download mode or odin mode. You will see a picture like this below.
odin mode

  • Now connect Galaxy Note 2 I317M to pc via usb cable while odin is still running. When you connect the tablet in download mode to odin then the field under the "ID:COM" in odin will turn blue and show you the connection ID. Also in message you will see "<ID:0/016> Added!!". This means that your Galaxy Note 2 I317M is now ready for flashing android kitkat 4.4.2.
flash galaxy note 2 i317m Android 4.4.2 KitKat I317MVLUDNF1 via odin

  • Now put a check in front of "PDA" then click "PDA" in odin and browse the android kitkat 4.4.2 rom file which you have downloaded its format is md5 this is the rom which is to be installed in your Samsung Galaxy Note 2 I317M and will replace the old rom.
  • Now click "Start". You will see progress in the progress bar above ID:COM.
  • After completion your galaxy S4 will auto reboot and start with latest android 4.4 I317MVLUDNF1 firmware.
Now you have installed the I317MVLUDNF1 kitkat update for Canadian Galaxy Note 2 I317M manually. If you have any problem while installing the update then feel free to ask.

How To Enable Bluetooth Tethering On Android

Bluetooth Tethering means sharing the internet of one android phone with other via Bluetooth. Bluetooth tethering is similar to Wi-Fi hotspot, but as compared to Wi-Fi hotspot Bluetooth tethering is much secure because we can hide our phones Bluetooth and restrict it to only paired devices.  Bluetooth tethering is fast and does not overheat the phone, but battery power may be an issue but as compared to Wi-Fi hotspot battery backups are longer in Bluetooth tethering. For sharing internet connection via Bluetooth you will need two android smartphones running on android 4.1 and above.

How To Enable Bluetooth Tethering On Android

  • Go to ‘Settings>More>Tethering & portable hotspot’. Enable ‘Bluetooth tethering’.

  • Now go to Bluetooth  option and enable it. Now other phone that want to share your phone’s internet connection will be visible here.

  • Tap on the phone’s name. It will connect and pair. If it asks for code then confirm and pair.
  • Then again tap the connected phone and enable ‘Internet Connection’.
bluetooth tethering on android

  • When connection is successful a big Bluetooth icon will appear in status bar. In Samsung phones it is blue in color while in Xperia it is white see the image above.
  • Now easily access internet on the other phone.
  • Now you can easily share internet via Bluetooth on android.

Samsung Galaxy Core Duos I8262 Tips And Tricks

Samsung Galaxy Core Duos GT-I8262 is android 4.1 Jellybean smartphone with 1.2 GHz dual core processor and Adreno 203 GPU. It has 1 GB RAM and 8 GB inbuilt storage. In this tutorial I am going to tell you about some tips and tricks of Galaxy Core Duos, the tricks are same for the  Galaxy Core GT-I8260 single SIM model.

Samsung Galaxy Core Duos I8262 Tips And Tricks

1. Take Screenshots: To capture screenshots on Galaxy Core Duos press the home and power button at the same time for two seconds. The screenshot will be captured. To view the screenshots go to 'My Files>All Files>Sdcard0>Pictures>Screenshots'


2. Enable Blocking Mode: When blocking mode is enabled then only notifications for selected features will be disabled. You will only receive notifications of incoming calls from people on your allowed list. To enable blocking mode either tap the blocking mode shortcut in notifications bar or go to 'Settings>Device>Blocking Mode'

3. Set Font: To choose your favourite font go to 'Settings>Display>Font Style>Choose Font'. You can choose among Rosemary, choco cooky, cool jazz or helvetica S.


4. Change Font Size: If you find the default font size too small or too large on your Galaxy Core Duos then you can easily change the font size. Go to 'Settings>Display>Font Size'. Either choose normal, tiny, huge, large or small.

5. Enable Smart Stay: Samsung Smart Stay is a smart feature only found in Samsung android smartphones. When smart stay is enabled then screen will never turn off when you look at it. The screen will turn off when you are not looking at. The front camera detects the eyes and keeps the screen ON. To enable it go to 'Settings>Display>Features>Smart Stay'

6. Change Touch Key Light Duration: When you are in dark then it will be difficult to find the hardware buttons on your Galaxy Core Duos because the default touch key light duration is just 1.5 seconds. To increase the duration go to 'Settings>Display>More Settings>Touch Key Light Duration'. Either select 6 seconds, always on or always off.

7. Display Battery Percentage: Enabling battery percentage % will let you know the percentage of battery remaining on your phone so that you can control its usage to save battery. To snable battery percentage move to ''Settings>Display>More Settings>Display Battery Percentage"


8. Enable Power Saving Mode: Power Saving Mode will enhance the battery life by lowering CPU usage and lowering screen brightness. To enable it "Settings>Device>Power Saving Mode". Here also enable 'CPU Power Saving' and 'Screen Power Saving'.

9. See Owner Info In Lock Screen: To put your name on your Galaxy Core Duos lock screen go to "Settings>Personal>Lock Screen>Owner information>Check show owner info on lock screen>Enter info>OK"

In owner info enter your name with alternate mobile phone number that is of some other phone like your mother's or father's phone or a separate phone of yours. This info with your name and phone number on the lockscreen will help you get back your phone if its lost. If a righteous person finds it then he will definitely call you on the alternate number and return the phone to you.

10. Enable Remote Controls And Mobile Tracker: With remote controls you can remotely wipe or track your lost Galaxy Core Duos with Samsung Dive and with SIM change alert you will be get notified of the thief's phone number when the SIM is changed on your phone. To learn more about Samsung Dive please read this article and to learn about Samsung remote controls and Mobile tracker please read this.

11. Enable Motion: Motion sensors on your Galaxy Core Duos give you three smart features.
Smart Alert: Catch missed calls and messages. Suppose your phone is lying on a flast surface with its screen facing the surface then when you pick it up it will vibrate just to notify that you have either received a messaged or a missed call.

Shake To Update: Shake the phone to scan for bluetooth devices.

Turn Over The Phone To Mute/Pause: While receiving calls just turn over the phone to mute the sound. Also turn over the phone to pause the music playback. Turning over the phone means the phone's screen should face the surface.


To Enable go to 'Settings>Device>Motion'. Slide the slider towards right to turn it ON.

12. Auto Date and Time: When this option is enabled then your phone will automatically update the date and time with current time zone. To enable auto date and time move to 'Settings>Date & Time>Auto Update'.

13. Enable Negative Colors: You can enable negative colors on your galaxy core duos. Negative colors will invert screen colors. Go to 'Settings>System>Accessibility>Vision>Negative colors'. But when you capture screenshots in negative colors it will be in true colors only.

negative colors galaxy core duos

14. View Serial Number: Serial number is a unique number which helps to identifiy a particular device. To view your Galaxy Core Duos serial number go to "Settings>System>About Device>Status>Serial Number".


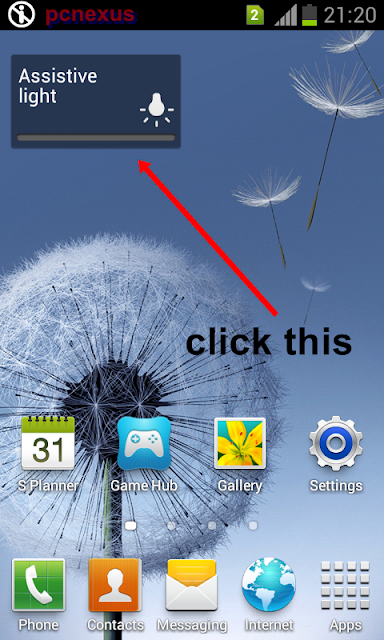
15. Use Camera Flash As Torch: You can use the camera flash as torch whenever you go into dark. To use camera flash as torch on your Galaxy Core Duos just open the app drawer and tap the 'Widgets' tab. Now find 'Assistive Light' widget here. Long press it to place it on home screen. To activate the flash as torch tap 'Assistive Light'.

assistive light galaxy core

16. Access Task Manager: To open task manager on your Galaxy Core Duos just long press the home button and tap the left most task bar icon. In task manager you can kill apps and free up RAM. Press the RAM tab and tap 'Clear memory' to free and speed up Galaxy Core Duos.

17.Backup Contacts On Galaxy Core Duos : You can backup all your contacts on Galaxy Core Duos without installing any other app. To backup contacts open Contacts and then tap menu button. A list will open,select “Import/Export” option. Further select an option like where you want to backup contacts like SD card or phone or sim. Based on your selected option the contacts will be backed up to sim/sdcard/usb storage in .vcf format. Later you can import these contacts to your phone’s sim. To import contacts reverse the above process.


18. Quick Redial Recently Dialled Contact : To quickly dial the recently dialled number you don’t need to open the contacts log. Just open the dial pad and click the button just below the ‘*’ key. After pressing this key the number will be automatically typed then you can dial that number without typing.


19. Trim Or Crop Videos On Galaxy Core Duos: You can trim videos on galaxy core duos. Trimming a video means cutting a short part from it. To trim any video proceed as follows.

  • Play any video then press the menu button and select “Trim” from the list.
  • A video trimming program will open. Slide the trimming sliders from left or right to select the part.
  • After selecting the the trim part click trim. A popup will open select “Trim as new video”.
  • Trimmed video will be found in sdcard>Output.

20. Record Incoming Calls On Galaxy Core Duos: To record incoming calls you need to download “auto call recorder”. This app will record all incoming calls on your phone.You can download it here.

21. Attach Any File In Gmail On Galaxy Core Duos: Currently Gmail for android doesn’t allow you to attach files except images. But with this trick you can attach almost any file in gmail. To read more about this trick you should read attach file gmail tutorial.

22. Chat Via Bluetooth Without Any App On Galaxy Core Duos: You can chat via Bluetooth on galaxy core duos without installing any Bluetooth chat app. Read this tutorial about Bluetooth chat on android without any app.

23. Play Playstation PS1/PSX Games On Galaxy Core Duos: You can play playstation ps1/psx games on galaxy core duos with fpse for android. Read this tutorial to play ps1 games on galaxy core duos.

Other gaming tricks include the following tutorials. You should read them to play games on galaxy core duos. The gaming tricks are given below.

24. Play Nes Games On Galaxy Core DuosRead This Tutorial.

25. Mame and CPS1 Games On Galaxy Core DuosRead This Tutorial.

26. DOS Games On Galaxy Core Duos TutorialRead This Awesome Tutorial.

27. Make Video Calls On Galaxy Core Duos: To make video calls on your galaxy core duos you will need 3G network. First of all make a call to any contact with whom you want to give a video call. Immediately cut the call and you will see an option of video call. Tap the video call option to start the video call with that contact. You can switch between cameras during a video call.

       video calls galaxy core  

28. Show Touches: When you enable this feature you will see that whenever you touch the screen your finger touch can be seen as a tiny white circle on the screen which specifies the point where you touch the screen. Enabling touches will help you to identify which parts of the screen you are touching. To enable this feature goto “Settings>System>Developer options>Input>Show touches”. First you have to enable the developer options by sliding the turn on switch to right. See the pic below.


29. Clear Cache And Tune Up Galaxy Core Duos: Galaxy Core stores more application cache which sometimes slows it. This cache should be cleared. Use android assistant app to clear the cache. First install this app then goto Tools>Clear cache>Clean all. Also use task manager to free up RAM when the tablet runs sluggish. Goto task manager then select RAM manager then click clear memory.

30. Change Camera Storage To SDcard: You can directly store camera photos in sdcard. To do this open camera and tap settings icon. Then tap 'Storage' and choose 'Memory card'.

31. Enable Camera Flash While Recording Videos: While recording videos in dark you can enable the camera flash and use it as a torch for light assistance. To enable this change the camera to video mode then tap the flash icon on top and choose 'On'. Now while recording videos in dark you will have your own light source for the camera.

32. Share Galaxy Core Duos Internet On Other Phones Or Laptops: You can share Galaxy Core's internet connection with other android smartphones by using the Wi-Fi hotspot function. Read this article.

These are the few tips and tricks about Galaxy Core Duos GT-I8262. I hope you liked them all.

How To Install Flash Player On Samsung Galaxy Tab S 8.5 LTE

Samsung Galaxy Tab S 8.5 is the latest Samsung tablet that runs on android 4.4.2 kitkat. Installation of flash player is required when we watch flash videos online, watch live TV or play online flash games and watch Facebook videos. In this tutorial I will teach you to install adobe flash player 11.1 on Galaxy Tab S 8.5.

flash player galaxy tab s 8.5 lte

Note : Before doing anything enable "Unknown Sources" on your phone otherwise you won't be able to install flash player apk. To do this goto Settings>Security>Unknown Sources check it.

This tutorial will teach you to install flash player on Galaxy Tab S 8.5 LTE and can be applied on any model including AT&T, Verizon, Vodafone, T-Mobile and International. Before installation download the following files below.

Install Flash Player On Galaxy Tab S 8.5

  • Adobe flash player 11 android 4.4.2 kitkat Galaxy Tab S 8.5 apk download
  • Adobe flash player 11.1 android 4.4.2 kitkat Galaxy Tab S 8.5 apk download
  • Mozilla firefox for android download
  • UC browser HD for android download
Note: I have given 2 links for flash player apk files so, download any apk which you want. If one doesn't work then download the other. We will cover the topic of flash player installation on your phone by using Mozilla firefox and UC browser HD. So lets start with UC browser.

Note : Galaxy Tab S 8.5 LTE default android browser doesn't fully support flash plugin. So you will see a missing plugin like a blue box in place of flash content on most websites. However sites like YouTube will work without any problem.

Installing Adobe Flash Player On Galaxy Tab S 8.5 LTE Using UC Browser HD For Android

  • Download and install UC browser HD from above link. If installation is blocked then go to Settings>Security>check Unknown Sources.
  • Install adobe flash player for Galaxy Tab S 8.5.
  • Now open UC browser HD and click the menu button next to search button on top right and choose 'Settings'.
  • Now choose 'Advanced Settings' and click 'Flash Plug-in' then choose 'Auto'.

  • Now go to Youtube.If mobile version opens then open it in desktop mode then click any video on youtube.You will see that video will play in the browser itself and not in the youtube android app.

flash player 11.1 on Galaxy Tab S 8.5 UC browser hd

Installing Adobe Flash Player On Galaxy Tab S 8.5 Using Mozilla Firefox For Android


  • Download and install Mozilla firefox from the playstore link given above.
  • After installing open it and goto settings>content>plugins>enabled.
  • Now goto any flash website you will be able to view flash in Mozilla firefox on Galaxy Tab S 8.5 and won’t see any blue lego cube in place of plugin.
  • When you see "Tap to activate plugin", tap it to start playing flash videos online. You can also watch live videos.


Now you have learnt how to install flash player on Galaxy Tab S 8.5 by using two browsers. This adobe flash player installed on your phone doesn't guarantee full compatibility with all websites running flash content. But it will work with most websites and you can Play Facebook videos In Galaxy S.

You have successfully installed flash player 11.1 on Galaxy Tab S 8.5 LTE with android 4.4 Kitkat.

How To Setup SIP Account For VoIP Calling On Android Without Google Voice Or Skype

With the latest technologies of Internet, VoIP Calling (Voice Over Internet Protocol) is becoming popular among smartphone users. VoIP calls is a perfect replacement for the voice calls made through your network provider. In some cases the VoIP calls are much cheaper then voice calls. VoIP calls are free to make they just only require a Wi-Fi or 3G/WCDMA connection to transfer the voice data from one phone to another via a SIP account.

SIP Trunking stands for 'Session Initiation Protocol' which is a signaling communications protocol mostly used for transferring voice and video calls over IP networks. A SIP account can be easily setup on your android phone and it doesn't require any app like Google Voice, Google+ Hangouts or Skype. You can obtain a free SIP account from free SIP account providers on the internet like 'getonsip.com'. With a pbx SIP account you can make unlimited free cheap VoIP calls/internet calls over IP networks. But you have to only pay for the 3G data and on Wi-Fi it is totally free and you can make VoIP calls worldwide like voip Canada, UK or USA.

So in this tutorial I am going to teach you how you can setup free internet calls and voip phone service for business calls on your android phone without using any app like Google Voice, Skype or Google+ Hangouts. I am using Sony Xperia M and Xperia Z for internet calls but it will work on all phones like Samsung, Motorola , HTC.

How To Make VoIP Calls On Android Without Using Any App Like Google Voice, Hangouts VoIP Or Skype


► Create SIP Trunking Account First

Before you can make any VoIP calls from your phone you have to setup a free SIP account. Follow the steps below to create one.
  • Go to www.getonsip.com free VoIP service allowing you to make phone to phone voip calls.
  • Enter your email and click 'Submit'.
  • Now getonsip will send you a verification link on your email address. Just click on this link.
  • It will take you to registration page. Here enter your details like full name, username and password.
  • Now a popup will open click 'Okay, got it'.
  • Now click 'View Profile'. It will give you details about SIP address, domain, SIP password, Auth Username and Outbound SIP Proxy.
  • Note down all these things on a paper.
  • Now you have successfully created a free SIP account for VoIP calling. Now we setup the SIP Trunking account on your android smartphone.


 How To Setup SIP Account On Android

  • Enable mobile data and open 'Settings' and move to 'Call settings'.
  • In 'INTERNET CALL SETTINGS' tap 'Use Internet calling' and choose 'Ask for each call'.
  • Now tap 'Accounts'. Put a check on 'Receive incoming call', this option will let you receive VoIP calls. Then tap 'Add account'.
  • Now enter the following details.
Username: your SIP username that you wrote on paper.
Password: SIP password that you wrote on paper.
Server: getonsip.com

Now tap 'Optional settings' and enter the following data.

Authentication username: enter 'Auth Username' that you wrote on paper.
Outgoing proxy address: sip.onsip.com

  • Finally tap 'Save'. Now you will see under your SIP account 'Primary account. Receiving calls'. This means that you have successfully created and setup SIP account on your android phone.
sip account android

How To Make VoIP Calls On Android

  • VoIP calls can only be made by dialing SIP address from the phone. The default caller does not support typing letters so we have to save the VoIP contacts in phone book as internet calls.
  • Open Contacts and create a new contact.  Enter the 'First name'.
  • Now scroll down and find 'Groups'. Below 'Group name' field tap 'Add another field'. From here choose 'Internet call'.
  • Now enter the SIP address of other person in Internet call field it is like 'username@getonsip.com'.
  • Finally save the contact and tap the contact the contact to open. Now tap the address below 'Internet call' for VoIP calling.
            VoIP calling on android
  • You can enable VoIP call recording to record VoIP calls on android by using any call recording app. You can also use this as voip phone service for business.


Receive VoIP Calls

You can only receive free VoIP calls only if the caller has a registered SIP account on his phone and data is enabled on your phone.

Note: The above tutorial can be applied on Sony Xperia devices. However if you want to setup SIP account on android 6.0 Marshmallow and android 7.0 Nougat then follow the tutorial below. The tutorial below can be applied to android smartphones running stock Google android OS like the Nexus devices, Motorola phones (Moto G3, Moto G4 Plus, Moto X Play, Moto X Style, Moto Z). However, the SIP setup is same for all devices the only difference is the location of SIP settings. SIP settings can be in "Call Settings". If they are not found here then they can be accessed through the phone dialer app settings in most like Nexus and Motorola.

How to Setup VOIP/SIP Calling Account On Android 5.0 Lollipop, Android 6.0 Marshmallow and Android 7.0 Nougat


The tutorial below has been tested on Motorola phones like Moto G4 Plus, Moto X and Moto X Style.
  • Open the dialer app and tap the menu icon on the top right corner just next to microphone icon.
  • In this menu tap "Settings". Then select "Calling accounts" by tapping it.


  • Here you will see "SIP settings". Tap "SIP accounts".

SIP setup android 7.0 nougat

  • Tap the "+" button to add an account.
  • Now a settings page will open. Here you will need to enter your Username, Password and Server.
  • Now tap "Optional settings" and enter your "Authentication username", "Outbound proxy address" and "Display name" (enter your desired name for this account). These credentials can be found in your getonsip account that you created above.
sip setup android 6.0

  • Finally tap "SAVE".
  • Now go back to "Calling accounts" and tap "All calling accounts". Make sure that your SIP account is enabled here.


  • If your SIP calling account is not enabled on your phone then while making a SIP voice call you will get an error stating "Service not supported".
  • You can also use this service as business voip telephone.


Video Tutorial

You can also watch this video tutorial below for setting voip on your phone.

How to Save a SIP Contact In Your Phonebook

Since there is no way to dial a SIP address just like a phone number. So you have to add that contact in your phonebook to make Wi-Fi calls.
  • On your phone go to "Contacts" app and tap the blue button to add a user.


  • Enter the name of your contact. Then tap "More Fields".
  • Scroll down and find SIP. Here enter the SIP address of your contact. It is like "user@getonsip.com".


  • Tap the "Right" icon on top to save the contact immediately.
  • To initiate a call go to the contacts app and find that saved user.
  • Tap the user's name and finally tap the "SIP address" below his name to start a call. Make sure either Wi-Fi or cellular data network is enabled.


  • Once you initiate the call then you can find the calling history in the dialer app. From here you can contact the same user again and no need to open the contacts app again.
  • The voip android calling interface is just like the normal call.

You have successfully learned to setup SIP account and enabled VoIP calling on your android without using Google Voice and Skype. If you liked the article please share it.