This Domain Name Is Up for Sale
Contact Us

How To Backup All Android Apps Of LG G Pro 2 On SdCard

Making a backup of your favorite android apps will save you from re-downloading them. Also you can share these apps with other android smart phones and tablets. In this tutorial I will tell you how to backup all android apps installed on your LG G Pro 2 on SD card. You can backup all android apps installed on your smart phone including the android system apps like Gmail, camera app etc as apk files and later install them manually. Follow the steps below to make it happen.

Backup Android Apps On SD Card On LG G Pro 2 D837

  • First download and install ‘androzip’ for android here.
  • Now open androzip and slide the horizontal scroll bar on top from right to left.


  • Now tap on ‘Apps’. A lsit of all installed android apps will open. This list will include android system apps and third party android apps (installed by you).

backup android apps on sdcard lg g pro 2

  • Put a check mark in front of all apps that you want to backup on sd card.
  • After selecting all android apps click the backup button on top.
  • Now go to ‘sdcard>app_backup’. You will find all backed up android apps here. Later you can re-install them if you accidently uninstalled any.

Install Apps After Backup
To manually install android apps after a backup, just tap on any app and click install. See this detailed tutorial.

Share Android Apk Files Via Bluetooth

  • To share any android apk file just long press on it and choose share. Then choose ‘Bluetooth’ to send the file.

How To Install Android APK Files On LG G Pro 2

Android APK Files are actually android apps with a .apk file extension. APK stands for android package. Official android apps can be downloaded from Google play store directly to your device. Google play app automatically downloads and installs the android apps. But if you want to manually install android apps from sdcard on LG G Pro 2 then I am going to teach you about this.
Android has an option in security settings with which we can enable or disable android apk file installation. This option is known as ‘Unknown Sources’ and if it is enabled the android apk files can be installed outside of Google play store. But installing apps outside of Google Play on your LG G Pro 2 can allow viruses and malwares to get inside your phone. These third party apps may be rogue apps that steal data while running in background and upload it on a web server. So, if you are installing apps outside of Google Play on your LG G PRO 2 then be careful.


Install Android APK Files On LG G Pro 2 D837


  • Open ‘Settings>General Settings>Security’
  • Now under ‘Phone administration you will find ‘Unknown Sources’ ( Allow Installation of Apps Other than Play Store). Enable it.
  • After enabling the ‘Unknown Sources’ a security popup will open. Tap OK to close it.
  • Now check ‘Verify Sources’ (Disallow or Warn before Installation of apps which can cause harm). If this option enabled then harmful or malicious apps will not be installed.

Now You are all set to install android apk files on LG G Pro 2. To install the apk files follow the steps below.

  • Download the android apk files and copy them to your phone’s sdcard either internal or external.
  • Use ES file explorer to locate the apk files.
  • Tap any file to start installation. Wait for few seconds.
  • The app is installed.
If you liked the article please share it.

Install Whatsapp On Galaxy Note Pro 12.2 Wi-Fi SM-P900

Samsung Galaxy Note Pro 12.2 SM-P900 is a Wi-Fi only android tablet. It doesn't have SIM support therefore you can't make voice calls from it. Also there is only one option to connect to internet is Wi-Fi. If you are willing to use Whatsapp on Galaxy Note Pro 12.2 SM-P900 then you are right place.


Install Whatsapp On Galaxy Note Pro 12.2 SM-P900

  • Download and install the latest version of Whatsapp for android here.
  • Now install the app. If install is blocked enable unknown sources. Then re-install the app.
  • Now after installing the app, open it. When you open it you will see a welcome screen. Click the ‘Agree and continue’ button.
  • When you click this button a note will open stating that “tablets are currently not supported.”. Click OK to begin the setup.
  • On the next screen you need to enter your phone number and choose the right country where you lives in.
  • Enter the phone number which you use often. Do not enter your friend’s phone number.

whatsapp installation on galaxy note pro 12.2

  • After entering the phone number click OK.
  • When you click OK a popup will open asking you to verify your phone number. Click OK again.


  • Whatsapp will automatically try to send a sms to the number specified by you. But after few minutes the sms verification will fail.
  • Now you will have to verify your number via voice call. Click the ‘Call me’ button to receive a voice call on that number. Hear the 6 digit verification code carefully. Enter this code in Whatsapp to verify your phone number.


  • Now enter your name for Whatsapp profile and follow the instructions by clicking the ‘Next’ button on top right.
Now you have successfully installed Whatsapp on galaxy note pro 12.2 SM-P900 with no SIM support. To add contacts just save the contacts list on your tablet and refresh the list in Whatsapp. Now you will need a working data network for sending and receiving messages on Whatsapp. You can use your smart phone’s network on your tablet via Wi-Fi hotspot, see this tutorial

If you encounter any problem while installing Whatsapp on android tablet then feel free to ask via comments. Now check whatsapp tips and trick here.

How To Enter Bootloader/Download Mode On Motorola Moto G

Bootloader or Download Mode can easily be accessed on Motorola Moto G if you know for what purpose it is used and how to do it. Entering bootloader or download mode on Moto G is required when you want to upgrade the android firmware of your phone, downgrade the android firmware or re-install the stock android firmware on your phone. The main reason for which the download mode is used is to upgrade the phone to latest official android firmware manually. This can be done manually first you have to  download the official Motorola Moto G Rom from Google then flash it via ADB. All the three operations can be achieved via Download mode.


Entering Download Mode on Motorola Moto G is extremely simple and can be done by pressing few buttons simultaneously. Basically we press volume down and power button at the same time but in case of Moto G it is a bit different. So lets start.

Requirements

  • A Windows PC or MAC.
  • A USB Cable.
  • Moto G Drivers installed on your PC.
Enter Download Mode On Motorola Moto G

  • Power off your phone by pressing the power button for few seconds. When a popup opens choose ‘Power Off’.
  • Now connect the USB cable to your phone.
  • Now press the volume down button and while doing so press the power button.
  • Now connect the phone to  PC with data cable.
  • The drivers will be automatically installed.
  • You have successfully entered bootloader/download mode on Moto G.

If you liked the article please share it. Now check this article.

How To Root Samsung Galaxy S5 SM-G900F Using ODIN

Samsung Galaxy S5 is an android 4.4 kitkat smartphone that has been recently launched by Samsung. If you are an advanced user of android then you may be willing to root your Galaxy S5. Rooting the android smartphone is recommended for advanced users so that they can take control over the maximum performance of their android smartphone. After rooting one can install custom roms, custom recovery, uninstall inbuilt apps, remove bloatware and customize the look and feel of the smartphone’s UI by using various custom android launcher apps.

rooted galaxy s5 SuperSU installed

Rooting can be difficult for some users as it requires several steps like first flashing a custom recovery image and then installing the SuperSU app. This procedure sometimes fails because the stock recovery comes back even after flashing the custom recovery. This procedure is time consuming. But in this tutorial I will teach you the easiest way to root your Galaxy S5, that will root it in one go. You do not have to flash custom recovery and install ROM manager and SuperSU app because everything is done for you by the developers . You just have to flash CF-Auto Root package on your Galaxy S5 via ODIN to successfully root it in one go.


Note 1: Before beginning the rooting process backup entire data stored on your phone because after rooting the phone all data may be lost in case device gets bricked. Use this tutorial at your own risk, we can't be held liable for any damages.

  • Backup all important apps with androzip, backup whatsapp messages and restore the database later, see this tutorial.
  • Enable USB debugging on your galaxy s advance by going to “Settings>Applications>Development>USB Debugging”.
Warning

  • This tutorial is meant to be applied only on Galaxy S5 model number SM-G900F.
  • The rooting procedure will void the warranty thereby increasing the binary/knox counter by 1.
  • After rooting if you want warranty claims then downgrade your phone or flash official rom of Galaxy S5 via ODIN.
Downloads Required

Root Galaxy S5 G900F by Flashing CF-Auto Root Package Via ODIN

  • Install Samsung USB drivers for Galaxy S5.
  • Download CF-Auto Root package and odin v3.07 zip and place these files on desktop.
  • Extract the files in separate folders.
  • Now turn off your phone and reboot into download mode. If you do not know how to do it then see this tutorial.
  • Do not release the buttons unless you see a custom rom warning. Press volume UP to continue to enter into download mode.
  • Now open odin.exe on your PC and connect the phone to PC via USB cable.
  • Let odin recognize your phone.When your phone is recognized by odin the field under <ID:COM> in odin will turn blue and you will see a message "<ID:0/016> Added!!".This means that your phone is recognized and is ready to be flashed.

galaxy s5 root via odin

  • Make sure that only "Auto Reboot", and "F.Reset Time" options should be checked.
  • Now check 'PDA' and click it and select the 'CF-Auto-Root.tar' from the desktop.
  • Click 'Start' to initiate the rooting process.
  • When the process is completed odin will return a message 'PASS'.
  • When your phone first boots to home screen then disconnect it from PC.
  • You can use Root Checker app to verify that your phone has been rooted.
Problems After Rooting The Galaxy S5
If your phone does not boot post the splash screen then it might be stuck in a boot loop. So to resolve this reboot the phone into recovery mode by pressing the volume up, home key and power button at the same time.

Warning: This procedure will erase everything stored on your phone. Use if and only if your Galaxy S5 doesn't boot correctly. Make sure you have backed up the entire data.

  • The device will automatically boot in recovery mode.You can move up and down by pressing volume up and down buttons.Now select “wipe data/factory reset”.
  • The device will be wiped and factory reset.Then go back and select “wipe cache partition”.
  • After wiping cache partition go back and select “reboot system now”.
  • Now Galaxy S5 will work perfectly.
Now you have successfully rooted your Galaxy S5 SM-G900F.

How To Enter ODIN/Download Mode In Samsung Galaxy S5

Entering the ODIN/Download mode on your Galaxy S5 is simple and easy. By pressing some buttons at the same time you can enter into download mode or recovery mode. Entering the download mode on your galaxy S5 is required if you are manually flashing a custom rom or a stock rom on your device by using odin. In download mode we install stock or custom android roms on our Galaxy S5 by using odin.


We use the android recovery mode to wipe cache and partition. Also the recovery mode on your galaxy S5 is used to factory reset the phone. In recovery mode you can root your phone by installing an auto-root package from the sd card. This tutorial can be applied on any model of Galaxy S5 like AT&T, Verizon, Vodafone and T-Mobile etc.

How To Enter Download Mode On Galaxy S5


odin/download mode galaxy s5

  • Switch off the phone completely. Remove the battery for few seconds and then again re-install it.
  • Now press the volume down, home button and power button at the same time and keep them engaged until your phone vibrates. On vibration release the buttons.
  • When your phone boots in download mode it will show you a warning page about installing a custom rom.
  • This is the download mode and you can enter it completely by pressing the volume up button. You will see a green android saying "Do not turn off target".
  • Now you can install custom or stock roms on your Galaxy S5 in download mode via odin. You can check odin tutorial here.

How To Install Flash Player On Samsung Galaxy S5

Samsung Galaxy S5 is the latest Samsung smartphone that runs android 4.4.2 kitkat. Installation of flash player is required when we watch flash videos online, watch live TV or play online flash games and watch Facebook videos. In this tutorial I will teach you to install adobe flash player 11.1 on Galaxy S5.

galaxy s5

Note : Before doing anything enable "Unknown Sources" on your phone otherwise you won't be able to install flash player apk. To do this goto Settings>Security>Unknown Sources check it.

This tutorial will teach you to install flash player on Galaxy S5 and can be applied on any model including AT&T, Verizon, Vodafone, T-Mobile and International. Before installation download the following files below.

Install Flash Player On Galaxy S5

  • Adobe flash player 11 android 4.4.2 kitkat Galaxy S5 apk download
  • Adobe flash player 11.1 android 4.4.2 kitkat Galaxy S5 apk download
  • Mozilla firefox for android download
  • UC browser HD for android download
Note: I have given 2 links for flash player apk files so, download any apk which you want. If one doesn't work then download the other. We will cover the topic of flash player installation on your phone by using Mozilla firefox and UC browser HD. So lets start with UC browser.

Note : Galaxy S5 default android browser doesn't fully support flash plugin. So you will see a missing plugin like a blue box in place of flash content on most websites. However sites like YouTube will work without any problem.

Installing Adobe Flash Player On Galaxy S5 Using UC Browser HD For Android

  • Download and install UC browser HD from above link. If installation is blocked then go to Settings>Security>check Unknown Sources.
  • Install adobe flash player for Galaxy S5.
  • Now open UC browser HD and click the menu button next to search button on top right and choose 'Settings'.
  • Now choose 'Advanced Settings' and click 'Flash Plug-in' then choose 'Auto'.

  • Now go to Youtube.If mobile version opens then open it in desktop mode then click any video on youtube.You will see that video will play in the browser itself and not in the youtube android app.

flash player 11.1 on Galaxy S5 UC browser hd

Installing Adobe Flash Player On Galaxy S5 Using Mozilla Firefox For Android


  • Download and install Mozilla firefox from the playstore link given above.
  • After installing open it and goto settings>content>plugins>enabled.
  • Now goto any flash website you will be able to view flash in Mozilla firefox on Galaxy S5 and won’t see any blue lego cube in place of plugin.
  • When you see "Tap to activate plugin", tap it to start playing flash videos online. You can also watch live videos.


Now you have learnt how to install flash player on Galaxy S5 by using two browsers. This adobe flash player installed on your phone doesn't guarantee full compatibility with all websites running flash content. But it will work with most websites and you can Play Facebook In Galaxy S.

You have successfully installed flash player 11.1 on Galaxy S5 with android 4.4 Kitkat.

How To Connect USB Storage Devices To Samsung Galaxy S5

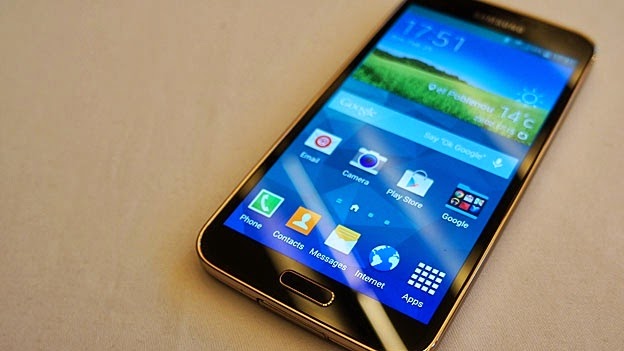
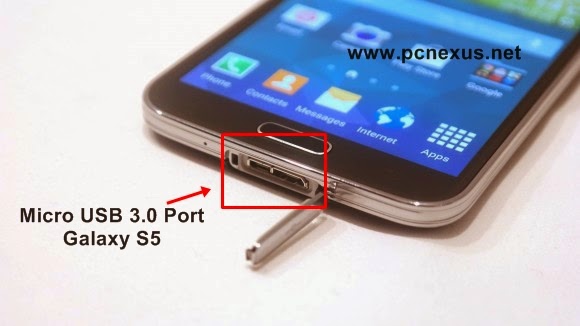
Samsung Galaxy S5 is the latest flagship smartphone in the Galaxy Series. It features a 2.5 GHz quad core krait processor, 2GB RAM, Adreno 330 GPU and 5.1 inch full HD screen. It has also got a micro USB 3.0 connector for high speed data transfer via external usb storage devices like pen drives, flash drives, external HDD etc. The Samsung Galaxy S5 has USB OTG support which means you can connect external storage devices to it with a OTG cable. Connecting flash drives or external HDD to your Galaxy S5 makes it portable to transfer data to and from the usb storage and can be carried anywhere. The Galaxy S5 has 2800mAH battery that can provide enough power to connect pendrives, flash drives, card reader, PS3 or PS4 gamepads or even external hard drives.


Also you can connect a keyboard. Using a keyboard will help you do the typing work very fast as you do it on a computer or a laptop. So there is no need to use the phone's on-screen keyboard, because typing with it is very slow. You can also play emulator games on your phone that support gamepad with keyboard used as a gamepad. Also browsing the internet with keyboard will make typing websites' names and dropping comments very fast. The keyboard, mouse and the usb flash drive require only 0.2 Ampere of current, so make sure your Galaxy S5 is charged above 60%. Enable power saving mode then use it to save more power when keyboard or other usb devices are connected.


Requirements

  • Samsung Galaxy S5 smartphone.
  • A USB OTG cable for Galaxy S5.
  • A storage device like flash drive, pen drive, external hard drive of WD or Seagate brand. Don't use unreliable brands as they can damage the battery of your phone.

Connect Pen Drives/Flash Drives/External HDD/Keyboard/Mouse/Card Reader To Galaxy S5

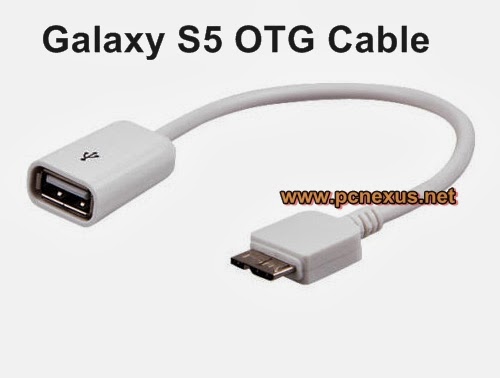
  • Buy a separate USB OTG cable specially designed for your Galaxy S5. A USB OTG cable has two connecting ends. One end fits in the phone and other end has a female USB connector in which you can connect keyboard/mouse/external HDD or flash drives. See the image below.

Galaxy S5 USB OTG cable 

  • First connect the one end of the OTG cable to your phone then connect either usb pen drive, external HDD, keyboard or a mouse.
  • On connecting any of the above mentioned usb devices you will get a notification on your smartphone.
  • When keyboard is connected then you can use your smartphone as a computer to edit and create Microsoft office documents much faster as compared to using the on-screen/software touch keyboard.
  • Connect a USB flash drive/pen drive/zip drive/external HDD to directly view the files stored in it and copy data from the flash drive or copy files in it. You can directly watch movies on your Galaxy S5 by connecting a usb drive by using OTG cable. No matter what the format of the movie. The Galaxy S5 supports all the major formats like MP4, MKV, AVI, MPEG.
  • Before removing the flash drive from the OTG cable go to 'Settings>Storage>Unmount USB OTG'. Then remove the flash drive after unmounting.

Advantages

  • Directly connecting a flash drive/external HDD to your Galaxy S5 will save much time and you can directly copy data from it to your phone.
  • The Galaxy S5 can support microSD cards upto 128 GB which are very costly. So if you don't want to buy sdcards then use the OTG feature to save time and money
  • Also you can listen to music and watch movies directly from the flash drive or external hard drive.
Now you have successfully learnt to connect the usb keyboard, flash drive, external HDD, card reader and a pen drive to your Galaxy S5. Read connect USB storage to Galalxy S7 and use it as a Power bank.

How To Enter Recovery Mode In Samsung Galaxy S5

Samsung Galaxy S5 is the latest flagship device in Galaxy series. It features android 4.4.2 kitkat and a 2.5 GHz quad core krait processor which makes it blazing fast when it comes to play games and run apps or  even do multitasking. This tutorial will teach you how to enter recovery mode in Galaxy S5. Entering recovery mode is necessary if you want to factory reset the phone, hard reset Galaxy S5, clear dalvik cache or erase entire data stored on the phone. Suppose if you have forgotten the unlock pattern or code on your Galaxy S5 and also you don’t remember the Google account password then you can unlock your device by hard reset in Recovery Mode.


Enter Recovery Mode On Galaxy S5

  • Switch off your phone.
  • Now press Volume Up, Home button and the Power button at the same time for few seconds.
  • When you see Recovery Mode release the buttons.
  • Now you have successfully entered the Recovery Mode in Galaxy S5.
  • Now you can factory reset, hard reset, clear dalvik cache and wipe data on your phone.
  • Also you can install updates with this method.
The tutorial can be applied on any model of Galaxy S5 including the following.

  • G900F/SM-G900H - for Europe
  • SM-G900I : Asia
  • SM-G900K/G900L/G900S: for Korea
  • SM-G900M: Vodafone
  • SM-G900A: AT&T
  • SM-G900T: T-Mobile
  • SM-G900V:  Verizon
  • SM-G900R4: US Cellular
  • SM-G900P: Sprint
The stock recovery has limited functions and if you want to add more functions then use custom recovery like TWRP or CWM (ClockWork Mod). The custom recovery gives you more functions then stock recovery and you can utilize your android phone in much better way.

How To Install Flash Player On Moto X

Motorola Moto X is the first smartphone with android 4.4.2 kitkat launched by Google. This android 4.4.2 smartphone is running the original android 4.4.2 kitkat OS. In this tutorial I will teach you to install adobe flash player 11.1 on Moto X.


Note : Before doing anything enable "Unknown Sources" on your phone otherwise you won't be able to install flash player apk. To do this goto Settings>Security>Unknown Sources check it.

This tutorial will teach you to install flash player on Moto X. Before installation download the following files below.

Install Flash Player On Moto x

  • Adobe flash player 11 android 4.4.2 kitkat Moto X apk download
  • Adobe flash player 11.1 android 4.4.2 kitkat Moto X apk download
  • Mozilla firefox for android download
  • UC browser HD for android download
Note: I have given 2 links for flash player apk files so, download any apk which you want. If one doesn't work then download the other. We will cover the topic of flash player installation on your phone by using Mozilla firefox and UC browser HD. So lets start with UC browser.

Note : Moto X default android browser doesn't support flash plugin. So you will see a missing plugin like a blue box in place of flash content.

Installing Adobe Flash Player On Moto X Using UC Browser HD For Android

  • Download and install UC browser HD from above link. If installation is blocked then go to Settings>Security>check Unknown Sources.
  • Install adobe flash player for Moto x.
  • Now open UC browser HD and click the menu button next to search button on top right and choose 'Settings'.
  • Now choose 'Advanced Settings' and click 'Flash Plug-in' then choose 'Auto'.

  • Now go to Youtube.If mobile version opens then open it in desktop mode then click any video on youtube.You will see that video will play in the browser itself and not in the youtube android app.

flash player 11.1 on Moto x UC browser hd

Installing Adobe Flash Player On Moto X Using Mozilla Firefox For Android


  • Download and install Mozilla firefox from the playstore link given above.
  • After installing open it and goto settings>content>plugins>enabled.
  • Now goto any flash website you will be able to view flash in Mozilla firefox on Moto x and won’t see any blue lego cube in place of plugin.


Now you have learnt how to install flash player on Moto X by using two browsers. This adobe flash player installed on your phone doesn't guarantee full compatibility with all websites running flash content. But it will work with most websites.

You have successfully installed flash player 11.1 on Moto X with android 4.4 Kitkat.

How To Use Motorola Migrate To Transfer Data From Old Android Phone To Moto G

Motorola Moto G is an exceptional android smartphone that runs the latest kitkat 4.4.2 OS. This phone is best ever android smartphone manufactured by Motorola Mobility. The best thing about this phone is its hardware specifications which can be availed at an affordable price of $200 dollars. Many people are buying this phone due to specs and awesome price. Noticeable features are a quad core cpu and HD display of 323ppi density which is very sharp and bright. If you have recently bought this phone then you may be willing to migrate your data from your old android phone to new Moto G. With Motorola Migrate app you can migrate all your photos, videos, text messages, call history, volume and screen brightness settings and SIM contacts from old smartphone to your new Moto G. I am going to teach you how you can do this.

Transfer Photos, Videos, SMS, Call Logs From Old Android Smartphone To Moto G

  • Download and install Motorola Migrate app on old android smartphone.
  • Download and install QR scanner on your old phone.
  • On your old android phone launch the app and tap Start.
  • Then choose ‘Android’ and tap ‘Next’.
  • On next step restore your stuff. Check all the options like music, videos, photos, messages, call history and settings. Then tap ‘Next’.

motorola migrate on moto g

  • Now in next step you have to pair the smartphones.
  • Open Motorola Migrate on Moto G it will show a QR code.


  • Scan this QR with QR scanner on your old phone.
  • Pairing will be automatically done.
  • It will take 10 minutes to migrate 2GB of data. So have patience till all of the data is migrated.
Now you have successfully migrated your data from old android phone to new Motorola Moto G with Motorola Migrate App.

DeepCool IceDisk 2 HDD Cooler Review

DeepCool IceDisk 2 is a cooler for desktop hard drives. The DeepCool icedisk 2 is compatible with all 3.5 inch desktop hard disks. This HDD cooler has two 60mm fans to cool down the data storage. It cools the hard drives efficiently to prevent overheating. It fits below the hard disks and throw a jet of cool air which keeps the storage device cool. In this tutorial I will teach you how to install DeepCool IceDisk 2 on your computer’s hard drive.

Build Quality

The body of this cooler is made of aluminium metal in which two 60mm fans are fixed. The fans has a single molex power connector which require 12V DC and can be directly connected to female molex connector of the power supply unit. There is no specific noise coming from fans.

deepcool icedisk 2 molex connector

deepcool icedisk 2 hdd cooler

Steps To Take Before Installing DeepCool IceDisk 2

Before installing this cooler monitor the hard drive temperature with a software program Speccy.

Download Speccy


Now after installing the IceDisk cooler you will notice drop in HDD temperature.

How To Install DeepCool IceDisk 2 HDD Cooler

Warning:
This tutorial will include opening the ATX computer’s cabinet and disassembling the hard drive. If you know how to install computer components and make motherboard connections then you can easily do this. If you are not aware of these things then take someone’s help who know about it.

  • Open the ATX computer cabinet and look for the hard disk.
  • Disconnect the Sata power connector and data connector. Do not touch the hard disk circuit board.
  • After removing the HDD from cabinet put it at a safe place.
  • Now at the bottom of the hard drive you will see 4 screw holes. See the image below.


  • Place the DeepCool IceDisk 2 above these screw holes and secure it with 4 screws that came with it. The screws will attach the cooler to the hard disk.
  • After installing the IceDisk your storage device will look as follows.

deepcool icedisk 2 fixed on a hard drive

  • Now re-install the hard drive in computer’s cabinet and make sure that the fans should face downwards.
  • Connect the power connector and data connector of the hard drive and connect the fan power cable with power supply molex connector.
  • Close the cabinet and start the PC.

Hard Drive Temperature After Installing DeepCool IceDisk 2 HDD Cooler
Before installing this fan the normal temperature of hard disk was 38 degree celcius but after installing the idle temperature was only 36 degree celcius. This is a 2 degree celcius drop in temperature. The hard drive that has low temperature has a longer life. But after playing games the HDD temperature rose to 37 degree celcius which is just 1 degree lower than actual temperature. So this cooler is not doing any miracles. Its a waste of money

DeepCool IceDisk 2 HDD Cooler: Cons

  • There is only one problem with this cooler that it will catch dust overtime and also spread it in the bottom of the drive. This problem exists with every cooling fan, you have to clean the HDD on a monthly basis for a dust free operation.
  • It creates strong vibration in the hard drive which will reduce its life overtime. This product will damage the hard drive in long run. 

This is Not A Worth Product
This product is a waste of money because it is creating strong vibrations in the hard drive and that can be felt in the wooden desktop table. Instead of using this install two 120mm fans in the computer cabinet one at front and one at the rear end to maintain airflow.

Install Windows 7 Service Pack 1 [SP1] Without Failure

Windows 7 Service Pack 1 is a Windows update released by Microsoft in 2011. This update is meant for enhanced system stability and security as it. It is a large collection of essential updates and is available for both x86/32bit and x64/64bit Windows 7 Operating Systems. There is a need to install the Windows 7 service pack 1 to get future security updates and to install Softwares that require SP1 like internet explorer 11. Soon Microsoft is bringing the free Windows 8 upgrade version specially for Windows 7 users and that may require the service pack 1 update installed on your PC. If you haven’t installed the update yet then your PC is not secure from latest security risks and viruses.
windows 7 sp1

  • In this tutorial I am going to teach you how you can install the Windows 7 SP1 on your 64bit computer without failure. In 64-bit systems the service pack 1 update sometimes fails after a long time of installation. This happens due to the non-working Windows update service. Because of it the system can not install new updates.
  • Recently I tried to install the Service Pack 1 update on a 64-bit PC but it was not successful and failed after 5 hours of installation giving a message windows 7 SP1 failure configuring service pack “Failure configuring service pack. Reverting changes” and getting an Error 0x800f0826 windows 7. It wasted my 5 hours. However the update procedure should not take more than 1 hour 30 minutes to install completely. It will take 1 hour to install on PC and another half hour to configure updates before and after system restart.
  • In this case the SP1 update took 4 hours to configure which was due to Windows update agent failure, because it was not running to handle updates. While configuring the updates, the progress rose to 9% then got stuck for 1 hour then moved to 12% and stuck for another half hour then finally rose to 14% and after 10 minutes the system restarted. This process was repeated further two times indicating a failure and wasted a total of 5 hours. The system was restored to its previous state automatically.
  • Finally I found a solution to this problem in which the Service pack 1 update gets stuck at some percent and would not go further. After following the right procedure I finally managed to install the Windows 7 SP1 within one and half hour. This tutorial can be applied when Windows 7 SP1 fails to install.

→ Steps To Take Before Installing Windows 7 Service Pack 1

Step 1: Download Windows 7 Service Pack 1 For 64 Bit Computers

The best way to update Windows 7 64-bit with SP1 is to download the full package from Microsoft Downloads Center. The package for x64/64-bit PCs is about 903 MB in size and takes about one hour and 30 minutes to install successfully without failure.

Download Windows 7 Service Pack 1/SP1 64bit

After downloading the package put the file either in D:\ or E:\ drive instead of putting it in the OS drive. Now follow the instructions step by step.

Step 2: Fix Windows Update Service

The main reason why the Service Pack 1 update fails is that the Windows update agent is not running on your PC. Go to ‘Control Panel>Windows Update’ click ‘Check for updates’. If you get a message "Windows can not check for updates because the service is not running" then you have to restart your computer. If you see this message then the update agent is not running. To fix this issue follow the steps below.

  • Restart your computer.
  • Go to “C:\Windows\SoftwareDistribution”.
  • Rename this folder to “SoftwareDistributionOLD”.
  • Now press “Windows key+R” and type ‘services.msc’ without quotes.
  • Find ‘Windows Update’ here. Right click on it and select ‘Stop’. Again right click on it and select ‘Start’.
fixing windows update service agent

  • Now restart your computer.
  • After the restart, connect your computer to internet and open Windows update. Click check for updates. If it shows you important and optional updates then you have fixed the problem.


Step 3: Install Few Security Updates Via Windows Update

Now the update agent is working, so you have to install some updates to get the job done. Skipping this step is unnecessary. You do not have to install all the updates. Just 10-20 minor updates will be okay.

  • Open Windows Update and click “? Important updates are available”.

  • A list of all updates will open. Uncheck all the updates by clicking the check box two times next to ‘Name’ on top.
  • Now select only those updates having size in KBs and having size of fewer MBs like 1-3 MB.
  • After selecting the updates click OK then click ‘Install updates’.
  • Let them finish. After downloading the updates, restart your computer. 
  • Let Windows configure the updates.

Step 4: Download And Install Important Updates

Before installing Windows 7 Service Pack 1/SP1 you need three important updates that will increase the chances of SP1 installation without failure. You can download these important updates from Microsoft Downloads Center. Click the links below to download.

Download and install all the updates. Each update requires restart so that you can install the others. Restart the computer every time you install one of these updates, otherwise they won’t install.

Step 5: Run A Full Virus/Malware Scan On Your PC

Before installing the SP1 make sure to scan your PC for virus, malware and spywares. Keep your antivirus program up to date and then run a full system scan. Use Malwarebytes anti malware to scan the computer for malware.

Step 6: Uninstall Antivirus Software

Before uninstalling the antivirus software disconnect your PC from the internet. Uninstalling the antivirus software is required because it can prevent the installation of Windows 7 SP1. After SP1 update you can re-install the antivirus software.

Step 7: Turn Off Windows Firewall

In control panel turn off windows firewall for both Home and Public networks. Windows Firewall can also prevent SP1 installation.

Step 8: Clear Temporary Internet Files

Clear the temporary internet and cache files. Press Windows+R keys and type "%temp%". Select all files and delete them. Empty the recycle bin. A more easy way is use to use ccleaner, that will clean entire unwanted cache files.

Final Step

Now you are all set to install Windows 7 Service Pack 1/SP1 on Windows 7 64-bit computers. Just double click the SP1 update file that you had saved in either D:\ or E:\ drive. Double click the file and follow the instructions to install it. During installation the progress bar will get stuck in between for about 40 minutes, but don’t worry it will take time around 1 hour before restarting your system. After the first automatic restart, Windows 7 will take 30 minutes to configure the Service Pack 1. After the procedure is complete you can login to your PC and your computer has been updated to Windows 7 Service Pack 1 without failure and fixed the Error 0x800f0826.

Upgrade To Windows 10 Pro For Free

After installing the service pack 1 for Windows 7 you are now eligible to get the free Windows 10 upgrade. You can get your free copy of genuine Windows 10 Pro if you use assistive technology. The upgrade is only available till December 31, 2017. So, don't wait and start the upgrade now. Windows 10 is secure and gets updated automatically, you can also run Microsoft store apps on it. Read how to upgrade to Windows 10 free.

Guide: How To Root Nokia X+ Android Phone

Nokia X+ is an android smartphone that runs the highly modified android jellybean OS. The modified software is known as Nokia X Software Platform. It is a mid range android smartphone that does not give the look and feel of android OS. It can be said a Nokia phone that can run android apps because it does not have any of the Google apps like Gmail, YouTube and Play Store app. In this tutorial I will teach you the easiest way to root Nokia X+ without using the computer.

Steps To Follow Before Rooting Nokia X+

  • Backup apps installed on your phone. See this tutorial.
  • Backup SMS messages with SMS Backup & Restore.
  • Backup contacts to SIM card.
Files You Need To Download

Root Nokia X+ Android Phone

  • Download all the files given above to your phone.
  • Open Astro File Manager and locate the Framaroot 1.9.1 apk on your phone.
  • Tap the Framaroot apk. Now select 'Gandalf' as the root exploit.
 
root nokia x+

  • After this a message will appear, stating that Superuser and su binary installed, you have to reboot your device.
  • After rebooting your phone will have root access which means it is successfully rooted.
  • Now you can install custom roms or apps that require root access.
You have successfully rooted the Nokia X+ android phone. If you feel any problem then do reply with comments. If you liked the article then take 2 minutes to share it.

Update Galaxy Note 2 N7100 To Official Android 4.3 Jellybean

Samsung Galaxy Note 2 N7100 has received an android 4.3 jellybean update named as XXUENC3. This update comes with bug fixes, overheating issues fixed in note 2 and wi-fi bug fixes and improved gaming performance. You can update your note 2 by using Samsung KIES or OTA by using your smartphone itself. But if you haven't received the update then do not worry because you can manually update your note 2 n7100 to official android 4.3 jellybean by using odin.

note 2 n7100 android 4.3 jellybean

Note: This is an official update so, after flashing the rom your note 2 will lose root access. If you have installed custom roms like paranoid android, AOKP or CM10 then they will be replaced with the official rom and also the custom recovery will be replaced with stock recovery only if you are using KIES.

Pre-Requisites
Before you install android 4.3 jellybean on your galaxy note 2 you should backup the entire data stored on your phone like sms messages, calls, contacts and whatsapp database etc.We can’t held responsible for whatever that goes wrong with your device. If you do not want to update your galaxy note 2 manually then use Samsung KIES if your device is running stock Samsung android firmware and is not rooted. You decide whether you want to apply this tutorial or not, but if your device is rooted and is running a custom firmware then you won’t be able to update your galaxy note via KIES and you are only left with manually updating the device. So do it at your own risk.

  • Use SMSBackupAndRestore to backup sms messages on sd card.
  • Backup contacts on sd card otherwise they will be lost.
  • Backup android apps apk by using android assistant. See this tutorial.
  • Before flashing the galaxy note 2 remove sd card from the phone.
  • Backup Whatsapp Database to your pc. The chat database can be found in "Whatsapp>Databases".
This tutorial is meant to be applied on galaxy note 2 n7100 model and should not be applied on other models otherwise the device may get bricked.

Tools You Need

  • ODIN 3.0.7 for windows. Download Here.
  • Samsung USB drivers for galaxy note 2. Get it Here.
  • Official Android 4.3 Jellybean ROM for galaxy note 2. For Netherlands Download it Here. And for Switzerland Download Here.
  • A USB cable.

Update Galaxy Note 2 N7100 To Official Android 4.3 Jellybean XXUENC3 OS
Now you have successfully backed up all the data stored on your phone and are ready to flash the device with official Samsung ROM. Follow the instructions step by step to successfully update the galaxy note 2 to android 4.3 jellybean.

  • Download and install Samsung USB drivers from above link. If you already did this then skip this step.
  • Download the official jellybean rom from above link and extract it on your computer’s desktop.
  • Enable USB debugging on your galaxy note 2 by going to "Settings > Applications > Development > USB debugging".
  • Now open ODIN on your windows pc but do not connect the device to pc yet.
  • Switch off your note 2 and start it in download mode by pressing the volume down, power key and home button at same time for few seconds.


  • The device will reboot in download mode showing you the warning of installing a custom rom.Connect your galaxy note to pc now with a usb cable and press the volume up button.You will see that "ID:COM" field in ODIN will turn blue and it will return a message "<ID:0/011> Added!!".
  • Only the "Auto Reboot","F. Reset Time" and the "PDA" options should be checked and rest of the options should remain unchecked.See the screenshot below.


  • Now your galaxy note 2 is ready to be flashed with the latest official android 4.3 jellybean.
  • Now click “PDA” but make sure to check the box in front of it and browse the jellybean ROM file and select it.
  • Now Click “Start” to begin the flashing process. It will take few minutes to update the jellybean OS and the old stock ROM will be replaced by the latest one.
  • After the flashing process ODIN will show you message “Pass” which means that your galaxy note 2 has been successfully updated to android 4.3 jellybean XXUENC3 firmware.
  • You can disconnect your device and reboot it to experience the android 4.3 jellybean OS.
Problems Arising After Updating Galaxy Note 2 N7100 To 4.3 Jellybean
After updating the device your device may not reboot properly or may hang in a continuous boot loop or may just stuck up on the Samsung splash screen. To solve this problem you need to factory reset your galaxy note 2 to clear the older entries in the EFS folder.The procedure is given below step by step.

  • If your phone is frozen or hanged permanently then remove the battery then again re-install (battery) it.
  • Now reboot the device in recovery mode by pressing the home button, volume up and power key at the same time for few seconds.

note 2 recovery mode

  • You can move up and down by pressing volume up and down buttons.Now select "wipe data/factory reset".
  • The device will be wiped and factory reset. Then go back and select "wipe cache partition".
  • After wiping cache partition go back and select "reboot system now".
  • Now your galaxy note will work perfectly.
Now you have successfully installed the official android 4.3 jellybean OS on your galaxy note 2 N7100.

Manually Update AT&T Moto X To Stock Android 4.4.2 Firmware

Recently AT&T pushed out an official android 4.4.2 kitkat update for the Moto X phone. AT&T Moto X users have already received the update notification that automatically updates the device to android 4.4.2. But if you haven't received the update notification on your Moto X then you can manually update it to android 4.4.2. The new update comes with several bug fixes and software enhancements. The latest AT&T Moto X update is 165.44.1.ghost_att.ATT.en.US.

at&t moto x android 4.4.2 update

What's New In Android 4.4.2 For AT&T Moto X

  • Printing documents and pictures: Added support for printing photos, Google Docs, GMail messages, and other content via Wi-Fi, Bluetooth and hosted services like Google Cloud Print and HP ePrinters.
  • Improved battery life: Fixed bugs which caused a small number of users to experience shorter battery life after upgrading to Android 4.4.
  • Fixed email sync delays: Fixed a bug that could cause email services like Microsoft Exchange to experience intermittent delays in data synchronization.
  • International roaming fix: Fixed a bug that caused data connectivity issues for AT&T Moto X users while traveling outside the US.
Warning: After updating your Moto X you can't downgrade it.


Update AT&T Moto X To Stock Android 4.4.2 Firmware

  • Select the Settings icon in the apps menu.
  • Choose "About phone".
  • Now select "System updates".
  • Select "Download". After the software is downloaded, select "Install".
  • After the update is installed, your phone will reboot automatically.
  • Your phone is now updated to 165.44.1.ghost_att.ATT.en.US android 4.4.2 kitkat.

Send Encrypted Messages In Whatsapp For Android

Whatsapp is the number 1 messaging app today used by almost every smartphone user. Due to increasing popularity of Whatsapp more security risks are arising. The latest security flaw in Whatsapp is that your chat history is not safe. The chat history is saved in form a database that resides on the sdcard or the phones internal storage. This chat database is vulnerable to rogue apps that secretly access the sdcard files and upload them on a web server. These rogue apps can reveal your entire chat history to hackers. However we can't stop using Whatsapp today because it is the fast and convenient way to send and receive messages.

encrypted messages in whatsapp

If you are concerned with your chat history security then there is way with which you can secure your chat history to a extent that will assure that your private chats would not be revealed to someone. The way is to encrypt Whatsapp messages. Encrypting all Whatsapp messages is a bit annoying task but if you want to share something secret in chats then this trick will be useful to you.

Send Encrypted Messages In Whatsapp

  • Download and install zoner antivirus for android here.
  • Open Zoner antivirus and tap 'Secure Message'.
  • Enter the 'Encryption Key'.
  • Then type your desired message in the 'Message Text'.
  • Then tap 'Send via' and choose 'Whatsapp'.
  • Tap the friend with which you want to share the encrypted message.
  • The encrypted message will be sent in form of a hyperlink.
Decrypt The Encrypted Message In Whatsapp


  • Now your friend should also have installed the zoner antivirus app on his android phone to decrypt the message.
  • To decrypt the message just tap on the encrypted message link, a list of supported apps will open. Choose 'Zoner Antivirus Free'.
  • Enter the 'Decrytion Key' and tap 'Decrypt' to see the original message.
  • To reply with an encrypted in Whatsapp click 'Reply' then repeat the encryption process above.
Now Read

Play WWF Wrestlemania Arcade Game On Android Phones

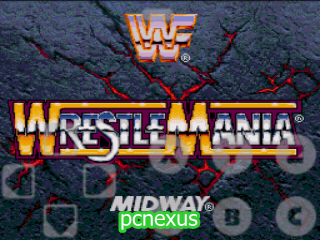
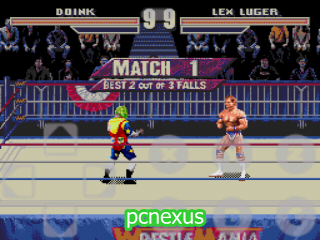
WWF Wrestlemania Arcade Game is a professional wrestling arcade game developed by Midway in 1995. This is the first most popular WWE game for promoting WWF. The game features 8 WWF superstars as characters including Bret Hart, Shawn Michaels, Undertaker, Bam Bam Bigelow, Lex Lugar, Doink the clown, Yokozuna and Razor Ramon. In this game commentary is done by Vince McMahon and Jerry Lawler.

The game features two modes that is 'Intercontinental Championship' and 'WWF Championship'. In this tutorial I will teach you how you can play WWF Wrestlemania arcade on your android phone. I am using Samsung Galaxy Exhilarate and Galaxy Y S5360. I will play wwe android games for samsung galaxy y.

Downloads

  • SNESOID snes android emulator Download
  • FPSE playstation (ps1/psx) android emulator and SCPH1001.bin Download
  • GENSOID sega genesis android emulator Download
  • WWF Wrestlemania Arcade ROMs

    You can buy FPse from Google play store and can download Gensoid and Snesoid from Google.
  • You can download any one emulator and any one ROM. It your choice whether you want to download all emulators and roms. The SNES version lacks two characters. For good graphics either download Gensoid or FPSE emulator.
  • Make a folder named as 'wwe android games' on your android phone's sdcard and put all the rom files in this folder.
Play WWF Wrestlemania Arcade Game On Android With SNESOID Emulator

  • Download and install the emulator apk file.
  • Now open snesoid and tap the blue sd card icon on top left. Now move to “wwe android games” folder. Open the game with .smc extension.
  • Now game will run and you will see buttons and a 4 axis controller. Now you have to make appropriate settings for snesoid to play snes games efficiently.
  • For setting up snesoid check this tutorial.
Play WWF Wrestlemania Arcade Game On Android With GENSOID Emulator

  • Install the gensoid.apk.
  • Now open gensoid and click the blue sd card icon on top left. Now move to “wwe android games” folder. Open the game.
  • Now game will run and you will see buttons and a 4 axis controller. 
  • Now you have to make appropriate settings for gensoid to play sega genesis games efficiently. Check this tutorial.
wwe android games   wwf wrestlemania arcade android
Play WWF Wrestlemania Arcade Game On Android With FPSE Emulator
 
  • Download all the files from  the links provided to you that is the FPSE emulator, SCPH1001 file and rom.
  • Install FPSE emulator apk on your android phone and copy the rom and SCPH1001.BIN file in 'wwe android game' folder. If your phone doesn’t allow it then goto Settings>Applications>Unknown sources and check it then again install FPse. This time it will install.
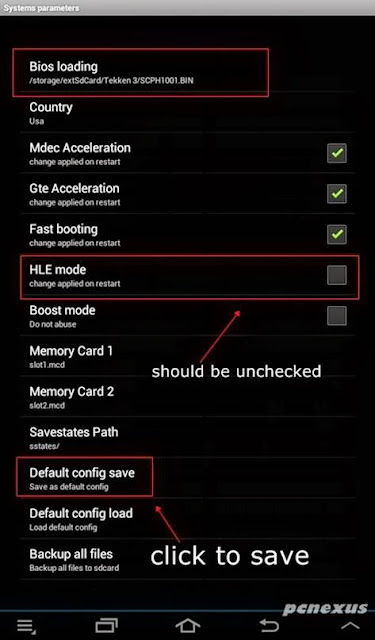
  • Now open FPSE your sd card’s files will open in it like a file explorer. Click your phone’s menu button and move to settings>SYSTEM>Bios loading>sdcard>SCPH1001.BIN. Now you have set the bios settings for FPSE without setting SCPH1001.BIN it won’t run. Uncheck the 'HLE mode' and click 'Default config save' to save bios settings.


  • Now tap menu button of your phone and choose 'Quit', then tap 'Restart'. This step is necessary because if you do not restart fpse then bios settings would not take effect and you can not save or load games without bios setup.
  • Now you have to load the game. FPSE will ask you to load an game iso or binary file which has a file format of (.bin). When you load the game file game will start playing. But you will see only the game running with no controls on screen.
  • To play the game fully you have to make optimal settings for FPSE emulator for android.For FPSE settings check this tutorial.
wwf wrestlemania fpse android  

Now you have learnt to play wwf wrestlemania arcade game on android by using fpse, gensoid and snesoid.

Convert Microsoft Word Doc To PDF With Google Chrome

There are many tools available online that can convert word doc to pdf for free. These are known as free doc to pdf converter, that are some softwares that can do the docx to pdf conversion. But most of these are spammy software and does not work properly to carry out the conversion. In this tutorial I will teach you how you can convert Microsoft office word document to pdf files without using a special converter. I will only use Microsoft office 2007 and Google chrome browser to convert word doc to pdf files. Converting word documents into pdf is required to ensure safety and prevent editing the file contains, in a word file any one can make changes while in a pdf file changing the information is not that easy. So if you are converting these files then you will find this tutorial helpful.

Convert Word (docx) To PDF With Google Chrome

  • Open the word file in office 2007 or whatever version you have.
  • Click file and select ‘Save As’. Choose ‘Other Formats’. The ‘Save As’ dialog box will open.
  • In ‘Save as type’ choose ‘Web Page, Filtered’ and click ‘Save’. Save it on desktop for convenience.
  • You will see a browser file with the same name as that of your word file. Now double click to open this file in Google chrome.
  • You will see that your word doc file is opened exactly same as in Microsoft office.
  • Now in chrome browser press ‘CTRL+P’. The print dialog will open.
  • Click the “Change” button and another dialog box opens.

doc to pdf converter in google chrome
  • Select “save as PDF” and then click 'Save' on top. Save the file where you want.
Now you have successfully converted word documents (doc and docx) into pdf files by using Google chrome browser and Microsoft Ofiice only.

Advantages

  • The conversion is free and you do not need to download any extra software as Microsoft Office and Google chrome browser are basically present in every computer.
  • You can take the print outs of the converted file immediately and can even save it as a soft copy for later use.
  • There are no formatting errors during file conversion.

If you liked the article please share it.