This Domain Name Is Up for Sale
Contact Us

Whatsapp Trick : Recover Messages From A Deleted Whatsapp Account

Whatsapp is a popular text message and media sharing app available for smartphones. Whatsapp creates a chat history backup on a daily basis and stores all the chats/messages in the database called “msgstore.db.crypt” on android phones. This “msgstore.db.crypt” stores all the chats and messages that you have done with your Whatsapp contacts. This database can be found in “sdcard>Whatsapp>Databases”. If you have this database then you can restore your deleted messages in Whatsapp. Check this tutorial to restore your deleted Whatsapp messages.

The “msgstore.db.crypt” chat database is the only way to restore your deleted Whatsapp messages. But what if you have accidently deleted this database. This chat history database will be deleted if you delete your Whatsapp account or you manually deleted it or the conversation backup is never done. Suppose if you deleted your Whatsapp account accidently then this is sure that the chat history backup file will also be deleted.

But don’t worry there is still an option that will let you restore your Whatsapp account with all deleted messages. I am trying to say that I will tell you a trick through which you can get back this “msgstore.db.crypt” database file. After getting this file back you can easily restore your Whatsapp messages. This tutorial applies to android, blackberry, iOS and Windows phone.

Recover Messages From A Deleted Whatsapp Account

Note: This tutorial will only work for phones running android 2.3 Gingerbread. Mass storage mode is removed from android 4.0 and above. So in this case you can store WhatsApp chats to Google Drive which is a good option if you don't want to lose your chats anymore. Also in case of a theft you can restore the chats on a new phone without the msgstore.db.crypt.

Your phone is using a SD card or internal mass storage in which Whatsapp stores its chat history and media files. So if after the chat history is deleted do not copy anything in the SD card or internal mass storage. After deletion the database file still resides in the storage, if you copy any file in the storage then the deleted file will be overwritten and can’t be recovered. So if the message backup file is deleted then do not copy other files to SD card, do not use camera to click pictures because this will also overwrite the file. Now follow the steps below.
  • Uninstall Whatsapp.
  • Download and install Recuva for Windows from here.
  • Connect the SD card to PC by using a card reader or SDHC adapter for micro sd on laptops.
  • Now right click on the SD card in ‘My Computer’ and choose ‘scan for deleted files’. Let Recuva to scan for deleted files.

  • After scan is complete recuva will show all the list of deleted files on sdcard. A green circle in Recuva means that file can be recovered.
Recover deleted whatsapp chat history
  • In recuva you need to find the file “msgstore.db.crypt”. Put a check mark on it.
  • Click ‘Recover’ on the bottom right and choose ‘Desktop’.
  • The file will be recovered to the desktop.
  • Now copy this file in “sdcard>Whatsapp>Databases”.
  • Now insert the SD card in the smartphone.
  • Re-install Whatsapp on your android smartphone. In application settings clear Whatsapp data.
  • Now open Whatsapp. Tap “Agree and continue”. Then enter your phone number.
  • In the next step, you will be asked to restore messages. Tap ‘Restore’ to get back all your deleted messages and chat history.

recover deleted whatsapp messages

  • Finally, enter username and tap OK. After initialization click ‘Continue’ to use the app.
You have successfully recovered deleted messages on Whatsapp after recovering the deleted chat history database in Whatsapp. Now check the following tutorials, click on below links to read the tutorials.

Automatically Optimize PC Games With NVIDIA GeForce Experience

NVIDIA GeForce Experience is a one game optimization application for NVIDIA GPUs that automatically optimizes games on Windows PC for optimal performance by downloading the pre configured settings for games according to your NVIDIA GPU. The GeForce Experience automatically tells the optimal settings for a supported game. Note that all games are not supported on NVIDIA GeForce Experience. The GeForce Experience automatically scans your PC for supported games and creates a list. You just have to click the optimize button for optimal game performance which would be best for your NVIDIA GPU. Optimal settings are needed to avoid GPU overheating because running the game in full resolution and max settings may damage the GPU due to heat.

The GeForce Experience automatically applies the best settings according to your pc hardware specifications for optimal performance.

nvidia geforce experience logo

Automatically Optimize PC Games With NVIDIA GeForce Experience

  • Download and install NVIDIA GeForce Experience from here.
  • Open it and click the ‘Games’ tab. Here you will see all the games supported by GeForce Experience. I have only 3 games GTA Sanandreas, Call Of Duty Modern Warfare 3 and NFS Most Wanted 2012.
  • Click on any game on the left side to highlight its details on the right side. You will see an ‘Optimize’ button. Click to apply the optimal settings.

nvidia geforce experience game optimization


  • Then click ‘Launch Game’ to play the game with optimal settings applied by GeForce Experience.
  • You will see that after applying optimal settings the game runs very smooth and the level of detail is improved, specially the graphics.
  • Now your games are optimized. Check NVIDIA 720M gaming review.

Other Things NVIDIA GeForce Experience Can Do

1. Automatic NVIDIA Driver Update
The GeForce Experience application automatically notifies you of new driver releases from NVIDIA.

2. Auto-Optimize PC Games
GeForce Experience connects you to NVIDIA's cloud datacenter to download optimal game settings tailored  made for your PC, CPU, GPU and monitor. This means you always get the best image quality while maintaining great performance. Plus, a built-in interactive screenshot viewer tells you about each setting and its benefit. A built in interactive screenshot viewer tells where zagged lines can become smooth, improved shadows and anti-aliasing. All games are not supported.

3. Capture HD Gameplay Footage Video With Shadowplay
With shadowplay you can capture HD gameplay videos without loss of performance and can broadcast your favorite gaming moments on twitch.tv.

4. Stream PC Games To NVIDIA SHIELD Portable
With the help of GeForce Experience, the NVIDIA SHIELD gaming portable gives you the power to wirelessly access your GeForce GTX-powered computer from the comfort of your couch. Play your favorite PC games on a full-size controller with ultra-low latency thanks to SHIELD's game-speed Wi-Fi and the blazing-fast performance of GeForce GTX GPUs.

Download NVIDIA GeForce Experience 1.8.2 With New Shadowplay Features

NVIDIA GeForce Experience is a GPU utility by NVIDIA which lets you manage the GPU performance. With GeForce Experience we can auto optimize pc games for optimal performance, automatic NVIDIA drivers update, capture HD gameplay footage (videos) with Shadowplay and streaming PC games via NVIDIA shield wirelessly over Wi-Fi. The GeForce Experience 1.8.2 is available to download and this is the latest version.

Download NVIDIA GeForce Experience 1.8.2.0 here.

nvidia geforce experience logo

GeForce Experience 1.8.2.0 New Features

Bug Fixes

  • Fixes "Installation is corrupt" bug when attempting to install a new driver.
  • Fixes incorrect reporting of the PC's monitor resolution.
  • Fixes an issue where log files consume excessive disk space over time.
ShadowPlay

  • Adds option to change the directory of the ShadowPlay buffer.
  • Fixes missing audio when playing in 5.1 surround mode.
  • Adds 30 FPS recording option.
  • Adds custom bit rate control.
  • Adds output resolution control.
  • Adds microphone on push function.
GameStream

  • Improved streaming stability and quality of service.
What Does GeForce Experience Does

1. Automatic NVIDIA Driver Update
The GeForce Experience application automatically notifies you of new driver releases from NVIDIA.

2. Auto-Optimize PC Games
GeForce Experience connects you to NVIDIA's cloud datacenter to download optimal game settings tailored  made for your PC, CPU, GPU and monitor. This means you always get the best image quality while maintaining great performance. Plus, a built-in interactive screenshot viewer tells you about each setting and its benefit. A built in interactive screenshot viewer tells where zagged lines can become smooth, improved shadows and anti-aliasing. All games are not supported.

3. Capture HD Gameplay Footage Video With Shadowplay
With shadowplay you can capture HD gameplay videos without loss of performance and can broadcast your favorite gaming moments on twitch.tv.

4. Stream PC Games To NVIDIA SHIELD Portable
With the help of GeForce Experience, the NVIDIA SHIELD gaming portable gives you the power to wirelessly access your GeForce GTX-powered computer from the comfort of your couch. Play your favorite PC games on a full-size controller with ultra-low latency thanks to SHIELD's game-speed Wi-Fi and the blazing-fast performance of GeForce GTX GPUs.

NVIDIA GeForce GTX TITAN Black Edition And NVIDIA GeForce GTX 790 Specs Leaked

NVIDIA GeForce GTX TITAN Black Edition
After the release of NVIDIA's most powerful GPU the GeForce GTX 780 Ti, NVIDIA has confirmed to launch two new powerful GPU for desktop named as GeForce GTX Titan Black Edition and GeForce GTX 790.

nvidia titan black edition and gtx 790 specs leaked

The GeForce GTX TITAN Black Edition features the kepler gpu architecture the 28nm GK110 and would have the same GPU as that of the GTX 780 Ti and it will have similar performance to GTX 780 Ti, but would have double precision computing performance, more FP64 CUDA cores. The TITAN black edition also said to have 6 GB of dedicated memory which is twice more than GeForce GTX 780 Ti and has memory bus width of 384 bit. The TITAN BLACK has 2880 CUDA cores, 240 TMUs and 48 ROPs. The power requirement of Titan black is 250W which require that your desktop pc should have 600W power supply (SMPS). It will have OpenGL 4.4 and DirectX 11.2.

TITAN Black will cost around $999 dollars. NVIDIA has not confirmed the launch date but it is expected to be released in February 2014.

NVIDIA GeForce GTX 790
The new TITAN will not replace GTX 780 Ti in terms of performance and is built upon the Kepler gpu architecture 2x28 nm GK110. TITAN series are basically a bridge between Quadro and GeForce models.

GeForce GTX 790 won’t feature full GK110 cores. Instead we are expecting two 2496 CUDA-packed processors giving 4992 in total. GTX 790 will have dual 320-bit interface. The GTX 790 will have 10 GB of DDR5 memory (VRAM). GeForce GTX 790 will cost around $1000. The power requirement of GTX 790 is 300W which require that your desktop should have atleast 600W or higher power supply (SMPS). It will have OpenGL 4.4 and DirectX 11.2.

The GTX 790 is likely to be released in March 2014 with a price tag of $1000.

NVIDIA GeForce GTX TITAN Black Edition And NVIDIA GeForce GTX 790 Specs


nvidia geforce gtx titan black edition and geforce gtx 790 specifications

Update Galaxy Note 2 LTE To Official Android 4.3 Jellybean XXUEML2 OS

The LTE Samsung Galaxy Note 2 N7105 has received the official android 4.3 jellybean N7105XXUEML2 update and the device can be upgraded via Samsung KIES and OTA. The new firmware upgrade includes several bug fixes and improved performance. This tutorial will let you to manually install the latest 4.3 jellybean XXUEML2 for LTE galaxy note 2 via ODIN. This update is now officially available in Denmark and Sweden and UK.


android 4.3 jellybean note 2 update

Manual installation of jellybean OS on your galaxy note 2 N7105 is required if your phablet is already rooted or is running a custom android ROM because Samsung KIES won’t let a rooted android device to get an official android 4.3 jellybean upgrade. With this manual installation of 4.3 jellybean OS on your LTE galaxy note 2 ,the root access will be revoked which means your phablet will be unrooted and your phablet’s warranty will be restored due to stock jellybean firmware if your galaxy note 2 is still under warranty period.

Tools Needed

  • A Windows pc.
  • ODIN 3.09 for Windows.Download Link.
  • USB drivers for galaxy note 2.
  • Official galaxy note 2 android 4.3 jellybean XXUEML2 ROM. For Denmark Download here and for Sweden Download here.
  • A USB data cable.
Prerequisites
Before you start upgrading your galaxy note 2 you should read the instructions stated below very carefully, otherwise if something goes wrong with your galaxy note 2, I can’t be held liable for that. So read the instructions carefully and do not skip any step.


  • Backup entire data stored on your phone’s storage like SMS, contacts, apps, bookmarks etc.
  • Use SMSBackupAndRestore to backup sms messages on your phone’s sd card.
  • Use androzip or android assistant to backup android apps apk on sd card.
  • Enable USB debugging on your galaxy note 2 by going to “Settings>Applications>Development>USB Debugging”. If developer options is locked then tap ten times on build number to unlock it.
  • Your device will be automatically unrooted after the jellybean upgrade so you need to root it again if you want to root it.
  • If you are using Google authenticator app on your galaxy note 2 then before flashing the device disable 2-step verification on all of your Google accounts if authenticator app is the only way to get 2-step verification codes for accounts associated with that authenticator app.
  • If your galaxy note 2 is running a custom recovery like TWRP or ClockWork mode then you can make a nandroid backup of your note 2 and skip the above steps.
Update Galaxy Note 2 To Official Android 4.3 Jellybean XXUEML2 OS


  • Download ODIN from the link given above.
  • Download and install Samsung USB drivers for LTE galaxy note 2 N7105.
  • Download the galaxy note 2 official android 4.3 jellybean rom from above links and extract it on your computer’s desktop.
  • Now switch off your phone and start it in download mode by pressing home, volume down and power key buttons at the same time for few seconds.
  • You will see a custom rom warning on your galaxy note 2. Press volume up button to continue to go into ODIN mode.


  • Now open ODIN on your windows pc and connect your galaxy note 2 to pc via USB cable.
  • Wait for few seconds till ODIN recognizes your phone.
  • When your galaxy note 2 is identified by ODIN the field under <ID:COM> will turn light blue and you will see a message “<ID:0/011> Added!!”.
  • Only the “Auto Reboot”,”F. Reset Time” and the “AP” options should be checked and rest of the options should remain unchecked. See the image below.

odin galaxy note 2 lte n7105

  • Now your galaxy note 2 is ready to be flashed with jellybean firmware.
  • Click “AP” and browse the 4.3 jellybean ROM file and select it.
  • Now click “Start” to begin the flashing process. It will take few minutes to upgrade your galaxy note 2 to jellybean 4.3.
  • After the upgrade process completes ODIN will show you a message “Pass” which means your galaxy note 2 is successfully updated to android 4.3 jellybean XXUEML2 firmware.

Now you have successfully upgraded your galaxy note 2 N7105 to official android 4.3 jellybean OS. But after upgrading the device your phone may show some problems like device not starting or freezing while startup or restarts itself again and again. To solve these problems follow the steps below.


  • Remove your phone’s battery and again put it back on the phone.
  • Now reboot your galaxy note 2 N7105 into android system recovery mode by pressing the home button, volume up and power key at the same time for few seconds.

  • Move up or down by pressing the volume up or down buttons. Now move to “wipe data/factory reset”.
  • Now go back and select “wipe cache partition”.
  • After wiping the cache partition go back and select “reboot system now”.
  • Your galaxy note 2 should now work perfectly fine after factory reset.
Now you have successfully installed the official android 4.3 jellybean XXUEML2 on your Galaxy Note 2 N7105. If you liked the article please share it.

How To Install Flash Player On Galaxy Tab Pro 10.1 SM-T525

Samsung Galaxy tab pro 10.1 SM-T525 is the latest galaxy tab series launched by Samsung. It runs on android 4.4 kitkat OS. In this tutorial I will teach you to install adobe flash player on galaxy tab pro 10.1 SM-T525.

galaxy tab pro 10.1

Note : Before doing anything enable "Unknown Sources" on your galaxy tab pro 10.1 otherwise you won't be able to install flash player apk. To do this goto Settings>Security>Unknown Sources check it.

This tutorial will teach you to install flash player on samsung galaxy tab pro 10.1.

Install Flash Player On Galaxy tab pro 10.1 on Android 4.4 KitKat

  • Adobe flash player for galaxy tab pro 10.1 apk for android 4.4 kitkat download
  • Mozilla firefox for android download
  • UC browser HD for android download
  • Phony plugin for Mozilla firefox for android
We will cover the topic of flash player installation on galaxy tab pro 10.1 by using Mozilla firefox, default android browser and UC browser HD. So lets start with UC browser.

Installing Adobe Flash Player On Samsung Galaxy tab pro 10.1 Using Default Android Browser

  • Download and install flash player for android 4.2 jellybean from above link.
  • Now open default android browser and goto Settings>Advanced>Enable plug-ins>Always on.
  • Now goto youtube and open it in desktop mode by clicking the menu on top right and selecting "Desktop".

flash player galaxy tab pro 10.1 lite

  • Now when you will play any youtube video in default android browser then it will play.

Installing Adobe Flash Player On Samsung Galaxy tab pro 10.1 Using UC Browser HD For Android

  • Download and install UC browser HD from above link. If installation is blocked then goto Settings>Security>check Unknown Sources.
  • Install adobe flash player for Samsung galaxy tab pro 10.1.
  • Now open UC browser HD and click the menu button next to search button on top right and choose 'Settings'.
  • Now choose 'Advanced Settings' and click 'Flash Plug-in' then choose 'Auto'.

  • Now goto Youtube. If mobile version opens then open it in desktop mode then click any video on youtube. You will see that video will play in the browser itself and not in the youtube android app.

flash player on galaxy tab pro 10.1 UC browser hd

Installing Adobe Flash Player On Samsung Galaxy tab pro 10.1 Using Mozilla Firefox For Android


  • Download and install Mozilla firefox from the playstore link given above.
  • After installing open it and goto settings>content>plugins>enabled.
  • Now goto any flash website you will be able to view flash in Mozilla firefox on galaxy tab pro 10.1 and won’t see any blue lego cube in place of plugin.


But some websites hide their flash content from mobile devices. So if you visit such a website then you might not be able to view flash.So you need to install a firefox android addon called ‘phony’. The phony addon will trick websites that you are browsing from a pc and not from galaxy tab pro 10.1 tablet or phone. Goto Mozilla addons website and install ‘phony’. After installation relaunch Mozilla firefox.The link to install this addon is given below.

install flash player plugin galaxy note 10.1 wifi mozilla

Phony Addon Mozilla Android Download

Now you have learnt how to install flash player on galaxy tab pro 10.1 LTE SM-T525 by using two browsers. This adobe player installed on your galaxy tab pro 10.1 doesn't guarantee full compatibility with all website running flash content. But it will work with most websites.

Now check this tutorial for playing playstation games on Galaxy tab pro 10.1.

5 Proven Tips To Increase Laptop Lifespan

Laptops are compact and portable computers. Their compact design and weight make them portable computers. The need of portable computers is increasing day by day because more and more people are choosing laptops over desktops due to their portability. A laptop needs more maintenance than a desktop computer. Without proper maintenance a laptop’s internal components and motherboard can fail before its life span. Well it is difficult to say about the correct life span of any laptop, but most laptop manufacturing companies like ASUS says that an ASUS built laptop will not get any problem after using it for 3 years from the date of purchase if used and maintained properly.

Yes, we can agree with the above statement, that a laptop’s life span greatly depends on maintenance and handling. Laptop computers are fragile and more vulnerable to breaking when falling from a height accidently, in this case a laptop may become dead. So besides maintenance and proper handling a laptop needs care too.

In this tutorial I will tell you about 5 proven tips that will increase your laptop’s lifespan.

5 Proven Tips To Increase Laptop Lifespan

1. Monitor Laptop Temperature : Monitoring the laptops temperature is the essential task to maintain correct temperature. You can use a laptop temperature monitoring software like ‘Speccy’ which will monitor the temperature of CPU, GPU, motherboard and hard disk. Out of these hardware components, CPU is more vulnerable to overheating  because it performs all tasks. The more the CPU is used, more it will heat. There is a temperature range for different CPUs. For example Intel Core i3 has a maximum temperature of 100 degrees Celsius. Intel Core i3 runs hot, even the low power Intel Core i3 3217U runs at 42-43 degrees Celsius at idle. Intel core i5 and i7 run hotter when used in turbo boost mode. If your laptop has Intel core i5 or Intel core i7 then you should disable the turbo boost mode in BIOS settings to prevent overheating. Visit Intel’s website to get the temperature range of your laptop’s CPU.

speccy temperature monitor

Today most laptops are manufactured with a Ball Grid Array BGA CPU which is soldered to the motherboard. A BGA CPU can't be upgraded because it is fixed on the motherboard. If a BGA CPU burns out because of overeating then there is no chance of replacing it by yourself, but the manufacturer can fix this but require a big repair amount. Laptops having BGA CPU should be cooled properly. By monitoring the laptop’s temperature we will get right info that our laptop is not overheating while doing normal tasks.

2. Cleaning The Laptop : Cleaning the laptop regularly will ensure good performance and a better life span. Clean the laptop keys with a soft brush to remove the accumulated dust. Weekly remove the battery and clean it to remove the dust, also clean the battery cavity in laptop to remove any dust particles. By using a soft brush gently clean the corners and sides of the LCD screen, and with a cotton swab clean all the ports of your laptop. You can clean the laptop’s body with a mild cleanser that can kill the germs living on your laptop.


3. Air Flow : A laptop has two types of air vents. One is the inlet air vents and other is the outlet air vent. The inlet air vents are located on the bottom of your  laptop where the laptop takes fresh air in to cool the internal components. The outlet air vent is located on the left side of the laptop which throws the heat out generated by CPU and GPU in form of hot air. Never place a laptop on a bed or sofa because doing so will block the inlet air vents and laptop will overheat, also never use the laptop by placing it in your lap, because doing so will block both the air vents. Do not use keyboard protectors like rubber covers because they will block the air flow.

laptop air flow vents
When air is blocked then laptop lifespan will start decreasing day by day. Because the CPU, GPU and all chips on motherboard are made of Silicon that expands more on heating and contract on cooling. This rapid expansion of Silicon due to overheating causes more wear and tear in CPU, GPU and motherboard chips. Always place the laptop on a firm surface so that air can flow below the laptop. To increase the ground clearance of the laptop, you can place four bottle caps or thick cardboard pieces cut into small squares at each corner below the laptop, so that the laptop has now more space below it. This will allow more air to flow below the laptop thereby keeping it cool.

4. Use Laptop Cooling Fan : If you run heavy tasks on your laptop like video conversions or play heavy games for long hours the be ready to say good bye to your laptop. Because playing heavy games on laptop for longer time periods damage the laptop’s internal hardware components in the long run. While playing without using a laptop cooler the CPU temperature may rise upto 65 degrees Celsius, this can’t be called overheating because most CPUs (Intel Core 2 Duo)  have a maximum operating temperature of 85 degrees Celsius, but this doesn’t means that playing heavy games on laptop won’t damage it.

home built led laptop cooling fan

Playing games on laptop creates little damages that can be felt over time. After all laptops are not meant for playing games, however if you play heavy games on your laptop, then use a laptop cooler fan that will cool your machine while you game. A laptop cooler will bring down the overall CPU and GPU temperature by 5 degrees which is essential to prevent overheating .  If you use a laptop cooling fan then the CPU temperature will below 55 degrees Celsius and GPU temperature will be between 45-50 degress Celsius which is a great success. Check out the video below.


I have played games like Call of duty Modern warfare 3, NFS most wanted 2012, Far cry 3, Battlefield 3, GTA 4, Call of duty black ops 2 on my laptop while using a laptop cooling fan during gameplay and the CPU temperature remains at 52 degrees Celsius. Never play games on a laptop without using a laptop cooling fan, don’t use laptop cooling pads because they are useless. If your laptop has AMD GPU then using a cooling fan is must because AMD GPU runs hotter than NVIDIA. You can see this tutorial making your own laptop cooling fan.

Note : A laptop cooler is also of no use if the fan is not directly situated below the air vents.

5. Prevent Electric Fluctuations While Charging Battery : Electric fluctuations can cause serious damage to the capacitors on your laptop’s motherboard. The capacitors hold charge that is essential for a laptop to work. Electric fluctuations can blow these capacitors and your laptop will not turn on when this happens. Always ensure that your home’s electricity is free from fluctuations and the electric port should be grounded or earthed. Heavy electric fluctuations while charging the laptop battery can ruin the laptop within one year and that will require serious repair. Don’t charge the laptop via unearthed electric port or that have electric fluctuations.

Room Temperature Highly Affects Laptop's Temperature And Performance
Hot room temperature can dangerously overheat your laptop within minutes. I have an ASUS notebook, I once used it in a room whose temperature was more than 28 degree celcius. Within few minutes I noticed that my laptop was overheating even while browsing internet. The temperature rose to 60 degree celcius, this is pretty high for a ULV notebook. I immediately moved to an air conditioned room and used a laptop cooler fan. After few minutes the temperature came down to 40 degrees while browsing the internet. So gaming on laptops is a big no in summers or unless you are sitting in a AC room with laptop cooler.

Tips To Increase The Laptop’ Battery Life

  • Never play games on laptop’s battery power.
  • Don’t charge the battery unnecessarily. Don’t wait it to get completely exhausted.
  • Do not overcharge it as it will start leaking charge over time.
  • If you are going to store your laptop for a long time then completely charge the battery. Then remove the battery and store it separately. Also if the battery is stored for several months then do not recharge it.
  • If a laptop is stored with a completely charged battery for a long time then the battery will leak and will damaged because all its electrolytes will come out and it will be blown causing damage to laptop. Never do this.
I think I have covered the topic in detail and I am sure enough that after following above tips your laptops life span will increase and also you have minimized serious damages and hardware failure problems on your laptop by following above tips. If you have any question do reply in the comments section.

How To Install Whatsapp On Galaxy Tab 3 Lite 7.0

If you own an android smart phone then you are definitely using Whatsapp messenger. Whatsapp is a free messaging app for android with which you can send text messages and media files like images, audio files and video files. Whatsapp requires an android phone or tablet with SIM support. Also you require a working phone number to use it. Whatsapp currently doesn’t support android tablets, but in this tutorial I will teach you to install Whatsapp on galaxy tab 3 lite 7.0. Galaxy tab 3 lite 7.0 is a Wi-Fi only tablet but do not worry because this tutorial for installing Whatsapp will definitely work 100% on your galaxy tab 3 lite 7.0

whatsapp on galaxy tab 3 lite

Install Whatsapp On Galaxy Tab 3 Lite 7.0 SM-T110

  • Download and install the latest version of Whatsapp for android here.
  • Now install the app. If install is blocked enable unknown sources. Then re-install the app.
  • Now after installing the app, open it. When you open it you will see a welcome screen. Click the ‘Agree and continue’ button.
  • When you click this button a note will open stating that “tablets are currently not supported.”. Click OK to begin the setup.
  • On the next screen you need to enter your phone number and choose the right country where you lives in.
  • Enter the phone number which you use often. Do not enter your friend’s phone number.

whatsapp installation on tab 3 lite 7.0

  • After entering the phone number click OK.
  • When you click OK a popup will open asking you to verify your phone number. Click OK again.

whatsapp verification

  • Whatsapp will automatically try to send a sms to the number specified by you. But after few minutes the sms verification will fail.
  • Now you will have to verify your number via voice call. Click the ‘Call me’ button to receive a voice call on that number. Hear the 6 digit verification code carefully. Enter this code in Whatsapp to verify your phone number.


  • Now enter your name for Whatsapp profile and follow the instructions by clicking the ‘Next’ button on top right.
Now you have successfully installed Whatsapp on galaxy tab 3 lite 7.0 with no no SIM support. To add contacts in Whatsapp just save the contacts list on your tablet and refresh the list in Whatsapp. Now you will need a working data network for sending and receiving messages on Whatsapp. You can use your smart phone’s network on your tablet via Wi-Fi hotspot, see this tutorial. Now Whatsapp will work on your android tablet.

If you encounter any problem while installing Whatsapp on android tablet then feel free to ask via comments. Now check whatsapp tips and trick here.

Samsung Galaxy Tab 3 7.0 Lite Tips And Tricks

Samsung Galaxy Tab 3 Lite 7.0 SM-T110 is the wifi only version of the galaxy tab 3. This android jellybean tablet is the best in its price range as compared to other cheap tablets. This android tablet run on android 4.2 jellybean OS, has a 1 GHz dual core processor, 1 GB RAM and most of all a powerful GPU Vivante GC1000 Core which is enough for android gaming.


Now in this post I am going to write about essential tips and tricks about Samsung Galaxy tab 3 SM-T110 which will be useful to you.

Note : The tutorial is derived for galaxy tab 2 tricks but most tricks are same for tab 2 and tab 3, so some tricks may not work on your galaxy tab 3 lite.

Samsung Galaxy Tab 3 Lite 7.0 SM-T110 Tips And Tricks

1.Take Screenshots On Galaxy tab 3 SM-T110
Taking screenshots on galaxy tab tab 2 SM-T110 is very easy. To do so,just press the home button and volume up key at the same time for 2 seconds. When the screenshot is captured you will see a notification in notifications bar. Screenshots are saved in 'sdcard0>Pictures>Screenshots'.

2.Show Touches
When you enable this feature you will see that whenever you touch the screen your finger touch can be seen as a tiny white circle on the screen which specifies the point where you touch the screen. Enabling touches will help you to identify which parts of the screen you are touching. The galaxy tab 3 7.0 SM-T110 can identify 10 finger touches simultaneously. To enable this feature goto “Settings>System>Developer options>Input>Show touches”. First you have to enable the developer options by sliding the turn on switch to right. See the pic below.


3.Enable Smart Stay On Galaxy tab 3 Lite
When you enable smart stay then the tablet's screen won't off unless you stop looking at it. The front camera tracks your face and eyes to keep the screen on and the screen goes off when the front camera can't detect your eyes or face. To enable smart stay goto "Settings>Device>Display>Features>Smart stay",enable it.

4.Show Your Name On Lockscreen
Showing your name on the lock screen will let others know that you are the owner of this android tablet. To show your name on lock screen goto “Settings>Personal>Lock screen>Owner information”. Enter your name here then check the box,then click ok.


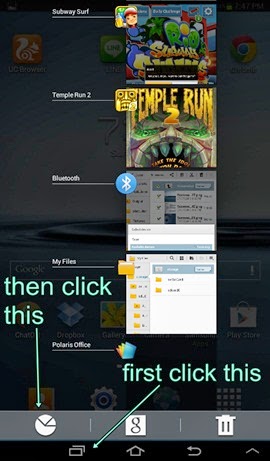
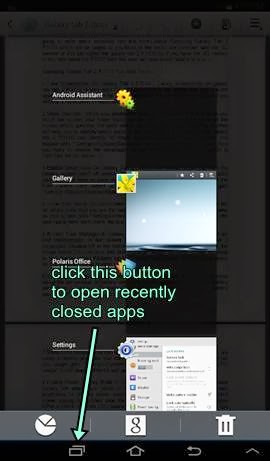
5.Access Task Manager In Galaxy tab 3 SM-T110
In galaxy tab 3 you will not find task manager in app drawer. To access task manager just click the 2 rectangles situated left to the home button then click the task manager. See the image below. You can also add task manager widget on home screen by going to app drawer,select Widgets tab,then select "Application monitor". Long press on it to add it on home screen.


6.Show Battery Percentage In Galaxy tab 3 Lite
When this feature is enabled you can easily know about the percentage of battery remaining in your galaxy tab 3. To show battery percentage goto "Settings>Display>More settings>Display battery percentage",put a check mark on it.


7.Show CPU Usage
You can enable show cpu usage to check which apps are using it heavily and later you can kill them via task manager. To enable show cpu usage goto "Settings>System>Developer options>Monitoring>Show CPU usage”. Scroll down a little bit and put a check mark on Show cpu usage.


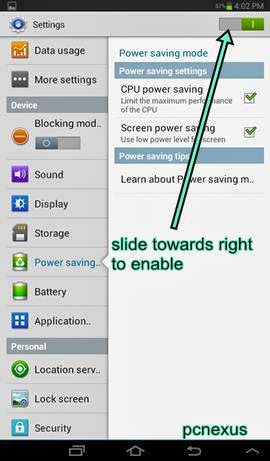
8.Enable Power Saving Mode In Galaxy tab 3
Power saving mode will save battery life when your tablet is low on battery by decreasing the screen brightness. To enable power saving mode goto “Settings>Device” and click Power saving mode. Then slide the button towards right on top right to enable it. Put a check mark on CPU power saving,when this option is enabled the cpu will run at low power and lower performance to save battery. The cpu will be undervolted. You can also enable the power saving mode in shortcuts bar in the notifications slider.See the image below.


9.Access hidden Live Wallpaper In Galaxy tab 3 SM-T110
To access hidden live wallpaper in your galaxy tab 3 goto "Settings>System>About device". Now keep clicking on Android version unless you see a red jellybean wallpaper. Now keep touching the screen on this red jellybean unless you see flying jellybeans. You can touch these jellybeans and move them anywhere you want,the kids will enjoy this. This live wallpaper can't be applied on home screen.


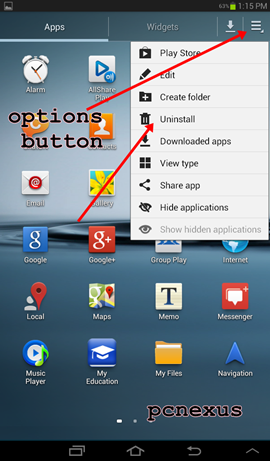
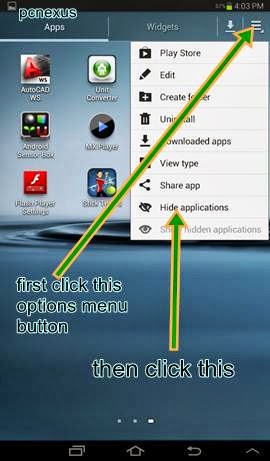
10.Quickly Uninstall Apps On Galaxy tab 3 SM-T110
To quickly uninstall apps from app drawer click the options buttons situated on right of the vertical arrow in app drawer. Then select uninstall and click the apps with red minus sign one at a time to uninstall.


11.Hide Apps On Galaxy tab 3 Lite
To hide apps simply click the options menu situated on right of vertical arrow as you did in 10th step. Then select "Hide applications". Now choose apps which you want to hide. The chosen apps will be hidden and nobody can see them. You can hide all apps by sliding the app drawer then choosing all apps on different screens. To unhide apps just click "Show hidden applications" in the same options menu.


12.See All Downloaded Apps
To see all the downloaded apps,simply click the apps button on home screen,then click the vertical arrow in app drawer to see your all downloaded apps. From the options menu button on top right you can uninstall these apps or share them via many sharing options.

13.Disable All Notifications On Galaxy tab 3 SM-T110
To disable all notifications on your tablet you need to enable the blocking mode. Simple slide down the notifications slider and click "Blocking mode". When this mode is enabled you will always see a minus sign inside a circle in the notifications which means blocking mode is enabled


14.Clear Cache And Tune Up Galaxy tab 3 Lite
Galaxy tab 3 stores more application cache which sometimes slows it. This cache should be cleared. Use android assistant app to clear the cache. First install this app then goto Tools>Clear cache>Clean all.Also use task manager to free up RAM when the tablet runs sluggish. Goto task manager then select RAM manager then click clear memory.

15.Delete Existing Google Account On Galaxy tab 3
If you no longer want to use your exisiting google account with galaxy tab 3 SM-T110 or you want to use a new google account and want to delete the old one then goto "Settings>Accounts>Google". Now tap on your google email address and click "Remove account" on top.


16.Limit Android Apps Running In Background
Android apps running in background consume more RAM. The most most times RAM is wasted by unused apps. So limited apps running in background will save RAM. To limit background apps and processes goto Settings>System>Developer options>Apps>Limit background processes>At most 4 processes. Select it.

17.Install Android Apps Apk Files On Galaxy tab 3 Lite
The galaxy tab 3 lite won't allow you to install android apps outside of google play store unless you enable unknown sources. To enable unknown sources goto "Settings>Personal>Security>Device administration>Unknown sources". Check it,now you can easily install android apps apk files which are not downloaded from google play.

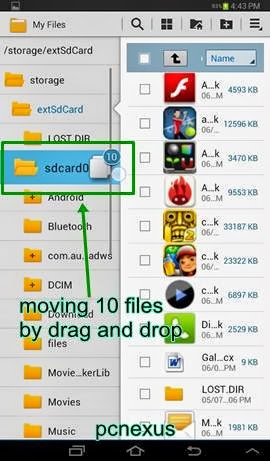
18.Move Files To Other Folders By Simple Drag And Drop
You can simply move files from one folder to other by simple drag and drop. Just select a simple file or multiple in "My Files". After selecting multiple files long press on any file to drag all of them. Now drag them to any folder you want located in left side in folder explorer. See the screenshots below in which I am moving 10   files at once to other folder through simple drag and drop.


19.Check Data Usage
To check data usage by android apps goto "Settings>Wireless and netwroks>Data usage". Here you can see data used by all the apps and which app uses the data network most.


20.Change Font Style On Galaxy tab 3
In galaxy tab 3 lite there are four fonts available. The default font,choco cooky,helvetica s and rosemary. You can make a choice out of these four. To change font style goto "Settings>Device>Display>Font>Font style>Change font". The new font style will be applied automatically. You can download more fonts from google play by clicking the button "Get fonts online".

21.Change Screen Timeout
Screen timeout means,screen goes off after a particular interval. You can set this interval by going to "Settings>Device>Display>General>Screen timeout>Choose time limit".

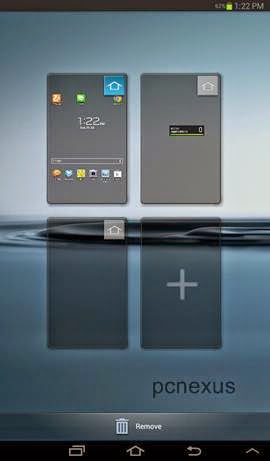
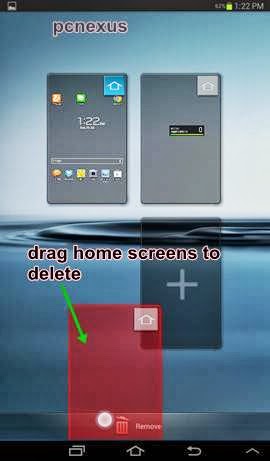
22.Add/Delete Multiple Home Screens
You can use upto 7 home screens and customize them according to your needs for quick access. To add home screens firstly press the home button. Now on home screen slide any two fingers so that bringing them close to each other. Now you will see a big plus sign with all home screens in small sizes.Click this plus sign to add more home screens. If you want to delete them just long press on any small home screen from the same menu and drag them to the delete icon that is the garbage bin icon below.


23.Add Widgets To Home Screens
To add widgets to home screen simply click "Apps" button to access the app drawer then click the 'Widgets' tab. Slide the screen towards left to see all widgets. Then long press on any widget to add it on home screen. To delete widgets simply long press the widget then drag it to the garabage bin delete icon on top right.

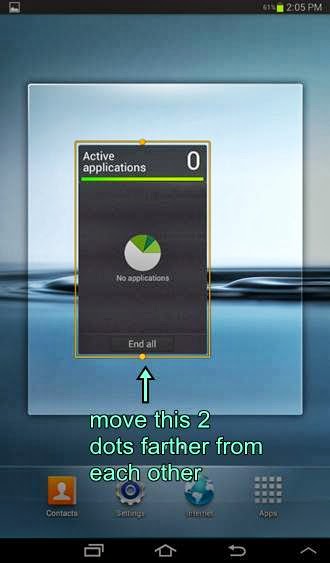
24.Resize Home Screen Widgets
Only android system widgets can be resized. Repeat the procedure to add a widget in home screen in trick 23. Then after adding it you will see that it is surrounded by a yellow rectangle with two yellow dots/circles up and down the widget. Just move these tiny dots away from each other to increase the size of the widget. Bring the dots closer to decrease the size of the widget.


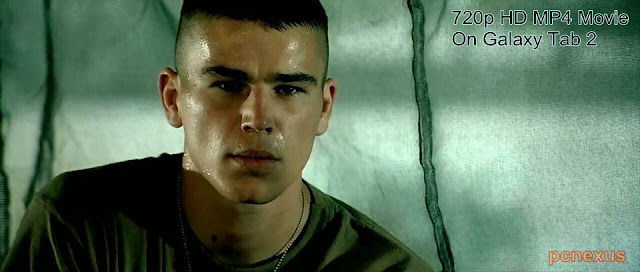
25.Play HD Videos On Galaxy tab 3 Lite
Your galaxy tab 3 lite can play HD videos at 720p and 1080p becasue it fully supports OpenGL 2.0. Just copy and paste your favourite HD movies in mp4,avi,xvid format in this tablet without converting their format and enjoy a mini home theatre system on this galaxy tab 3. Use earphones for home theatre system experience.


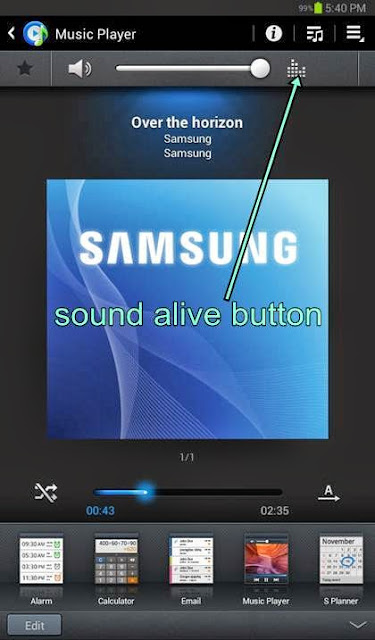
26.Use SoundAlive in MP3 Songs And Videos
Sound Alive is like the normal equalizer but it has more sound effects than a normal equalizer. Sound Alive works even without heaadset. To activate sound alive just see the image below.


27.Enable Flash Player On Galaxy tab 3 SM-T110
You will need adobe flash player to play flash content on websites.You can learn how to install flash player on galaxy tab 3 SM-T110 here.

28.Create Office Documents In Galaxy tab 3
Galaxy tab 3 comes with Polaris office in which not only you can read Microsoft office documents but also can create word,excel,powerpoint and text files. But I would recommend to use a usb keyboard for typing faster. Keyboard can be connected via OTG cable. Open Polaris office and click the “+” sign to create an office document.


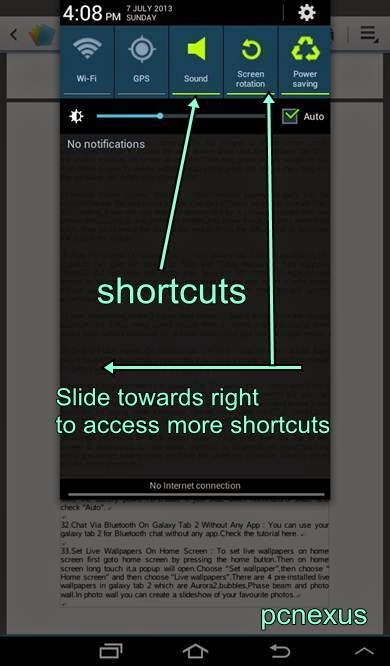
29.Access Shortcuts In Notifications Slider
Just slide from the top of the screen to downwards to view quick shortcuts to Bluetooth,wifi,sound,blocking mode,gps,power saving mode etc. Slide the shortcuts container towards left to access more shortcuts.


30.Set Screen Brightness To Automatic
When automatic brightness is enabled the galaxy tab 3 light sensor will automatically adjust the screen’s brightness to save the battery power. To enable it just slide down notifications slider and check “Auto”. See the image above.

31.Chat Via Bluetooth On Galaxy tab 3 Without Any App
You can use your galaxy tab 3 for Bluetooth chat without any app. Check the tutorial here.

32.Set Live Wallpapers On Home Screen
To set live wallpapers on home screen first goto home screen by pressing the home button. Then on home screen long touch it,a popup will open. Choose “Set wallpaper”,then choose “Home screen” and then choose “Live wallpapers”. There are 4 pre-installed live wallpapers in galaxy tab 3 which are Aurora2,bubbles,Phase beam and photo wall.In photo wall you can create a slideshow of your favourite photos.

33.Set Wallpaper For Lock Screen
Long touch on homescreen and select “Set wallpaper”,then choose “Lock screen” then choose wallpaper from gallery or pre-installed wallpapers.

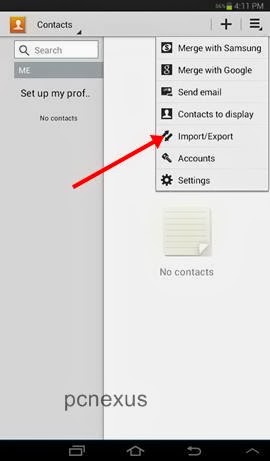
34.Backup Contacts List To SD Card
To backup contacts on your sdcard or galaxy tab 3 lite, open contacts and click the options menu button next to garbage bin icon and choose import/export. Then select “Export to SD card”, then click ok. Your contact list will be backed up on sd card in vcf format.

To restore the contacts simply click on the vcf file to resotre, but make sure that your galaxy tab 3 should not have that old contacts otherwise the 2 copies of contacts will be created. You can copy or transfer contacts to galaxy tab 3 lite from other android devices by this method.


35.Enable Popup Video Play
When you enable popup video play then video will play on a small are on screen hiding items behind it. You can multitask while watching the video or a movie. See the image below to enable it.


36.Enable Movie Subtitles In Video Player
The galaxy tab 3 video player fully supports movie subtitle files in srt format. So you can see subtitles while watching a movie. Just copy the movie and its subtitle srt file in same folder and play the movie. The subtitles will be automatically loaded.

37.Change Photo Gallery View
The photo gallery view can be changed to three styles that is image grid,spiral view and timeline view. Goto gallery and click the icon next to camera icon to change the gallery view. Press the same icon again to change the view.


38.See Photos As Slideshow With Background Music
To see photos as slideshow with background music go to gallery and click options button on top right and click slideshow. Then click “Slideshow settings”. Choose your favorite transition effect, then click the ‘Music’ tab and turn it on by sliding the turn on slider towards right in front of Music.

Now choose the music from the list and click ok. If you want to choose your own music then click ‘Add’. Then click ‘Speed’ tab and choose the time interval and finally click ‘Start’. Your slideshow will play with a background music.


39.Open Recently Closed Apps
To open recently closed apps click the 2 rectangles icon before the home button and choose the recently closed app that you want to open again.


40.Change Camera Storage To SD Card On Galaxy Tab 3 Lite
You can save camera photos directly to memory card by changing the storage from galaxy tab 3 to sd card. To do so open camera and click settings by clicking the gear icon and scroll down and select ‘Storage’ then choose ‘Memory card’. Now all camera photos will be saved to sd card.


41.Take Photos/Shoot Videos From Front Camera (Won't work on Tab 3 Lite)
From the front camera you can take self photos and create self videos. To enable front camera simply click the camera switch button in camera. See the image below.


42.Take Screenshots From Movies/Videos While Watching
You can take movie or video screenshots in the Samsung video player. The images will be saved in screenshots folder. See the image below to take screenshots of movies or videos while you watch them.


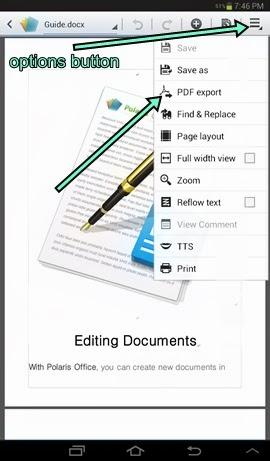
43.Convert Word And Powerpoint Files To PDF On Galaxy tab 3
You can convert Microsoft office word and powerpoint files to pdf via Polaris office. Just open any office word or powerpoint file in Polaris office. Then click options menu and choose ‘PDF Export’. Enter the name of your new file and click save. The pdf file will be saved in ‘Storage/sdcard0’.


44.Edit Photos And Videos On Galaxy tab 3
On galaxy tab 3 lite you will find a dedicated app for photo editor and video editor. In photo editor you can add your favorite photos and images as you do in adobe photoshop.

In video editor you can choose template for video creation,insert your favorite sounds etc. The photo and video editing tutorial is lengthy so I will discuss them in next tutorial.

45.How To Use 2G/3G/4G Network On Galaxy tab 3 SM-T110
Galaxy tab 3 SM-T110 is the wifi only version which means you can only connect to internet via wifi on this tablet. But there is another trick in which you can other phone's 2G/3G/4G network on this phone via wifi hotspot. For wifi hotspot you need a smartphone that supports wifi hotspot functionality. For full tutorial about wifi hotspot check this tutorial.

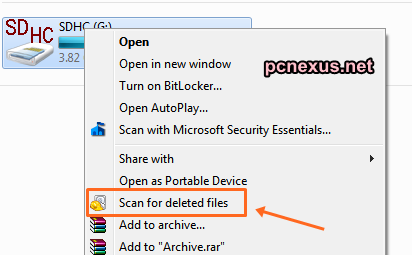
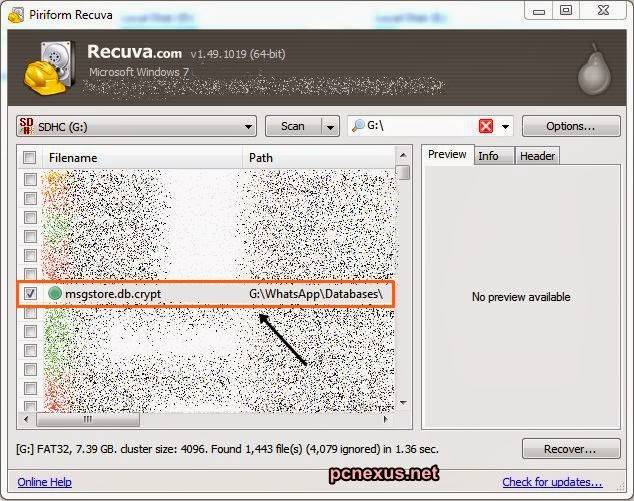
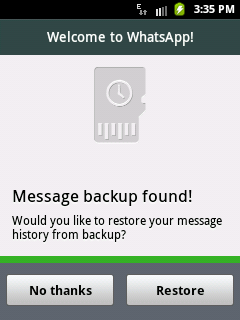
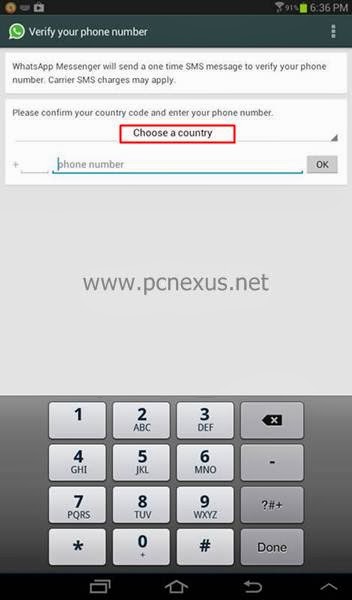
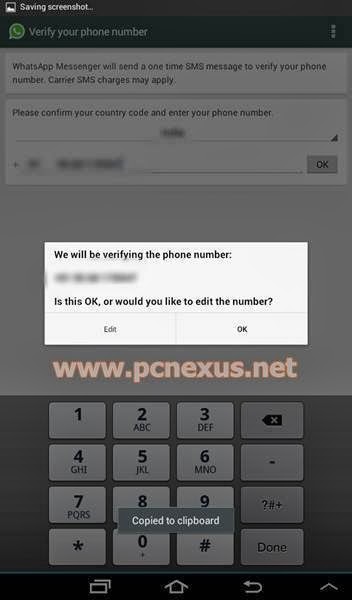
46. Install Whatsapp On Galaxy Tab 3 Lite 7.0
Galaxy tab 3 lite 7.0 is a Wi-Fi only android tablet, so you can install whatsapp on it by reading this tutorial for install whatsapp on galaxy tab 3 lite.

47. Play Playstation Games On Galaxy Tab 3 Lite With FPSE
To play playstation [ps1/psx] games on galaxy tab 3 lite read playing playstation ps1/psx games on galaxy tab 3 lite.

That were 48 useful tips and tricks for Samsung galaxy tab 3 7.0 Lite SM-T110. Hope you liked them,these tips and tricks. If you liked the article please take 2 minutes to share it.