Windows 7 Service Pack 1 is a Windows update released by Microsoft in 2011. This update is meant for enhanced system stability and security as it. It is a large collection of essential updates and is available for both x86/32bit and x64/64bit Windows 7 Operating Systems. There is a need to install the Windows 7 service pack 1 to get future security updates and to install Softwares that require SP1 like internet explorer 11. Soon Microsoft is bringing the free Windows 8 upgrade version specially for Windows 7 users and that may require the service pack 1 update installed on your PC. If you haven’t installed the update yet then your PC is not secure from latest security risks and viruses.
Download Windows 7 Service Pack 1/SP1 64bit
After downloading the package put the file either in D:\ or E:\ drive instead of putting it in the OS drive. Now follow the instructions step by step.

Download and install all the updates. Each update requires restart so that you can install the others. Restart the computer every time you install one of these updates, otherwise they won’t install.

- In this tutorial I am going to teach you how you can install the Windows 7 SP1 on your 64bit computer without failure. In 64-bit systems the service pack 1 update sometimes fails after a long time of installation. This happens due to the non-working Windows update service. Because of it the system can not install new updates.
- Recently I tried to install the Service Pack 1 update on a 64-bit PC but it was not successful and failed after 5 hours of installation giving a message windows 7 SP1 failure configuring service pack “Failure configuring service pack. Reverting changes” and getting an Error 0x800f0826 windows 7. It wasted my 5 hours. However the update procedure should not take more than 1 hour 30 minutes to install completely. It will take 1 hour to install on PC and another half hour to configure updates before and after system restart.
- In this case the SP1 update took 4 hours to configure which was due to Windows update agent failure, because it was not running to handle updates. While configuring the updates, the progress rose to 9% then got stuck for 1 hour then moved to 12% and stuck for another half hour then finally rose to 14% and after 10 minutes the system restarted. This process was repeated further two times indicating a failure and wasted a total of 5 hours. The system was restored to its previous state automatically.
- Finally I found a solution to this problem in which the Service pack 1 update gets stuck at some percent and would not go further. After following the right procedure I finally managed to install the Windows 7 SP1 within one and half hour. This tutorial can be applied when Windows 7 SP1 fails to install.
→ Steps To Take Before Installing Windows 7 Service Pack 1
Step 1: Download Windows 7 Service Pack 1 For 64 Bit Computers
The best way to update Windows 7 64-bit with SP1 is to download the full package from Microsoft Downloads Center. The package for x64/64-bit PCs is about 903 MB in size and takes about one hour and 30 minutes to install successfully without failure.Download Windows 7 Service Pack 1/SP1 64bit
After downloading the package put the file either in D:\ or E:\ drive instead of putting it in the OS drive. Now follow the instructions step by step.
Step 2: Fix Windows Update Service
The main reason why the Service Pack 1 update fails is that the Windows update agent is not running on your PC. Go to ‘Control Panel>Windows Update’ click ‘Check for updates’. If you get a message "Windows can not check for updates because the service is not running" then you have to restart your computer. If you see this message then the update agent is not running. To fix this issue follow the steps below.- Restart your computer.
- Go to “C:\Windows\SoftwareDistribution”.
- Rename this folder to “SoftwareDistributionOLD”.
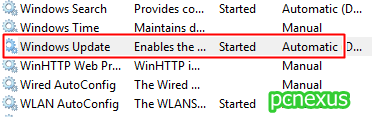
- Now press “Windows key+R” and type ‘services.msc’ without quotes.
- Find ‘Windows Update’ here. Right click on it and select ‘Stop’. Again right click on it and select ‘Start’.

- Now restart your computer.
- After the restart, connect your computer to internet and open Windows update. Click check for updates. If it shows you important and optional updates then you have fixed the problem.

Step 3: Install Few Security Updates Via Windows Update
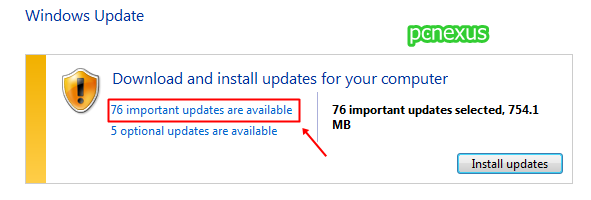
Now the update agent is working, so you have to install some updates to get the job done. Skipping this step is unnecessary. You do not have to install all the updates. Just 10-20 minor updates will be okay.- Open Windows Update and click “? Important updates are available”.

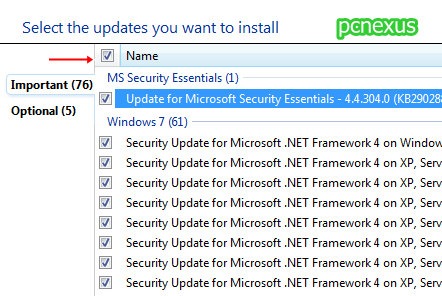
- A list of all updates will open. Uncheck all the updates by clicking the check box two times next to ‘Name’ on top.

- Now select only those updates having size in KBs and having size of fewer MBs like 1-3 MB.
- After selecting the updates click OK then click ‘Install updates’.
- Let them finish. After downloading the updates, restart your computer.
- Let Windows configure the updates.
Step 4: Download And Install Important Updates
Before installing Windows 7 Service Pack 1/SP1 you need three important updates that will increase the chances of SP1 installation without failure. You can download these important updates from Microsoft Downloads Center. Click the links below to download.Download and install all the updates. Each update requires restart so that you can install the others. Restart the computer every time you install one of these updates, otherwise they won’t install.
Step 5: Run A Full Virus/Malware Scan On Your PC
Before installing the SP1 make sure to scan your PC for virus, malware and spywares. Keep your antivirus program up to date and then run a full system scan. Use Malwarebytes anti malware to scan the computer for malware.Step 6: Uninstall Antivirus Software
Before uninstalling the antivirus software disconnect your PC from the internet. Uninstalling the antivirus software is required because it can prevent the installation of Windows 7 SP1. After SP1 update you can re-install the antivirus software.Step 7: Turn Off Windows Firewall
In control panel turn off windows firewall for both Home and Public networks. Windows Firewall can also prevent SP1 installation.Step 8: Clear Temporary Internet Files
Clear the temporary internet and cache files. Press Windows+R keys and type "%temp%". Select all files and delete them. Empty the recycle bin. A more easy way is use to use ccleaner, that will clean entire unwanted cache files.Final Step
Now you are all set to install Windows 7 Service Pack 1/SP1 on Windows 7 64-bit computers. Just double click the SP1 update file that you had saved in either D:\ or E:\ drive. Double click the file and follow the instructions to install it. During installation the progress bar will get stuck in between for about 40 minutes, but don’t worry it will take time around 1 hour before restarting your system. After the first automatic restart, Windows 7 will take 30 minutes to configure the Service Pack 1. After the procedure is complete you can login to your PC and your computer has been updated to Windows 7 Service Pack 1 without failure and fixed the Error 0x800f0826.Upgrade To Windows 10 Pro For Free
After installing the service pack 1 for Windows 7 you are now eligible to get the free Windows 10 upgrade. You can get your free copy of genuine Windows 10 Pro if you use assistive technology. The upgrade is only available till December 31, 2017. So, don't wait and start the upgrade now. Windows 10 is secure and gets updated automatically, you can also run Microsoft store apps on it. Read how to upgrade to Windows 10 free.You May Also Read
Get Blog Updates Via Email Subscribe Now
Please check your email for the verification link. Click on the verification link to start your email newsletter subscription.


waw thx to admin
ReplyDelete