This Domain Name Is Up for Sale
Contact Us

Android OTG USB Flash Drive : Transcend Jet Flash 380 & Jet Flash 510

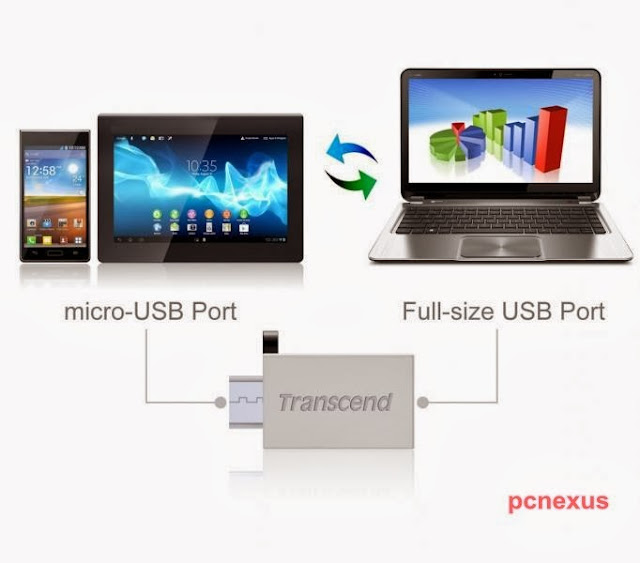
OTG means On The Go which is feature supported by today’s most android phones and tablets in which you can connect a USB flash drive or pen drive to the android phone by using an OTG cable. Recently Transcend released two USB OTG pen drives specially designed for android phones having a mini USB port. These two USB OTG flash drives are named as Transcend Jet Flash 380 and Jet Flash 510. The Transcend Jet Flash 380 has two USB interfaces for Dual Access Storage. One is the mini USB interface for android phones and other one is the full functional USB interface for pc, laptop and Macbook.

transcend jet flash 380 android usb otg

The USB OTG feature is not supported by all android phones having a battery capacity less than 1700 mAh, so there is no use of connecting this mini pen drive to these phones as the flash drive can’t be powered due to low power. The Jet Flash 380 is the fastest and secure way to share data between 2 android phones, tablets and between an android phone and a pc, laptop or a Macbook. It is much faster then Bluetooth and more secure then Wi-Fi. The Transcend Jet Flash 380 and Jet Flash 510 both are water resistant.

The minimum capacity of these two android USB OTG flash drives is 16 GB and maximum is 64 GB. Almost every android phone can support the 16 GB USB OTG pendrive.

How To Transfer Data Using Transcend Jet Flash 380 & Jet Flash 510

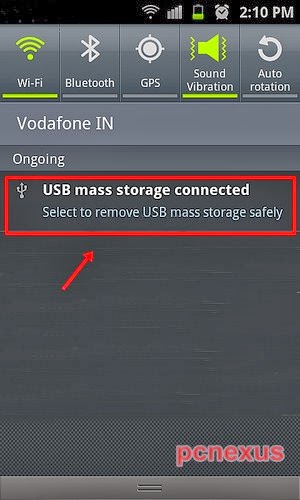
  • To transfer data between two android phones, first connect the flash drive to one one android phone. A notification will appear on the phone “USB Mass Storage Connected”. Now open ‘My Files’ in Samsung android phones for other android phones use ES File Explorer.

usb mass storage connected jet flash 380

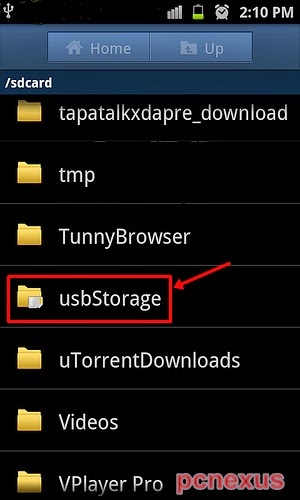
  • The contents of the Jet Flash 380 can be found in ‘usbStorage’ folder in ‘My Files’. Copy files in this folder or copy files from this folder.


  • Now connect this mini flash drive with other android phone to share data.

transcend jet flash 380 and 510 connection to pc and android

  • The other end of the OTG Jet Flash 380 is a fully functional USB interface for PC, laptop and macbooks. You can connect it to pc, laptops and macbooks to copy files and then share with your android phones and tablets.
  • Both USB connectors in Jet Flash 380 can't be used at the same time.

Are Tablets Supported
Android tablets like Samsung Galaxy Tab 2, Galaxy Tab 3, Galaxy Note 10.1 etc doesn’t have the mini USB interface so the Jet Flash 380and Jet Flash 510 can’t be connected directly to these android tablets. For this we need to use a USB OTG cable designed for these tablets and connect the bigger USB interface in the OTG cable which you connect to pc and laptops. For connecting pen drives to any android tablet check this tutorial.

The Transcend Jet Flash 380 and Jet Flash 510 can be directly connected to any android phone having a battery capacity of more than 1700 mAh and a mini USB port also known as micro B USB connector. Also it can be connected to PC, laptop and macbook.

Easiest Way To Change Graphics Between Intel HD And Nvidia On Any Laptop

Most laptops have two types of graphics, one of them is the integrated graphics and other one is the dedicated graphics. Integrated graphics are integrated in the CPU chip while the dedicated graphics has a separate chip on the motherboard with its own memory which is more superior to the integrated graphics. Integrated graphics mostly includes the Intel HD graphics with shared memory which means it takes the memory from system memory (RAM) while dedicated graphics includes Nvidia GeForce graphics with dedicated memory which doesn’t use system RAM much.

Now if your laptop or notebook has two types of graphics that is integrated and dedicated then you want to know how to change graphics to Nvidia because integrated graphics do not perform well while gaming. Nvidia GPU is high performance graphics chip and its performance can be noted while playing games at full resolution and max settings.

Now question arises is there any way to switch to Nvidia graphics from Intel HD 4000, 4200, 4600 integrated graphics. Well the answer is yes, firstly if your Nvidia GPU supports ‘Optimus’ technology then you don’t need to switch graphics from Intel HD to Nvidia because Nvidia’s Optimus technology automatically selects Nvidia graphics when you play games on laptop.

Now I will tell you the easiest trick to switch laptop graphics from Intel HD 4000, 4200, 4600 to Nvidia graphics GT 720M, GT 740M, GT 750M, GT 755M, GT 630M without changing Nvidia PhysX settings. This trick will work on any laptop like HP, ASUS, LENOVO, DELL running either windows 7 or windows 8 with Nvidia GPU.

Change Laptop Graphics Between Intel HD Graphics And Nvidia GeForce 720M

  • Right click on any game’s exe file.
  • Choose ‘Run with graphics processor’. Expand it by pressing right arrow key.
  • Choose ‘High- performance NVIDIA processor’.
switch laptop graphics between integrated and dedicated

  • The game will run on Nvidia graphics and not use integrated graphics.
  • And the interesting thing is that you can use Nvidia processor to run any application. Just right click on the application and choose ‘Run with graphics processor’ and choose Nvidia GPU.
Advantages Of Changing To High Performance Nvidia Graphics While Gaming

  • It doesn’t completely run on system memory (RAM) because it has its own dedicated memory.
  • Games run at full resolution without any lag.
  • No overall laptop heating due to high usage of cpu.
Share this post if you like it.

Manually Update Google Nexus 5 To Android 4.4.2 Kitkat KOT49H Firmware

Android 4.4.2 Kitkat is the latest release for Nexus 5 which improves the Nexus 5 camera with faster shooting, less shutter lag, less motion blur, faster and more accurate focusing, better white balancing for truer colors and more accurate exposures and finally other bug fixes and performance improvements. The main thing about this Nexus 5 update is that camera is now able to catch truer colors in photos.

nexus 5 android 4.4.2 kitkat kot49h

Pre-Requisites

  • Backup entire data stored on your Nexus 5 because if something goes wrong you will lose your precious data.
  • Battery should be charged to 60%.
Warning
This update tutorial is only applicable for the Google Nexus 5 device running either android 4.4 Kitkat or android 4.4.1 Kitkat. This tutorial can’t be applied on rooted Nexus 5 because doing so will return an error during update process. We can’t be held responsible for anything wrong that may happen to your Nexus 5, do it at your own risk.

Downloads

  • For Nexus 5 devices running android 4.4 Kitkat KRT16M. Download KOT49H update file.
  • For Nexus 5 devices running android 4.4.1 Kitkat KOT49E. Download KOT49H update file.
Update Nexus 5 To Android 4.4.2 Kitkat KOT49H From Sdcard

  • Download the required KOT49H firmware file according to your current Nexus 5 android OS from the links given above.
  • Rename the file to kitkat for your convenience.
  • Place the kitkat update file on your phone’s internal storage.
  • Now switch off your phone and boot it in bootloader mode by simultaneously pressing Volume button + Power button.
  • Navigate to "Recovery mode" by using the volume up and down keys, and then press the power button to select it.
  • Once you see an exclamation mark, hold down the power button, quickly followed by the volume up button to enter into Recovery Mode menu on your Nexus 5.
  • Now select "update from SD card" first, and then select the "kitkat.zip" file using the Power button to start the update process.
  • Your phone will automatically reboot after the update has finished.
Update Nexus 5 To Android 4.4.2 Kitkat KOT49H By Using ADB Sideload
This is the second method through which you can update your Nexus 5 by using a android sdk. The step by step procedure is given below.

  • Download ADB tools. Mac/Windows. Put kitkat.zip update file in the ADB folder.
  • Download and install Google USB drivers.
  • Now switch off your phone and reboot into Recovery mode by pressing Volume down + Power buttons at the same time.
  • After the device boots into bootloader mode, use the Volume keys to navigate to the ‘Recovery’ option and select it by using by the Power button.
  • Once you see an exclamation mark, hold down the power button, quickly followed by the volume up button to enter into Recovery Mode menu on your Nexus 5.
  • After the device has booted into recovery mode use volume keys to navigate to ‘apply update from ADB’. Press the power button to select it.
  • Now connect your phone to computer via data cable and open command prompt. Windows users now open the ADB folder and press ‘Shift’ key the hit right click and choose ‘Open command window here’. Mac owners use cd command to open the ADB directory in command prompt.
  • Type ‘adb devices’. This will check whether your Nexus 5 is connected and recognized by ADB. If the phone is recognized then it will be listed after you execute the command.
  • Now your phone is recognized. Finally type ‘adb sideload kitkat.zip’ without single quotes. Mac owners copy and paste this command ‘./adb sideload kitkat.zip’ without single quotes. These commands will start the update process and will take few minutes to complete.
nexus 5 android 4.4.2 kitkat

Now you have successfully updated your Nexus 5 to android 4.4.2 kitkat. After update the device may take long to startup.

How To Build A Laptop Cooling Fan At Home

A laptop cooler is a fan which provides fresh air to your laptops internal parts through its air vents to keep it cooler. A laptop or a notebook needs fresh air to operate at optimal temperature and prevent overheating. The laptop gets the fresh air from the air vents located at its bottom. These air vents should never be blocked. A laptop, notebook or an ultrabook will require a laptop cooler when you mostly use it for playing games for longer times or run applications that make heavy usage of cpu and gpu thereby making the motherboard components even hotter.

Ageing laptops also require laptop cooling fans because the thermal grease of cpu and gpu dries up over time and the notebook requires some other ways of cooling. In this tutorial I will teach you to build a homemade laptop cooler that will have its own power source and will not operate on your laptop’s usb power, also it will prove better than any cooler master cooling fan that are useless and expensive.

My Laptop Cooler Vs Cooler Master
The laptop cooler that I will teach you to build here will prove better than any cooler master cooling fan in terms of performance, cooling and air flow. Reasons why my home built laptop cooler is better than cooler master or other brands.

  • It has dual fans.
  • It doesn’t operate on laptop’s usb power and has its own dedicated power source. I used a nokia cell phone charger as a power source to power up the two fans and they work perfectly.
  • It can draw more air from its surroundings to keep the laptop even more cooler.
  • Much more cheaper than cooler master cooling pads and other brands.
  • Easy to clean, store and can be used as a container for computer accessories like CDs, DVDs etc.
Note : If you use cooler master cooling fan then it will operate on usb power and acquire one usb port of your laptop completely, but it also has a female usb connector in which you can connect other usb devices. That means you are using two usb devices in one usb port, according to me this is usb overloading and make the usb module hotter when more current is drawn from it. So whats the use of cooling if the laptop cooler is making your laptop hotter. Also these laptop cooling fans will drain the laptop’s battery quickly.

On the other hand my home built laptop cooler will get its power from Nokia cell phone charger and doesn’t require USB power so you can use this laptop cooling fan even when you are running your notebook on battery power.

Things You Will Need

  • A box that is big enough on which your laptop can rest. Choose the box according to laptop/notebook size.
  • A 120 mm computer case fan and an optional smaller cpu heat sink or similar fan. You can use any kind of computer fan having a voltage rating of upto 12 Volts.
home made laptop cooling fan

  • A Nokia cell phone charger. You can use any cell phone charger.
  • Electrical tape, paper cutter and 4 screws.

How To Build A Homemade Laptop Cooler Powered By A Cell Phone Charger Under $ 5 Dollars

Step 1. Choose A Right Box Or Build One Yourself
First of all measure the length and breadth of your laptop and choose a box accordingly so that your laptop can rest on it completely. If however you are unable to find the right sized box then you can create one. Just gather some cardboard pieces and make a cuboid box whose one face is open. Join the box joints with glue and finally cover them with newspaper pieces soaked in glue and water mixture. Let the box to dry overnight. Next day the box will become very hard. The box height should be 4 inches and length should be according to laptop size. See the pic below

DIY notebook cooler box


Make air vents on both side of the box. For this you have to cut square windows in the box parallel to each other. Make only 3 air vents at each size. Now cut a circle on top the box for the 120 mm fan as shown in the pic above.

Note : Cut the circle according the air vents located on the back of your laptop so that fan directly blow air in these vents otherwise cooling will not be perfect. Just turn your laptop upside down and see where the air vents located, whether they are in middle, left or right side below the laptop. Now finally cut the circle on top of the box.

Step 2. Place The Fan On Right Place
Now after cutting all pieces, place the fan inside the box. The fan should be placed so that it will throw air up and not suck air from laptop vents which is dangerous. See the pic below how I screwed and fixed the fan correctly.

home made laptop cooler

If you have another fan then you can do the same as above for it to fix it on place. But this part is optional. The box after fixing two fans will look as follows.

dual fan notebook cooler

Step 3. Power Source : A Cell Phone Charger
I used a Nokia cell phone charger to power my laptop cooler. You can use any cell phone charger. Cut the charger wire at the end to remove the connector and peel the two wires to expose the copper wire. Also peel the two wires of the fan.


Step 4. Connections
The fan and the cell phone charger both have two wires one is neutral and other is live. You have to connect the live wire of charger to live wire of fan and neutral wire of charger to neutral wire of fan. Now insert the charger in power outlet and check whether fan is working or not. If fan doesn’t start then you have mixed the neutral, live connections. Re-connect the wires and again check whether fan is working. Repeat the steps until fan starts to work. Secure the wire connections with electrical tape. See the pic below that the fan is working and the red LED is glowing.

power connections

Final Product
The final product will look as follows. This is the inside view of the laptop cooling fan box.

home made laptop cooling pad

Step 5. Testing
Now after building the laptop cooler you have to check that it is working correctly. Check that the fan is throwing air above. Hover your hand over the laptop cooler fan and feel the air. If you don’t feel any air on your hand then you have fixed the fan from the other side, which will suck air from laptop which is not good. Re-install the fan from the other side and check whether you are feeling air on your hand. Now you have build your laptop, notebook or ultrabook cooling fan. See the image in step 2, you have to hover our hand over the fan shown in image in step 2.

Step 6. Laptop Lifters
Now you have to make 4 laptop lifters that will lift your notebook a little bit up thereby creating space between the cooling fan and your notebook so that air continues to flow without being trapped. To make laptop lifers follow the steps below.

  • Cut 8 small square pieces from cardboard.
  • Stick together 2 pieces at a time with glue to make 4 separate laptop lifters.
  • Now place these 4 lifters at the corners of the top of the laptop cooling fan and place your notebook above these lifters.

Working Principle Of My Homebuilt Laptop Cooler
Since I have used two fans, the smaller fan helps to draw more air in the box that is picked up by the bigger fan and thrown upwards directly on the laptop's air vents. The idea behind choosing a box is that a box can trap more air which can't move here and there as compared to cooler master notepal cooling fans. The bigger fan suck air from its surroundings and air enters through the air vents made on both sides of the box. Together dual fans do a great cooling job.

Performance
Before using this laptop cooler the temperature of the notebook is given below.

CPU : 41-43 degrees
GPU : 34-35 degrees
HDD : 28 degrees

laptop temperature

After using the laptop cooler the temperature of the notebook is given below.

CPU : 37-39 degrees
GPU : 31 degrees
HDD : 27 degrees


From the above data you can see a big drop in laptop's CPU temperature around 4 degrees and GPU temperature lowers by 3 to 4 degrees. This successfully proves that home built laptop, notebook cooler is working very good and cooling the laptop and saving it from overheating. In my opinion it is the best home built laptop cooling fan for HP, ASUS, DELL, Lenovo, Toshiba laptops, notebooks and ultrabooks.

Check Out The Video
You can watch the video of this home built laptop cooler.


How To Find Out The Battery Backup Of Any Android Smartphone

Android smartphones are power hungry when it comes to run apps and use the phone at its maximum. Most android smartphones would not last a day long with heavy usage. Today most android smartphones have only a battery backup of one day with normal usage. Also to get a good battery backup from any android phone one should make sure that the Bluetooth, wifi, data network and background data should be turned off.


In this tutorial I will tell you how you can measure the battery backup of any android phone.  After getting the correct battery backup duration of your phone you will get an idea about how you can use your phone so that your phone’s battery won’t die when you need your phone the most.

Find Battery Backup Duration Of Any Android Phone
1. Open Settings and go to ‘About phone’ in android 2.3 and ‘About device’ in android 4.1 jellybean.
2. Now tap on ‘Status’ and scroll down a little bit to find ‘Up time’.
3. Below ‘Up time’ the duration of battery backup is shown.

android battery backup time

Backup Duration For Different Battery Usage
Now you can measure the battery backup of your android phone quickly and easily by the method above. Now you have to check how your phone’s battery perform when you use it for playing games and running apps like listening to music, watching videos etc. You can do this as follows.

  • Just fully charge your phone’s battery in morning and use your phone for the whole day. You can use it according to your needs like if you want to listen to music, play games or browse the internet.
  • Now check the battery backup duration in ‘About device’ section as told above when your android phone’s battery is about to die at 1% remaining. You will get the correct battery backup time.
Now you have easily measured the battery backup of your android smartphone in two situation that is one in normal usage and other is heavy usage. Now compare battery backup of both situations and finally design a usage plan to use your phone so that you get most from its battery if you can’t charge the phone’s battery frequently. 

How To Clean Dirty Android Smartphone From Inside And Remove Dust

Android smartphones are a fun to use because they help us in many ways through useful apps. Android smartphones over time become very dirty and accumulate dust near buttons and screen. Also dust can be found inside the phone, not only dust a smartphone can be a home of millions of germs that can be very dangerous if ignored. So it’s a good idea to clean your android smartphone. Dust is the worst enemy of any electronic gadget as it increases the thermal temperature of mobile chips overtime.

In this tutorial I will teach you to clean your android smartphone from inside by opening it and removing all kind of dust particles from every part of the phone. After opening the phone you can easily clean dust under speaker grills, dust around camera lens and dust around android smartphone’s motherboard.

Tools Needed
1. Tiny screw drivers to open the screws of your phone.
2. A soft brush to clean the dirt.
3. A clean cloth
4. Few cotton buds and cotton swabs.

Warning : This tutorial is for advance users who have some knowledge about opening a smartphone, I mean assembling and disassembling an android smartphone. So if you are not aware of this process then do not try on your smartphone or you will end up with a damaged smartphone. If you still want to try then don’t blame me if anything goes wrong with your smartphone.

Clean Dirty Android Smartphone From Inside And Remove Dust
I am using a Samsung Galaxy Y S5360 android phone and will show you how to clean Galaxy Y and similar Samsung android devices.

  • Remove the back panel of your android smartphone to access the battery and screws.
  • Remove the battery, SIM and memory card and put them aside.
  • Open the screws with the help of a screw driver.

  • Now gently remove the white plastic cover. The white plastic cover can’t come out on its own because it is fixed at place with plastic notches. You have to separate this plastic cover from its notches.
  • After separating the white plastic cover the phone will look as follows.


  • Now disconnect the touchscreen connector from motherboard. Gently pull it up to disconnect. See the pic below.


  • Now separate the phone’s motherboard from the touchscreen module. Gently insert the screw driver in the notch  and lift the motherboard up. After removing the motherboard the android phone aka galaxy y will look as follows.

android phone galaxy y motherboard

  • Now you have completely disassembled the android smartphone. Now use the brush and cloth to clean the dust from the inside.
  • Do not touch the touchscreen module or apply liquid cleanser to it as doing so will completely damage it.
  • After thorough cleaning place the phone’s motherboard correctly on place and connect the touchscreen connector. Do not forget to connect the touchscreen connector otherwise touchscreen won’t work and will not identify any finger touch.
  • Finally place the white plastic cover and make sure that it is completely fixed with notches. Make sure that the white cover should not be opened from any side.


  • Finally insert the screws and tighten them.  Insert the SIM and memory card and finally put the battery back on phone.
  • Now your android smartphone is more cleaner than ever.

Sony Xperia M Dual Vs Galaxy S Duos 2 S7582

Samsung Galaxy S Duos 2 S7582 is an android 4.2 jellybean smart phone recently launched by Samsung to compete other android phone brands at a price of around $172. This android smart phone is the upgraded version of the galaxy s duos which has a laggy performance as experienced by its users. Galaxy S Duos features slight updates like a 1.2 GHz dual core processor and android 4.2 jellybean but the rest the things are same.
In this post I will compare Galaxy S Duos 2 with Sony Xperia M Dual which also runs on android 4.2 jellybean and will tell you which android smart phone will have good performance over the other.

Sony Xperia M Dual Vs Galaxy S Duos 2 S7582


sony xperia m vs galaxy s duos 2 s7582

1. CPU : Sony xperia m dual has 1 GHz dual core snapdragon krait processor which is better than galaxy s duos 2 s7582 processor which is 1.2 GHz dual core A9 application processor. The Sony xperia m dual has a CPU score of 6771 in quadrant benchmark while the galaxy s duos 2 has scored only 5667 which is less than Sony xperia M. Other benchmark data is given below for the CPU only of both smart phones.

Benchmarking App
Sony Xperia M Dual
Galaxy S Duos 2
AnTuTu
11435
12111
NenaMark 2
64.4
54.9
Vellamo
1787
1524
Multitouch Test
5 points of touch are supported
2 points of touch are supported

Sony Xperia M Dual wins in case of cpu performance, which means that we can easily multitask on xperia M dual without feeling any lags and glitches. Also Xperia M supports finger touches while Galaxy S duos 2 only supports 2 finger touches.

2. GPU : Sony Xperia M Dual has Adreno 305 graphics which is better than Galaxy S Duos 2’s Broadcom Videocore IV graphics. Sony Xperia M Dual is playstation certified Sony smart phone so you can enjoy playstation android games on your xperia M while Galaxy S duos 2 has no such certification. The GPU of galaxy s duos 2 will perform slightly better than its previous version but you may encounter several lags and glitches while gaming if you install many apps on galaxy s duos. While gaming is smooth on Xperia M Dual.
The Xperia M Dual has a gpu score of 4981 in AnTuTu benchmark while Galaxy S Duos 2 only scores 4644. So xperia M is a winner in case of gpu comparison.

3. RAM : Sony xperia M has 1 GB RAM while Galaxy S Duos 2 has only 768 MB of RAM. So it is clearly visible that xperia M dual has more RAM than galaxy s duos 2. So xperia m dual can do multitasking easily as compared to galaxy s duos 2. Having a 1 GB RAM is also good for gaming as playing any game will not give you lags. Games like dead trigger, nfs most wanted, temple run 2, subway surfers will run smoothly on Sony xperia M dual while these games have a low performance on Samsung’s galaxy s duos 2 as compared with Xperia M dual. Also galaxy s duos 2 identifies only 2 finger touches which is sometimes less to play games which require at least 3 simultaneous touches. On the other hand Sony xperia M identifies 5 finger touches which is enough to play any android game.

4. Screen : Sony xperia M has better screen display with a ppi density of 245 pixels per inch, but it is missing the bravia engine, otherwise it will outstanding in screen display. While galaxy s duos has only 233 ppi density which is low as compared with xperia M. More ppi density means more crisp and clear screen display. Viewing angles of Xperia M dual are great and in sunlight we can easily see the screen while galaxy s duos 2 screen will turn into a mirror in sunlight and we can’t see anything unless the brightness is increased.

Galaxy S Duos 2 has no light sensor while xperia M dual have it. A light sensor automatically adjusts the screen’s brightness according to the light falling on the sensor. So xperia M dual will automatically adjust its screen brightness in sunlight due to its light sensor, while on galaxy s duos 2 you have to manually set the brightness.

5. Notification Light : Sony xperia M dual has notification light which will give illuminated alerts when any notification appears on your phone. Galaxy s duos 2 is missing this feature and almost no Samsung phone has this feature in this price range ($174). If you don’t hear the notification sound then you can see the notification light on Xperia M dual and never miss your important notifications.

6. NFC : NFC or android beam is a premium feature which can be seen in phones like Galaxy S3. With NFC you can share data very fast by placing two NFC enabled phones back to back. Sony is giving this feature in Xperia M dual at a low price. No other android smart phone have this feature in this price group ($209). Galaxy S Duos 2 also missing this feature.

7. Battery : Sony xperia M has 1750mAh battery with stamina mode while galaxy s duos 2 has only 1500mAh battery with no such mode. Stamina mode can help to reduce battery drain by closing connectivity features when phone is idle. So xperia M dual has a good battery backup than galaxy s duos 2.

8. Dual Band WiFi : Xperia M dual has dual band WiFi (a/b/g/n) which means it can work with 2 wifi frequencies while galaxy s duos 2 has only single band wifi (b/g/n) and can only work with single wifi frequency.

Verdict : According to the above comparison Sony Xperia M Dual comes out to be a winner. The previous version Galaxy S Duos has a very bad performance, it hangs a lot as experienced by its users. You can check the problems faced by S duos users in comments sections on this post. So if you previously had Galaxy S Duos then you definitely don’t want to buy Galaxy S Duos 2 with slight upgrades just to lure you and make you fool. Only the price is a issue for most smart phone owners, Sony Xperia M dual is Rupees 2000 more expensive than Galaxy S duos 2. If you do not have the price issue then opt for Sony Xperia M dual with good specifications and great performance.

How To Install Flash Player On Galaxy S Duos 2 S7582

How To Install Flash Player On Samsung Galaxy S duos 2 S7582 Samsung Galaxy S Duos 2 S7582 is a dual sim android 4.2 jellybean smart phone. It has a 1.2 GHz processor A9 and 768 MB RAM and also Broadcom VideoCore IV graphics. This android smartphone is good for low level gamers which require a dual sim android smartphone. This tutorial will teach you to install adobe flash player on Samsung galaxy S duos 2.

Installing flash player on android galaxy S duos 2 is required to view flash content on your phone while browsing websites in desktop mode. Also you can directly view Youtube videos in the the browser itself without launching the android Youtube app.

Install Flash Player on Galaxy S duos 2
1.Download and install adobe flash player 11.1 for android 4.2 jellybean from the link below. Because galaxy S duos 2 runs on android 4.2 so you should install flash player 11.1.

Adobe flash player 11.1 android 4.0 apk Download

2.Make sure not to disable data traffic on your phone. Install Flash player 11.1 apk.
3.Now open flash player 11.1 app by clicking ”Open” after installation. Open with default android browser for quick settings.
4.Now open default android browser and goto “Settings” then click “Advanced” then click “Enable plug-ins” and select “Always on”. This will allow the flash player plugin to load while playing youtube videos on default android browser.


5.Now goto youtube and open it in desktop mode by clicking the top right menu and selecting “Desktop” at the end of menu.
6.Click to play any video of your choice. The video will play depending upon the internet speed on your galaxy S duos 2.
7.You will see that youtube videos will play in the default android browser’s flash player plugin and no youtube app will launch automatically. Here is the proof below.

Youtube videos playing directly in the default android browser’s flash player.

flash player on galaxy S duos 2 S7582


Now you have successfully installed flash player 11.1 on your galaxy S duos 2. Let others know about this
wonderful article share it if you like like it.

Samsung Galaxy S Duos 2 S7582 Tips And Tricks

Samsung Galaxy s duos 2 2 S7582 Tips And Tricks

Samsung Galaxy S Duos 2 S7582

Is an android 4.2 Jellybean smartphone and is next upgrade of its previous version Galaxy S Duos.It is a dual sim android phone with a Broadcom BCM21664T 1.2 GHz dual core A9 application processor and 768 MB of RAM. The screen is of 4 inches having a resolution of 800x480 pixels and is capable of displaying 16 M colors.Galaxy S duos 2  has Broadcom VideoCore IV graphics which means that this  phone can be also used for gaming. In this post you will learn some essential tips and tricks for Samsung Galaxy S duos 2 S7582. In this tutorial you will learn 21 tips and tricks for galaxy S duos 2. Out of 21 tips and tricks 4 are gaming tricks.

Samsung Galaxy S Duos 2 S7582 Tips And Tricks

1. Take Screenshots On Galaxy S duos 2 : This is the very first trick and easiest of all. To take screenshots on galaxy s duos 2 just press home and power button at the same time and hold them for 3 seconds. The screen capture photos will be automatically saved to sdcard>ScreenCapture folder on phone’s storage.
2. Use Camera Flash As Torch : Samsung galaxy s duos 2 is equipped with a 5 MP powered with a LED flash. This LED flash is not only for taking pictures in dark also it can be used as a standalone torch. To use camera flash as torch click “Apps” on homescreen and then click “Widgets” tab on top right. Now from this list of widgets select “Assistive Light”. The widget will be added to home screen. Click the “Assistive light” button to use the camera flash as torch.

galaxy s duos 2 flash light

3. Change Font Style : You can change the font style on your galaxy s duos 2. There are 4 font styles available in it. To change font style goto Settings>Display>Font Style.You can select your desired font from a list of 4 font styles.You can choose between helvetica,choco cooky and rosemary font style.


4. Unlock Developer Options On Galaxy S Duos 2 S7582 : If you do not see any developer options on your phone then you have to unlock it. To unlock developer options on s duos 2 go to 'Settings>About device'. Click or tap on 'Build number' around 10 times to unlock developer options.

5. Show CPU Usage : You can see your CPU usage while using the phone. To see cpu usage goto Settings>Developer options>Show cpu usage.


6. Show Battery Percentage : You can see battery percentage of your galaxy s duos 2’s battery without installing battery percentage app or any other special battery app. Battery percentage option will show you the percentage remaining on your phone’s battery. It will warn you against low battery. To enable battery percentage on galaxy s duos 2 S7582 goto Settings>Display>Battery Percentage and check it. You will see battery percentage in notifications bar before battery icon.


7. Limit Background Processes : Limiting background processes can increase your phone’s battery life. Running low number of background apps will surely increase battery life. To limit background processes goto Settings>Developer options>Apps>Limit Background Process>Select number of apps. You can limit a maximum of 4 background apps.

8. Encrypt SD Card And Phone : Encrypting your SD card and phone will secure it against misuse. To encrypt phone and SD card your phone’s battery should be charged to above 80%. Be careful before encrypting the phone and SD card,backup your entire data on your pc first. Your encrypted SD card may not work on other android phones. To encrypt phone and sd card goto Settings>Security>Encryption>Encrypt device or Encrypt external device.

9. See All Widgets : To see all the widgets click the “Apps” on homescreen then select the “Widgets” tab. You will see all the widgets installed on your phone.You can slide left or right to access all the widgets. Just click on any widget and it will be automatically added to homescreen.


10. See All Downloaded Apps : These are the apps that you have installed from play store or from somewhere else. To see all the downloaded apps click “Apps” on home screen then click the vertical arrow next to “Widgets” tab. Click this arrow to see all the downloaded apps on your phone.

11. Access Shortcuts In Notifications Bar Slider : Just click on the top of the screen and slide down.You will see an array of important shortcuts here. These shortcuts include wifi,gps,sound,screen rotation,notification,Bluetooth,driving mode etc. These are quick shortcuts. You can activate or deactivate android system services with one click through notifications slider.


12. Backup Contacts On Galaxy S duos 2 : You can backup all your contacts on galaxy s duos 2 S7582 without installing any other app. To backup contacts open Contacts and then click menu button. A list will open,select “Import/Export” option. Further select an option like where you want to backup contacts like SD card or phone or sim.Based on your selected option the contacts will be backed up to sim/sdcard/usb storage in .vcf format. Later you can import these contacts to your phone’s sim. To import contacts reverse the above process.


13. Quick Redial Recently Dialled Contact : To quickly dial the recently dialled number you don’t need to open the contacts log. Just open the dial pad and click the button just below the ‘*’ key. After pressing this key the number will be automatically typed then you can dial that number without typing.

14. Trim Or Crop Videos On Galaxy S duos 2 : You can trim videos on galaxy s duos 2. Trimming a video means cutting a short part from it. To trim any video proceed as follows.

1.Play any video then press the menu button and select “Trim” from the list.
2.A video trimming program will open. Slide the trimming sliders from left or right to select the part.
3.After selecting the the trim part click trim. A popup will open select “Trim as new video”.
4.Trimmed video will be found in sdcard>Output.

15. Download Galaxy Call Recorder For Galaxy S duos 2 : If you want to record incoming and outgoing calls on your s duos 2 then download the galaxy call recorder from google play. Only this call recording app will work with your s duos.

16. Attach Any File In Gmail On Galaxy S duos 2 : Currently gmail for android doesn’t allow you to attach files except images. But with this trick you can attach almost any file in gmail. To read more about this trick you should read attach file gmail tutorial.

17. Chat Via Bluetooth Without Any App On Galaxy s duos 2 : You can chat via Bluetooth on galaxy s duos 2 without installing any Bluetooth chat app. Read this tutorial about Bluetooth chat on android without any app. This will work with galaxy s duos 2.

18. Play Playstation PS1/PSX Games On Galaxy S duos 2 : You can play playstation ps1/psx games on galaxy s duos 2 S7582 with fpse for android. Read this tutorial to play ps1 games on galaxy s duos 2.

Other gaming tricks include the following tutorials. You should read them to play games on galaxy s duos 2. The gaming tricks are given below.

19. Play Nes Games On Galaxy S duos 2 : Read This Tutorial.

20. Mame and CPS1 Games On Galaxy S duos 2 : Read This Tutorial.

21. DOS Games On Galaxy S duos 2 Tutorial : Read This Awesome Tutorial.

That were 21 tips and tricks for Samsung Galaxy S Duos 2 S7582. Hope you liked them. If you like the tips and tricks for galaxy s duos 2 then you can share this article.

How To Install Android Apps On Windows 8 With Bluestacks Without Google Account

Bluestacks app player is a software for Microsoft Windows through which we can install and run android apps on a Windows 7 or a Windows 8 computer. There are many ways to run android apps on computer which includes the android emulator itself in Google android sdk. But most of the softwares that claim to run android apps on pc doesn’t work well like the bluestacks app player. The bluestacks app player doesn’t run the entire android OS to emulate android apps on a Windows pc instead it only provides android system runtime to apps so that they can run.

Bluestacks app player is the easiest to work with, I mean you can install and run any android app on your pc without having to know that you are emulating the android OS. You will just see android apps running on your pc and not an android user interface to run them. But bluestacks have several  system requirements. Bluestacks will not install on older pc’s including pentium 3 processors and pentium 4 processors without a GPU. Your computer or laptop should have atleast Intel Core i3 processor to run bluestacks app player.
Now in this tutorial I will teach you how to install android apps in bluestacks without logging into your google play account. Bluestacks will ask your Google Play credentials to download apps. But don’t worry you can still play latest android games on your pc without using your Google account for downloading them, follow the steps below to make it happen.

Install Android Apps In Bluestacks Without Using  Google Account

  • First install bluestacks app player from here.
  • Now go to Google.com and search your favorite apps. Download the apk files to your pc.
  • If you want to run apps installed on your android smart phone, then you have to first backup them then transfer them to your computer. You can see how to backup android apps here.
  • After downloading or transferring all android apps you will see bluestacks icon on every android apk.
  • Now double click on any android apk file to install it. The bluestacks app handler will open and automatically install the android app.


  • After installation the app handler will close.
  • Now open bluestacks and click ‘My Apps’. Here you will see all the installed android apps. Click on any app to run it.


  • Use keyboard to play android games or you can use a Logitech game controller to play android games in bluestacks.
Below is a video of Temple Run 2 on pc by using BlueStacks.

Watch the video


If you face any problems related to installing android apps then drop your comments here for a quick solution.

How To Backup Android Apps On SD Card

Making a backup of your favorite android apps will save you from re-downloading them. Also you can share these apps with other android smart phones and tablets. In this tutorial I will tell you how to backup android apps on SD card. You can backup all android apps installed on your smart phone including the android system apps like Gmail, camera app etc. Follow the steps below to make it happen.

Backup Android Apps On SD Card
1. First download and install ‘androzip’ for android here.
2. Now open androzip and slide the horizontal scroll bar on top from right to left.


3. Now tap on ‘Apps’. A lsit of all installed android apps will open. This list will include android system apps and third party android apps (installed by you).

backup android apps on sdcard

4. Put a check mark in front of all apps that you want to backup on sd card.
5. After selecting all android apps click the backup button on top.
6. Now go to ‘sdcard>app_backup’. You will find all backed up android apps here. Later you can re-install them if you accidently uninstalled any.

Install Apps After Backup
1. To manually install android apps after a backup, just tap on any app and click install.
2. Make sure that ‘Unknown sources’ is checked in application settings before you manually install android apps.

Share Android Apk Files Via Bluetooth
1. To share any android apk file just long press on it and choose share. Then choose ‘Bluetooth’ to send the file.