This Domain Name Is Up for Sale
Contact Us

How To Install Flash Player On Nexus 5

LG Nexus 5 is the first smart phone with android 4.4 kitkat launched by LG. This android 4.4 smart phone is running the original android 4.4 OS. In this tutorial I will teach you to install adobe flash player on LG Nexus 5.

flash player on LG nexus 5
Note : Before doing anything enable "Unknown Sources" on your LG nexus 5 otherwise you won't be able to install flash player apk. To do this goto Settings>Security>Unknown Sources check it.

This tutorial will teach you to install flash player on LG LG nexus 5. Before installation download the following files below.

Install Flash Player On LG nexus 5

  • Adobe flash player 11 android 4.4 kitkat LG Nexus 5 apk download
  • Adobe flash player 11.1 android 4.4 kitkat Nexus 5 apk download
  • Mozilla firefox for android download
  • UC browser HD for android download
  • Phony plugin for Mozilla firefox for android
Note: I have given 2 links for flash player apk files so, download any apk which you want. If one doesn't work then download the other. We will cover the topic of flash player installation on Nexus 5 by using Mozilla firefox and UC browser HD. So lets start with UC browser.

Note : LG Nexus 5 default android browser doesn't support flash plugin. So you will see a missing plugin like a blue box in place of flash content.

Installing Adobe Flash Player On LG Nexus 5 Using UC Browser HD For Android

  • Download and install UC browser HD from above link. If installation is blocked then goto Settings>Security>check Unknown Sources.
  • Install adobe flash player for Nexus 5.
  • Now open UC browser HD and click the menu button next to search button on top right and choose 'Settings'.
  • Now choose 'Advanced Settings' and click 'Flash Plug-in' then choose 'Auto'.

  • Now go to Youtube.If mobile version opens then open it in desktop mode then click any video on youtube.You will see that video will play in the browser itself and not in the youtube android app.

flash player on LG nexus 5 UC browser hd

Installing Adobe Flash Player On Nexus 5 Using Mozilla Firefox For Android


  • Download and install Mozilla firefox from the playstore link given above.
  • After installing open it and goto settings>content>plugins>enabled.
  • Now goto any flash website you will be able to view flash in Mozilla firefox on LG Nexus 5 and won’t see any blue lego cube in place of plugin.

flash games on nexus 5

But some websites hide their flash content from mobile devices. So if you visit such a website then you might not be able to view flash. So you need to install a firefox android addon called ‘phony’. The phony addon will trick websites that you are browsing from a pc and not from LG Nexus 5 smart phone.Goto Mozilla addons website and install ‘phony’. After installation relaunch Mozilla firefox. The link to install this addon is given below.

install flash player plugin galaxy note 10.1 wifi mozilla

Phony Addon Mozilla Android Download

Now you have learnt how to install flash player on Nexus 5 by using two browsers. This adobe flash player installed on your LG Nexus 5 doesn't guarantee full compatibility with all websites running flash content. But it will work with most websites.

Other Browsers To Try
You can try above tutorial on below mentioned android browsers also to install flash player on LG nexus 5.

  • Puffin web browser.
  • Maxthon android browser.
You have successfully installed flash player 11.1 on Nexus 5 with android 4.4 Kitkat.

File Shredder : Leaves No Trace Of Deleted Files On Computer Hard Disk

Deleting a file from a computer’s hard disk does not mean that the file is gone for forever. When we delete a file from a hard drive on a windows based pc then only the references and access paths to that file are deleted while the file still resides in the computer’s hard disk with deleted references and access paths. The file can be recovered easily by using various file recovery softwares for Microsoft windows, you can see how to recover deleted files. Its always a good idea that you delete your private data and files from a computer’s hard disk permanently leaving behind no trace of it that may help to recover it back.

file shredder icon

Well permanently deleting a file from a hard drive, leaving behind no recovery trace of it is called file shredding. Shredding is a process in which you delete a file by using some shredding algorithm so that it can’t be recovered. In this tutorial I will teach you how you can shred your private data and files and prevent them from recovering again by any means. I will be using ‘File Shredder’, it is a software for Microsoft windows that is used for file shredding purposes.

Use File Shredder To Permanently Delete Files From Computer Hard Drive
1. Download and install file shredder from here.
2. Now right click on any file that you want to delete and choose ‘File Shredder’. It will expand then choose ‘Secure delete files’.


3. That file will not be sent to recycle bin and will be permanently removed without leaving any trace of being recovered.
4. You can shred multiple files at once also. Just open file shredder and click ‘Add Files’. Choose multiple files and click open. Then finally click ‘Shred Files Now..’.


5. To save more time on selecting multiple files instead use a folder and move all files to be shred in it. Now click ‘Add Folder’ and select that folder. Finally click ‘Shred Files Now..’ and you are done.

Benefits Of Using File Shredder For Windows
1. Permanently deletes files from hard drive without leaving behind any recovery trace.
2. Good for deleting private data and files.
3. Saves disk space. Hard disk will work faster if it is free from deleted files.

How To Use The Combo Audio Jack On Laptops

Today most laptops and notebooks have an inbuilt combo audio jack which is a single 3.5 mm audio jack supporting the headphones, headset and speaker out functions. Today combo audio jacks can be found on HP, Asus, Dell, Sony and Toshiba laptops and notebooks. Most notebook users today always complain that the combo audio jack on these laptops doesn’t work. I mean to say that when they try to connect any headset, headphone the combo audio jack doesn’t respond and there is no sound in the headphones or the headset, also the speaker out function doesn’t work. So in this post I will teach you how the combo audio jack will work without using a 3.5 mm combo audio splitter.

How To Use The Combo Audio Jack

  • Today most laptops and notebooks of HP, Dell, Asus and Sony use Realtek audio chip on the laptop motherboard.
  • So you should install the Realtek audio driver for the combo audio jack to work.
  • The Realtek audio driver can be found in the driver cd of your notebook or laptop. Or you can download it from your laptop manufacturer’s website from the support section.
  • Now after installing the Realtek driver connect the headset or headphones to the combo audio jack.
  • After you connect the headphones a popup will automatically open asking you about the device you connected, whether it is a headset, headphones or speakers. Choose the appropriate option for the connected device to work properly and click OK.
combo audio jack laptop

Combo Audio Jack Supported Devices
The following audio devices are supported by the combo audio jack.

1. Headset : A headset is a simple audio device which is worn over the head to listen the sound coming from its speakers. It may or may not have a microphone. When you connect a headset, choose headset option from Realtek sound manager for it to work properly. These are mostly used for chatting and voice calls on notebooks.

2. Headphones : These are simple in the ear tiny speakers that are mostly used with mobile phones. The headphones are fully compatible with your laptop if the headphones have a 3.5 mm audio jack.

3. Speaker Out : The speaker out function is the very important feature supported by the combo audio jack. With this function you can send the laptop’s audio output to bigger speakers, home theaters and sound bars as soon as they support the 3.5 mm audio jack.

Connecting The Laptop To Home Theater System Via Combo Audio Jack
Taking the sound output of your laptop on a home theater system gives you total audio immersion, because home theatre systems now support 5.1 channel and 7.1 channel surround sound. So if you game a lot on your notebook and have a home theatre system then you can enjoy the real theatre sound in 5.1 channel surround sound format. To connect your laptop to home theatre system via combo audio jack follow the steps below.

  • First buy a 3.5 mm to Aux audio connector. See the image below.


  • Now connect the red and white leads on the rear audio panel of your home theatre system.
  • Connect the 3.5 mm jack to the combo audio jack of your laptop. Now a popup will open, you have to choose ‘Speaker out’ and click OK.
  • Now enjoy real surround sound of your laptop or notebook on the home theatre system.
  • You can play games, watch movies or listen to music with a powerful sound.
If you liked the article then take 2 minutes to share it.

Nvidia GeForce GT 720M Notebook Graphics Gaming Review

Nvidia GeForce GT  720M is a mid level gaming gpu that is found in most notebooks today. The Nvidia GeForce 720M is a notebook gpu that can be used to play any latest windows platform game till date (2013). This notebook gpu features a 28nm architecture which makes it more power efficient and delivers awesome performance at low power. In this post I will review Nvidia GeForce 720M and tell about its pros and cons, but lets start with its quick specifications.

nvidia geforce gt 720m

Nvidia GeForce GT  720M Specifications

Core Speed : 938 MHz
Memory : 2048 MB DDR3 VRAM
Memory Speed : 900 MHz
Memory Bus : 64 bit
Shader version : 5.0
OpenGL : 4.3
OpenCL : 1.2
DirectX : 11.1
Max Resolution : 2560x1600
Memory Bandwidth : 28.8 GB/sec with HDMI connection
Max Power : 17-25 watts
Supported Technologies : Optimus, Physx, CUDA, FXAA, OpenCL, Direct Compute
Audio : 7.1 channel HD audio on HDMI
GeForce Performance Score : 3.3 which means it is 3.3x times faster than Intel HD Graphics 4000.

Nvidia GeForce GT 720M Gaming Performance And Review

1. No Lags: While playing games on a Windows based pc this gpu never lags even at max resolutions. The games runs like a charm and I can’t find a single bit of lag that can destroy gameplay experience. Gaming on Nvidia GeForce 720M is smooth due to its 128bit memory bus through which it can process more data as compared to 64bit bus notebook gpu. Also OpenGL 4.3 is a boon to this gpu because it is the latest version of OpenGL. I have played games like NFS most wanted 2012, Call of duty MW3, Grid 2 and Battlefield 3 at full resolutions without lags. The gpu temperature reaches upto 40 degree Celsius while playing games in high resolution. You can use a laptop cooler to lower down the gpu temperature by few degrees.

2. No Overheating: While playing heavy games the gpu temperature is between 40-50 degree Celsius if the notebook is new. Nvidia GPUs are on better side than AMD GPUs because AMD GPUs run hot as compared to Nvidia. So overheating is not an issue for GeForce 720M as far as notebook is new. Overtime the temperature will increase because the (TIM) thermal interface material will dry out. Its maximum temperature is around 100 degree celcius. While playing games in summer season without a notebook cooler the the temperature may rise to70 degree celsius depending on the game which you are playing.

3. Nvidia Optimus : Nvidia Optimus technology automatically switches graphics between Intel HD graphics and Nvidia’s dedicated graphics. So due to optimus technology we get best all round performance while gaming.

4. GPU Boost : GPU Boost automatically overclocks the GPU chip whenever needed while gaming, if the laptop cooling system allows it. Nvidia GeForce 720M fully supports GPU Boost 2.0 which will deliver even faster and balanced performance when required.

5. 3D Support: The NVIDIA 720M fully supports 3D games, but you need a 3D monitor or 3D HDTV and you use HDMI cable for gaming.

6. Nvidia GeForce Experience:  The GeForce Experience is specially designed software for Windows that keeps the Nvidia drivers updated. It also downloads optimal game profiles for the games stored on your notebook's hard drive. It automatically optimizes PC games to deliver best performance while gaming. Download GeForce Experience

Nvidia GeForce GT 720M Vs Intel HD Graphics 4000
Intel HD Graphics 4000 is integrated graphics in Intel Core i3 processors. Nvidia GeForce 720M is 3.3 times faster and efficient than Intel HD Graphics 4000. You can check how to change between intel hd graphics and nvidia GT 720M on any laptop.

Gaming Via HDMI Cable
If you game on HDTV’s via HDMI cable then you will get best gaming graphics on a larger screen. Nvidia GeForce 720M has 2 GB dedicated DDR3 memory which is suitable for playing games on a larger HD screen via HDMI connection between your notebook and the HDTV.

No Issues With Older Games
Nvidia GeForce 720M is backward compatible with older games that are around 8 to 10 years older. I played GTA Sanandreas on this GPU without any error. However some games will give error due to incorrect resolution. So run these games in max resolution and settings. Few games require patch fix according to the windows OS you are running, but run smoothly.

Check Out The Video
Below is a gameplay video of NFS Most Wanted 2012 on Nvidia GeForce 720M at max resolution and settings.


Whatsapp Tips, Tricks And Hidden Secrets

Whatsapp is a cross platform instant messaging apps for android smart phones like android, IOS, blackberry, windows phone and Nokia Symbian. With Whatsapp you can send instant text messages to other people and can share files within the messenger. Whatsapp today is very useful because it can be found in almost every smart phone and is very easy to send instant text messages. In this tutorial you will learn about Whatsapp tips, tricks and hidden secrets that you might not know.

Whatsapp Tips, Tricks And Hidden Secrets 201


1. Start New Chat: Open Whatsapp and click the menu button on your smart phone, be it an android, IOS, blackberry or a windows phone. Now tap ‘New Chat’. Now select your friend from the list to start a new chat.

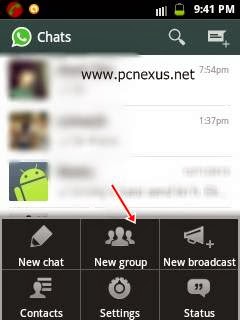
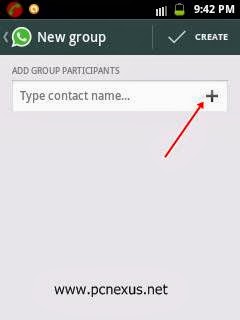
2. Group Chat On Whatsapp: You can group chat on Whatsapp. In group chat you can send same message to all the group members. To start a group chat click menu button and choose ‘New group’. Enter a name for your group and click ‘NEXT’ on top right corner. Now click the plus sign and put a check mark in front of all friends whom you want to add in the group. Finally click ‘DONE’ to add friends to the group. Now click ‘CREATE’ on top right. Now the group chat will be available in chats list. Tap the group to start group chat. To delete the group, just long press the group and choose ‘ Delete and exit group’.

whatsapp group chat        add contacts in group

3. Add Conversation Shortcut To Home Screen: Open Whatsapp and long press on any contact. Tap ‘Add conversation shortcut’. The conversation shortcut for that friend will be added to home screen. When you click this shortcut on home screen, the chat will open automatically for that person in Whatsapp. This is a quick way to start chat with whom you chat a lot.

4.Change Chat Background Wallpaper: At any time you can change the chat background wallpaper. To change it open chat with any friend. Click menu>wallpaper. Choose gallery and choose your wallpaper. If you choose Whatsapp in wallpaper instead of gallery, then you have to download Whatsapp wallpaper pack for android, IOS, blackberry or windows phone and install it. Now again click menu>wallpaper>Whatsapp and choose the wallpaper to set.

5. Backup Conversations: Whatsapp messages or conversations are automatically backed up everyday. But you can backup manually whenever you need. Go to Whatsapp chat list then click menu and choose ‘Settings’. Scroll down and select ‘Chat settings’, then click ‘Backup conversations’. You can restore message backup if you delete your account. Also if you move to different android phone with same account then you also restore this backup on new phone, see this tutorial for more info. This message backup is not cross platform, which means the Whatsapp message backup of android will run on android only but not on IOS apple Iphone or windows phone.

6. Block And Unblock Contacts: To block contacts on Whatsapp just start a chat with the desired contact. Click menu button of your smart phone and choose ‘More’. From the list choose ‘Block’. To unblock the contact repeat the process but this time choose ‘Unblock’.

7. Send Media Files: Media files include images, videos and audio files. You can share these media files in Whatsapp. Start a chat with any contact then click ‘Attachment’ icon on top right. From the list choose gallery, take photo (use camera to take photo), video and audio. The files will take time to upload depending on the file size and speed of mobile internet.

whatsapp attachments

8. Send Your GMaps Location In Whatsapp: To send your gmaps location to other contacts simply click the attachment icon on top right corner and choose location. GPS should be enabled for accurate location. Click ‘Send your current location’. Your location will be sent instantly. The location can be viewed directly in the phone, just click the link and the Gmaps app will automatically open with correct location. See this detailed tutorial for Gmaps.

send location in whatsapp

9. Change Notification Light Color: A notification light is a tiny LED light present in most smart phones like Sony Xperia smart phones. This light blinks when notification appears on your phone. You can change the color of this notification light, to identify that you have received a notification from Whatsapp. To change the color goto ‘Settings>Notifications>Light’. Choose your desired color from white, red, yellow, green, cyan, blue, purple.

10. Enable Popup Notification On Whatsapp: A popup notification on Whatsapp allows you to reply even faster, without having the need to check the notification slider. A popup notification opens up on your phone’s home screen when you receive a message. Suppose you received a message from a contact, then the popup notification for that contact with the received message will open in home screen with a text box to reply quickly. See the image below.

popup notification

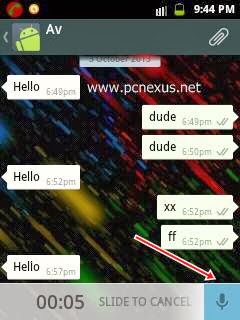
11. Voice Chat On Whatsapp: To voice chat on Whatsapp use the whatsapp recorder to quickly record and send your voice message to other contacts. Simply click and hold the microphone icon in below right corner during a chat. Hold the button to record the voice message and release it to instantly send it. This will make voice chat even faster because you don’t need to attach your voice message as an attachment.

voice chat

12. Update Status In Whatsapp: To update status in Whatsapp open it and click menu button. Then select ‘ Status’. Click the pencil icon to update your status. After writing the status click OK, you can insert smileys to your status.

13. Change Profile Pic In Whatsapp: To change the profile pic open the app click menu button and select ‘Settings’ then choose ‘Profile’. The current pic will open. Click add/edit and choose gallery or camera. Choose gallery to choose pic from sd card or choose camera to take a photo from camera.

14. Email Whatsapp Messages/Conversations As Text File: Your Whatsapp messages or conversations can be mailed as text file. Which means that you can email your Whatsapp messages as text to other people or to your self. To do this open a chat with any contact, then click menu and choose ‘More’. From the list choose ‘Email conversation’. A popup will open asking you to send an email with or without media attachments. Choose the desired option and then again choose the mailer app on your android phone. Either choose ‘Email’ or ‘Gmail’ to send the mail. If you deleted the conversation/chats accidently then to recover whatsapp messages when you lost the backup file check this tutorial.

15. Hide Last Seen In Whatsapp: The Last Seen time stamp in whatsapp tells other users when their contacts last checked their chat with them. You can hide Last Seen in whatsapp by going to ‘Settings>Account>Privacy>Last seen>Nobody’. You can either set it to ‘Everyone’ or ‘My contacts’ only.

16. Hide Profile Photo In Whatsapp: In whatsapp you can hide your profile photo if you no longer want it to be public. To hide profile photo go to ‘Settings>Account>Privacy>Profile photo’. You can either choose ‘Everyone’, ‘Nobody’ or ‘My contacts’.

17. Hide Whatsapp Status: To hide the status go to ‘Settings>Account>Privacy>Status’. Choose either ‘Everyone’, ‘Nobody’ or ‘My contacts’.

18. Send Encrypted Messages In Whatsapp: To send encrypted messages in whatsapp read this tutorial.

19. Use Bold, Italics And Strikethrough: You can send highlight a word in either bold, italics or strikethough in WhatsaApp to highlight a word. Please read this tutorial.

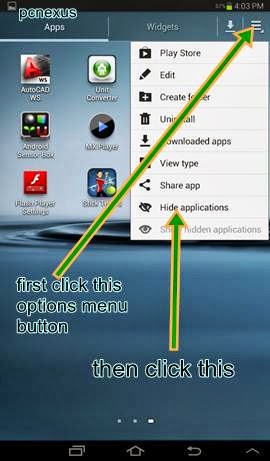
20. Hide Whatsapp App Icon On Screen: You can hide Whatsapp icon in apps menu. But this trick is supported only on phones running android 4.1 jellybean and above. To hide Whatsapp icon simply click the options menu situated on right of vertical arrow. Then select "Hide applications". Now choose Whatsapp and put a check mark on it by tapping it. Whatsapp icon will be hidden and nobody can see it. You can hide all apps by sliding the app drawer then choosing all apps on different screens. To unhide icon just click "Show hidden applications" in the same options menu.

hide whatsapp icon in apps menu

21. Install Whatsapp On Tablets Without SIM: Whatsapp can be installed on tablets without SIM support. See whatsapp for galaxy tab 3

Note: The tricks 15, 16 and 17 work only in whatsapp v2.11.169, v2.11.177 and above. You can download it from this link.

22. Whatsapp Hidden Trick
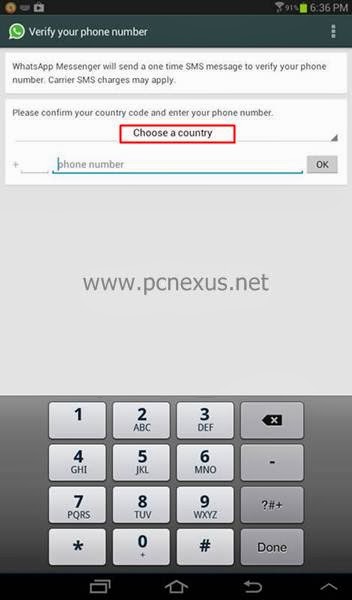
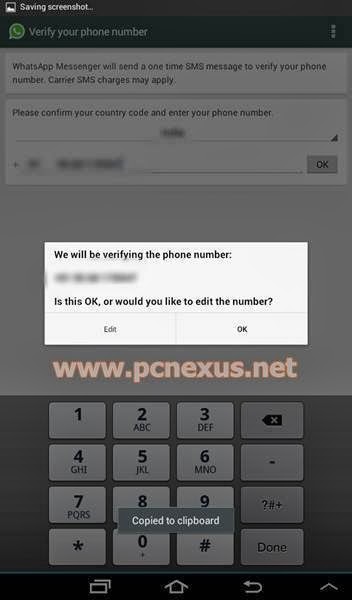
There is a hidden trick in Whatsapp that you can know about the person by his or her phone number. This trick helps you to find the person by his/her phone number and later you can search more about him/her in Google by the Whatsapp profile pic. Follow the steps below to apply this trick.

  • Save the contact number in your phone’s contact list.
  • Open Whatsapp and click the plus icon next to search icon on top right corner.
  • Now click menu button and choose ‘Refresh’. Wait for few seconds till your contact list is updated.
  • See if that person is showing up in your Whatsapp contacts list. If it appear in your contacts list then click on it.
  • Now click menu button and choose ‘View contact’. Then click on its tiny profile pic. Let the image to load completely. After image is loaded goto to this directory ‘SDcard>Whatsapp>Profile Pictures’.
  • That photo will be found in this directory. Now you can search this image on Google by Google image search by uploading the image to Google and searching it. You can get much information about that person from Google. Better use a pc to search this image.
Note: This trick is only applicable if the person is using Whatsapp.

23. Download Whatsapp Emoticons Pack: You can download all the Whatsapp emoticons in PNG format. Download Whatsapp Emoticons.

24. Install Whatsapp On iPad: See install Whatsapp on iPad without jailbreak

25. Disable Automatic Chat History Backup: Whatsapp automatically backs up chat history/conversations in database file with a crypt format. This file is stored in 'sdcard>Whatsapp>Databases'. This file contains all the chats that you have sent or received on Whatsapp. If you do not want this database to be saved automatically then switch off your phone, because Whatsapp automatically creates chat backup at 4:00 AM. If at this time your phone is off backup can't be done.

26. Enable Whatsapp Calling Feature In Whatsapp : Whatsapp has a new calling feature with which you can make voice calls, voip calls or even free international calls. To know how to enable this read this tutorial.

How To Install Whatsapp On Android Tablets Without SIM Card Support

If you own an android smart phone then you are definitely using Whatsapp messenger. Whatsapp is a free messaging app for android with which you can send text messages and media files like images, audio files and video files. Whatsapp requires an android phone with SIM support. Also you require a working phone number to use it.

Whatsapp currently doesn’t support android tablets, but in this tutorial I will teach you to install Whatsapp on android tablets. The tablets can be Wi-Fi only android tablet or android tablet having SIM support. But do not worry as the this tutorial for installing Whatsapp on tablets will work on both types of android tablets like Galaxy Tab 3, Galaxy Tab Pro 12.2 SM-T900, Galaxy Tab 4, Galaxy Tab Pro 10.1 SM-T520 and all other android tablets.


Please Note: This tutorial is only tested on Samsung Galaxy Tablets. I am not saying that it will work on every android tablet. Day by day WhatsApp is getting updated so it may not work on tablets. It is officially not supported on larger screens and devices which do not have a SIM support. So, whatever I am writing here is just a tutorial trick that worked on Samsung Galaxy Tablets.

Install Whatsapp On Wi-Fi Only Android Tablets With No SIM Support

  • Download and install the latest version of Whatsapp for android here.
  • Now install the app. If install is blocked enable unknown sources. Then re-install the app.
  • Now after installing the app, open it. When you open it you will see a welcome screen. Click the ‘Agree and continue’ button.
  • When you click this button a note will open stating that “tablets are currently not supported.”. Click OK to begin the setup.
  • On the next screen you need to enter your phone number and choose the right country where you lives in.
  • Enter the phone number which you use often. Do not enter your friend’s phone number.

Whatsapp on android tablet

  • After entering the phone number click OK.
  • When you click OK a popup will open asking you to verify your phone number. Click OK again.

whatsapp verification

  • Whatsapp will automatically try to send a sms to the number specified by you. But after few minutes the sms verification will fail.
  • Now you will have to verify your number via voice call. Click the ‘Call me’ button to receive a voice call on that number. Hear the 6 digit verification code carefully. Enter this code in Whatsapp to verify your phone number.


  • Now enter your name for Whatsapp profile and follow the instructions by clicking the ‘Next’ button on top right.
Now you have successfully installed Whatsapp on Wi-Fi only android tablets with no SIM support. To add contacts in Whatsapp just save the contacts list on your tablet and refresh the list in Whatsapp. Now you will need a working data network for sending and receiving messages on Whatsapp. You can use your smart phone’s network on your tablet via Wi-Fi hotspot, see this tutorial. Now Whatsapp will work on your android tablet.

If you encounter any problem while installing Whatsapp on android tablet then feel free to ask via comments. Now learn to install Whatsapp on iPad without jailbreak.

Must Read

Asus X550CC-XO072D Notebook Review

Asus X550CC-XO072D is the latest notebook launched by Asus. This notebook belongs to the X550C series which comes under versatile series and is dedicated to performance. This notebook is very light to carry and weighs only 2.28 kgs. In this post I will review the Asus X550CC-XO072D notebook and will tell you about it in depth, also I will tell its pros and cons in detail.

asus x550cc-xo072d

Asus X550CC-XO072D Specifications

CPU : 3rd Gen Intel core i3 3217U CPU clocked at 1.8 GHz.
CPU Cache : 3 MB.
RAM/Memory : 4 GB DDR3 1600 MHz Single channel.
Hard Drive/Storage : Hitachi 500 GB HDD at 5400rpm. Read Upgrade/Replace Hard Drive on ASUS X550CC-XO072D
Graphics : Integrated Intel HD Graphics 4000
                Dedicated Nvidia GeForce GT 720M
Graphics Memory : Intel HD Graphics 4000 - 1696 MB shared memory
                            Nvidia GeForce GT 720M – 2 GB dedicated memory
DVD Drive : Matshita DVD RAM RW 8X SM DL.
OS : Free DOS
Bluetooth : Bluetooth 4.0.
WLAN : 802.11 b/g/n.
Webcam : HD Camera.
Ports : 1x USB 2.0 and 1x USB 3.0.
           1x RJ45 LAN port.
           1x VGA port.
           1x HDMI port.
           1x 3.5 mm Combo audio jack for mic in, headset and speaker out.
           Charging port DC in.
           Card Reader SD/SDHC/SDXC

asus x550cc xo072d ports

Screen : 39.6 cms (15.6 inches) HD Non Glare.
Keyboard : Island style chiclet keyboard.
LED Lights : Six LED lights for power, charging, hdd, wlan, numlock and capslock.

asus x550cc xo072d led indicators

Special Features : Ice cool technology, crystal clear and powerful sound with sonic master, true 2 second instant On and smart gesture.
Battery : 4 Cell 2600 mAh Lithium ion battery.

Asus X550CC-XO072D Full Review


1. Build Quality : The build quality of Asus X550CC- XO072D is very good. The back part of the notebook has got a finger print finish and a metallic ‘ASUS’ logo in the middle. The finger print finish makes the notebook very grippy to hold in hand and cannot slip out of hand accidently. The keyboard is of chiclet style and keys are very smooth and responsive. The keys rest on a silver panel. The touchpad is quite big enough and responsive and comes with ‘Ice Cool Technology’ which keeps the entire palm rest and touchpad very cool. All ports are on the left side, and on the right side there is DVD RAM drive. The battery rests on the back panel with two locks. One is automatic lock and other one is manual lock so battery can’t come out accidently on its own.

asus x550cc xo072d

2. CPU : The Asus X550CC-XO072D has 3rd generation Intel core i3 3217U CPU clocked at 1.8 GHz. The ‘U’ in 3217U means that the CPU is ultra portable and 'Ultra Low Voltage' and requires very low power to operate. The power required by Intel core i3 3217U is just 17 watts. This processor is designed to deliver performance at low power. The i3 3217U is built under code name Ivy Bridge and uses 22nm technology which makes it a powerful CPU requiring low power of 17 watts only. The new thing is that this processor has a maximum operating temperature of 105 degree Celsius which is highest as compared with other Intel processors. So heating is not an issue for this CPU and it won’t overheat often even while gaming. You might be thinking about the low clock rate of this processor which is just 1.8 GHz. But one thing I tell you that don’t underestimate the power of this CPU. This processor includes new instructions that previous second generation i3’s missed, so it is a powerful CPU and can handle any latest game without any single bit of lag. For full specifications of Intel core i3 3217U click here.

3. RAM/Memory : The Asus X550CC-XO072D has 4 GB DDR3 1600 MHz onboard memory which makes it very fast in launching applications and booting. The bios booting just only takes 2 seconds to on from sleep and this technology is known as ‘True 2-Second Instant On’. The memory can be further upgraded to 8 GB.

4. Storage/HDD : The Asus X550CC-XO072D notebook has a 500 GB Hitachi HDD which runs at 5400 rpm. The hard disk is fast enough at reading, writing and moving data. But you should regularly clean unwanted files and defrag it timely for fast performance.

5. Graphics/GPU : The Asus X550CC-XO072D notebook features two types of graphics. One is the integrated Intel HD graphics 4000 with a shared memory of 1696 MB and other one is dedicated NVIDIA GeForce GT 720M with a dedicated memory of 2 GB or 2048 MB. The NVIDIA PhysX control panel allows us to switch graphics, so you can choose whether to use the integrated or dedicated graphics. The NVIDIA GeForce 720M is a very good notebook GPU that allows you to play latest games at full resolution without any serious lags. I have tested games like Call of duty modern warfare 3 and NFS most wanted 2012 without any single bit of lag. The games run smoothly without overheating the CPU because mostly the work is done by the NVIDIA GPU if PhysX is set to auto mode. The CPU temperature remains under 60 degrees Celsius while gaming. Other technologies supported by this GPU are GPU boost, direct compute, CUDA, Optimus (switch between integrated and dedicated graphics).  Check NVIDIA 720M Gaming Performance.

6. Temperature:  The ASUS X550CC-XO072D has 3rd generation Intel Core i3 3217U processor which is built on Ivy bridge 22nm technology. So the CPU runs hot. During browsing the internet the temperature rises to 47 degrees celcius, GPU temperature keeps at 39 degrees celcius. But CPU temperature sometimes rises to 50 degrees while only browsing. While gaming the temperature rises to upto 57 degree ceclius and GPU temperature becomes 40-45 degrees. The temperature highly depends on CPU usage. Only 30% CPU usage rises the temperature to 50 degrees. You can use a notebook cooler while playing games if you don't have one hen build it yourself, see here.

The maximum CPU temperature of Intel Core i3 3217U is 105 degree celcius. So while playing games like Call Of Duty Ghosts the temperature may rise to 60 degrees. The normal temperature of this notebook is 43-50 degree celcius. Do not use laptop cooler except while gaming because unnecessary use of it will increase dust accumulation in the laptop fan.

Specifications Of Nvidia GeForce 720M

  • Core Speed : 938 MHz
  • Memory Bus : 64 bit
  • Memory Bandwidth : 28.8 GB/sec
  • DirectX : DirectX 11.1. Which is the latest.
  • OpenGL : OpenGL 4.3.
  • OpenCL : OpenCL 1.2. Which is the latest
  • Max Resolution : 2500x1600.
  • Shader : 5.0
  • GPU Memory : 2 GB dedicated memory which is very good for larger screens like hdtv if you connect this notebook via HDMI cable. Nvidia GeForce GT 720M scores 6.6 in windows experience index. For full specifications of NVIDIA GeForce GT 720M click here.
6. Battery : The battery doesn’t take long time to charge and can give backup upto 3 hours if used for normal computing. The battery is of 4 cells 2600 mAh.

Windows Experience Index
Below is the data of windows experience index for Asus X550CC-XO072D.

  • Processor : 6.2
  • Memory (RAM) : 5.9
  • Graphics : 4.8
  • Gaming graphics : 6.6 which is enough to play any latest pc game.
  • Primary hard disk : 5.9
The overall windows experience index score is 4.8.
Price
The Asus X550CC-XO072D is priced at $544 or 33500 INR.

Asus X550CC-XO072D : Pros

  • 3rd gen Intel Core i3 processor.
  • 4 GB DDR3 1600 MHz RAM.
  • Nvidia GeForce 720M graphics with 2 GB memory which is best for gaming on larger HD screens.
  • Good built.
  • True 2 second instant ON from sleep.
  • Crystal clear and powerful sound.

Asus X550CC-XO072D : Cons
In Asus X550CC-XO072D there are only 2 USB ports and that are closed to each other. So you can’t connect a dongle and a USB drive together, but two USB drives can be connected together. So if you want to connect a dongle and USB flash drive together then use a female USB extension wire.

It has got a problem with Wi-Fi, it sometimes doesn't detect the Wi-Fi networks in range. So I have to log off Windows and again log on then it connects to Wi-Fi, otherwise no issues with Wi-Fi and it works perfectly even mobile Wi-Fi hotspots. Check this tutorial.

Gallery
Click on any image to view larger size.


asus x550cc xo072d

chicklet keyboard

asus x550cc-xo072d


Verdict
This Asus notebook is good for a medium end gamer and powerful computing due to its latest Intel i3 processor and NVIDIA 720M gpu. So if you looking for a budget notebook that is good for gaming, computing and requires low power then Asus X550CC-XO072D is the best choice.

That was the Asus X550CC-XO072D notebook review. If you have any question about it then you can ask here via comments.