This Domain Name Is Up for Sale
Contact Us

Samsung Galaxy S Duos S7562 Tips And Tricks

Samsung Galaxy S Duos S7562 Tips And Tricks

Samsung Galaxy S Duos S7562

Is an android 4.0 smartphone.It is a dual sim android phone with a 1 GHz single core processor and 768 MB of RAM.The screen is of 4 inches having a resolution of 800x480 pixels and is capable of displaying 16 M colors.Galaxy s duos  has adreno 200 graphics which means that this  phone can be also used for gaming.In this post you will learn some essential tips and tricks for Samsung galaxy s duos S7562.In this tutorial you will learn 20 tips and tricks for galaxy s duos.Out of 20 tips and tricks 4 are gaming tricks.

Samsung Galaxy S Duos S7562 Tips And Tricks

1.Take Screenshots On Galaxy S Duos : This is the very first trick and easiest of all.To take screenshots on galaxy s duos just press home and power button at the same time and hold them for 3 seconds.The screencapture photos will be automatically saved to sdcard>ScreenCapture folder on phone’s storage.

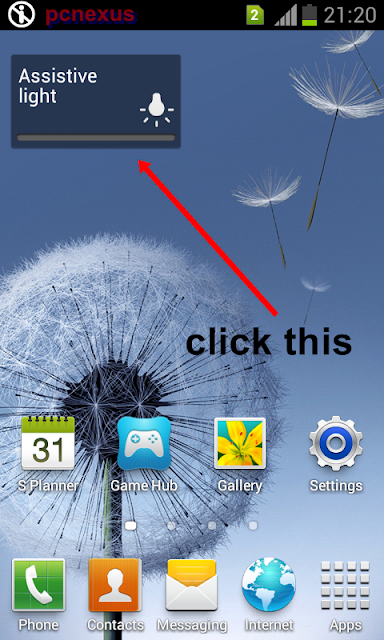
2.Use Camera Flash As Torch : Samsung galaxy s duos is equipped with a 5 MP powered with a LED flash.This LED flash is not only for taking pictures in dark also it can be used as a standalone torch.To use camera flash as torch click “Apps” on homescreen and then click “Widgets” tab on top right.Now from this list of widgets select “Assistive Light”.The widget will be added to homescreen.Click the “Assistive light” button to use the camera flash as torch.


3.Change Font Style : You can change the font style on your galaxy s duos.There are 4 font styles available in it.To change font style goto Settings>Display>Font Style.You can select your desired font from a list of 4 font styles.You can choose between helvetica,choco cooky and rosemary font style.


4.Show CPU Usage : You can see your CPU usage while using the phone.To see cpu usage goto Settings>Developer options>Show cpu usage.


5.Show Battery Percentage : You can see battery percentage of your galaxy s duos’s battery without installing battery percentage app or any other special battery app.Battery percentage option will show you the percentage remaining on your phone’s battery.It will warn you against low battery.To enable battery percentage on galaxy s duos goto Settings>Display>Battery Percentage and check it.You will see battery percentage in notifications bar before battery icon.


6.Limit Background Processes : Limiting background processes can increase your phone’s battery life.Running low number of background apps will surely increase battery life.To limit background processes goto Settings>Developer options>Apps>Limit Background Process>Select number of apps.You can limit a maximum of 4 background apps.

7.Encrypt SD Card And Phone : Encrypting your SD card and phone will secure it against misuse.To encrypt phone and SD card your phone’s battery should be charged to above 80%.Be careful before encrypting the phone and SD card,backup your entire data on your pc first.Your encrypted SD card may not work on other android phones.To encrypt phone and sd card goto Settings>Security>Encryption>Encrypt device or Encrypt external device.

8.See All Widgets : To see all the widgets click the “Apps” on homescreen then select the “Widgets” tab.You will see all the widgets installed on your phone.You can slide left or right to access all the widgets.Just click on any widget and it will be automatically added to homescreen.


9.See All Downloaded Apps : These are the apps that you have installed from play store or from somewhere else.To see all the downloaded apps click “Apps” on homescreen then click the vertical arrow next to “Widgets” tab.Click this arrow to see all the downloaded apps on your phone.

10.Access Shortcuts In Notifications Bar Slider : Just click on the top of the screen and slide down.You will see an array of important shortcuts here.These shortcuts include wifi,gps,sound,screen rotation,notification,Bluetooth,driving mode etc.These are quick shortcuts.You can activate or deactivate android system services with one click through notifications slider.


11.Backup Contacts On Galaxy S Duos : You can backup all your contacts on galaxy s duos without installing any other app.To backup contacts open Contacts and then click menu button.A list will open,select “Import/Export” option.Further select an option like where you want to backup contacts like SD card or phone or sim.Based on your selected option the contacts will be backed up to sim/sdcard/usb storage in .vcf format.Later you can import these contacts to your phone’s sim.To import contacts reverse the above process.


12.Quick Redial Recently Dialled Contact : To quickly dial the recently dialled number you don’t need to open the contacts log. Just open the dial pad and click the button just below the ‘*’ key. After pressing this key the number will be automatically typed then you can dial that number without typing.

13.Trim Or Crop Videos On Galaxy S Duos : You can trim videos on galaxy s duos.Trimming a video means cutting a short part from it.To trim any video proceed as follows.

1.Play any video then press the menu button and select “Trim” from the list.
2.A video trimming program will open.Slide the trimming sliders from left or right to select the part.
3.After selecting the the trim part click trim.A popup will open select “Trim as new video”.
4.Trimmed video will be found in sdcard>Output.

14.Record Incoming Calls On Galaxy S Duos : To record incoming calls you need to download “auto call recorder”.This app will record all incoming calls on your phone.You can download it here.

15.Attach Any File In Gmail On Galaxy S Duos : Currently gmail for android doesn’t allow you to attach files except images.But with this trick you can attach almost any file in gmail.To read more about this trick you should read attach file gmail tutorial.

16.Chat Via Bluetooth Without Any App On Galaxy S Duos : You can chat via Bluetooth on galaxy s duos without installing any Bluetooth chat app.Read this tutorial about Bluetooth chat on android without any app.This will work with galaxy s duos.

17.Play Playstation PS1/PSX Games On Galaxy S Duos : You can play playstation ps1/psx games on galaxy s duos with fpse for android.Read this tutorial to play ps1 games on galaxy s duos.

Other gaming tricks include the following tutorials.You should read them to play games on galaxy s duos.The gaming tricks are given below.

18.Play Nes Games On Galaxy S Duos : Read This Tutorial.

19.Mame and CPS1 Games On Galaxy S Duos : Read This Tutorial.

20.DOS Games On Galaxy S Duos Tutorial : Read This Awesome Tutorial.

21.Download Galaxy Call Recorder For Galaxy S Duos : If you want to record incoming and outgoing calls on your s duos then download the galaxy call recorder from google play.Only this call recording app will work with your s duos.

That were 21 tips and tricks for Samsung galaxy s duos S7562.Hope you liked them.If you like the tips and tricks for galaxy s duos then you can share this article.
How To Install Flash Player On Samsung Galaxy S Duos S7562

How To Install Flash Player On Samsung Galaxy S Duos S7562 Samsung galaxy s duos S7562 is a dual sim android 4.0 smartphone.It has a 1 GHz processor and 768 MB RAM and also adreno 200 graphics.This android smartphone is good for low level gamers which require a dual sim android smartphone.This tutorial will teach you to install adobe flash player on Samsung galaxy s duos.

Installing flash player on android galaxy s duos is required to view flash content on your phone while browsing websites in desktop mode.Also you can directly view youtube videos in the the browser itself without launching the android youtube app.

Install Flash Player on Galaxy S Duos
1.Download and install adobe flash player 11.1 for android 4.0 ice cream sandwich from the link below.Because galaxy s duos runs on android 4.0 so you should install flash player 11.1.

Adobe flash player 11.1 android 4.0 apk Download

2.Make sure not to disable data traffic on your phone.Install Flash player 11.1 apk.
3.Now open flash player 11.1 app by clicking ”Open” after installation.Open with default android browser for quick settings.
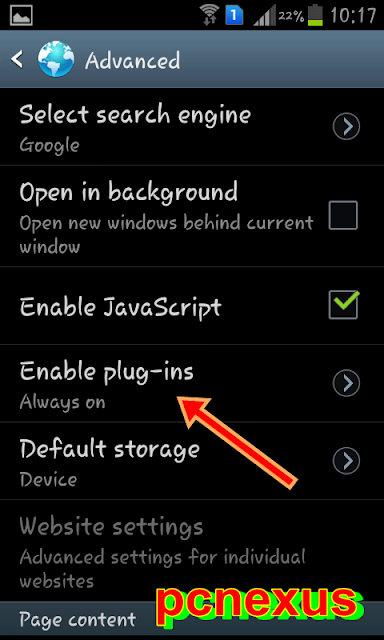
4.Now open default android browser and goto “Settings” then click “Advanced” then click “Enable plug-ins” and select “Always on”.This will allow the flash player plugin to load while playing youtube videos on default android browser.


5.Now goto youtube and open it in desktop mode by clicking the top right menu and selecting “Desktop” at the end of menu.
6.Click to play any video of your choice.The video will play depending upon the internet speed on your galaxy s duos.
7.You will see that youtube videos will play in the default android browser’s flash player plugin and no youtube app will launch automatically.Here is the proof below.

Youtube videos playing directly in the default android browser’s flash player.


Now you have successfully installed flash player 11.1 on your galaxy s duos.Let others know about this
wonderful article share it if you like like it.

Essential Facebook Tips And Tricks For Every Facebook User

Essential Facebook Tips And Tricks For Every Facebook User Facebook is a social networking site.We use it to connect with the people in our life.If you are new to facebook then you might not know about latest facebook tips and tricks 2013.These tips and tricks are essential and useful to every user in 2013.You will like these tricks which I am going to tell you through this post.So lets start.

1.Send Exe Files On Facebook : Exe files are executable windows files.Every windows software has an extension of .exe.Facebook doesn’t allow you to send files having an extension of .exe.But it doesn’t mean that we can’t send exe files on facebook.Here is a simple trick through which you can send exe files to multiple friends at one time.For this trick I will be using facebook messages.

1.Login to your account.
2.Goto facebook.com/messages.
3.Click new message on the top and enter your friend’s name.
4.You can enter multiple names in the message by selecting multiple friends.You can choose your friends from the message list on the left.
5.Now compress the exe file using winrar.It will change the extension of that file from .exe to .rar.Now you have to send this rar file only containing the original exe file.


6.Now at the bottom you will see “Add Files”.Click this and select your compressed exe files and press enter to send.This trick will send exe files on facebook.

2.Send Photos In Chatbox : Open chatbox with any friend and click the settings button in chat box.Now choose "Add Files".Click this and choose multiple photos to send in chat box.Through this method you can also send exe files in rar format.


3. Get Updates From Non-friend Users On Facebook : You can’t get updates from a person with whom you are not a friend on facebook.But you can still get some updates from that person.The updates will be limited to page likes,photo tags,public information,comments and facebook games.Now to get updates from a non-friend person on facebook do as follows.

1.Add that person as friend on facebook.
2.Now goto homepage and click “Friends” on the left side bar,a list will open.Now click “Close Friends”.
3.On the right you will see a list of your close friends.You can add that person in this list just type his name in to “Add friends to this list” text box and select it.


4.It will be automatically added to your close friends sections.Now you will see updates from that friend in this close friends sections only.You will see updates only that are made public by her/him or shared with you.

4.See Your Old Status Updates : Before getting a timeline update it was difficult to see your past post updates on facebook.But today with timeline and facebook activity log it is possible to see the status updates that you updated in the past some 8 or 9 years ago.To see your past status updates on facebook proceed as follows.


go to your profile and click activity log.A page will open now select “Your posts” on the left side bar.This will open all the status updates till date you have made on facebook.You will see the timeline years on the right.Just select the year and month and see what status you had updated in that month and year.

5.Turn On Chat For Only Some Friends : If you don’t like to chat much and want to chat only with your close friends then you can limit the chat for some close friends only.To do this follow the instructions below.

1.Open the chatbox and click the gear icon.Then click advanced settings.


2.A page will open about advanced chat settings.In this setting you will see an option “ Turn on chat for only some friends”.


3.Choose this option and in the text box enter the names of all you close friends one by one and select them.Then click save.Now you will see only that friends online on facebook chat.

6.View Profile As Public : Viewing your own facebook profile as public will give you an exact idea how it will look to the public and what things are visible to them.After viewing your profile as public you can control your privacy settings.To do this.

1.Goto your facebook profile and click the gear icon next to activity log and select “View As…”.When you click this you will see your own facebook profile as public.


2.There is an alternative trick to view your own facebook profile as public without logging in to your account.Just enter this address in your browser’s address bar.

http://www.facebook.com/MyUserName

3.MyUserName is unique user name for your profile.
5..If you know your user name then good but if you don’t know then log in to your facebook account and goto your profile by clicking your name.Now see the address in your browser’s address bar.It will look like as follows.

https://www.facebook.com/profile.php?id=somenumber

Copy this address and logout of your account.Now paste this address in the browser’s address bar.Now you will be able to see your own facebook profile as public.

7.Install Facebook Messenger On Your Desktop : Facebook messenger is available for windows.So if you want to chat from your desktop then goto

https://www.facebook.com/about/messenger


to download the facebook messenger for windows.Click “Install Now” and download the messenger and install it.After installation you will be able to chat on facebook from your desktop or laptop.You can also install facebook messenger on mozilla firefox and google chrome just read this tutorial.

How To Play Dos Games On Android

Everybody has played the old classic dos games back in 1990 on a windows pc. Dos games were very popular at that. Due to modern windows software these old dos games cannot run on windows 7 and windows 8 due to compatibility issues. If you want to play dos games then you can play them on any android phone with an android app called andosbox. This app lets you to play dos games on android.So are you ready to travel back in time to play dos games.

First you need to change the input method on your android phone and set it to swype because in andosbox the normal keyboard will not work if you are using a Samsung android phone,but will work with other phones. To select select swype keyboard goto Settings>Locale & text>Select Input Method>Swype.

For android 4.0.x goto Settings>Language & Input. Under "Keyboard & Input Methods" select "Swype". However if your normal keyboard is supported by andosbox then there is no need to change it to swype.

How To Play Dos Games On Android


You need to download the prince of persia dos game and dos emulator for android andosbox from the links given below. AnDosBox is not a free app, so you need to buy it.

1.Prince of persia Dos game. You can search in Google for this.
2.AnDosBox Android apk Download

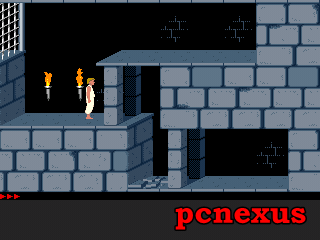
prince of persia dos game on android

Instructions
1.Make a folder on your phone's memory card as "Dos" and put the extracted Prince folder of prince dos game in this folder.The directory looks like Dos>Prince>prince.exe
2.Now open AnDosBox app.
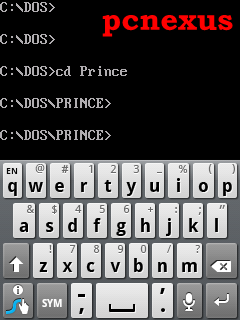
3.Click the menu button on your phone and select "Keyboard".A command prompt will open like C:\>
4.Now click menu and select keyboard and type "cd Dos" and press enter.Your directory will now look like as C:\DOS>.Now again select keyboard and type "cd Prince".Now your directory will look like as C:\DOS\PRINCE>.Now in front of this type "prince.exe" and press enter.The prince of persia dos game will run.

andosbox

Settings For AnDosBox To Play Dos Games
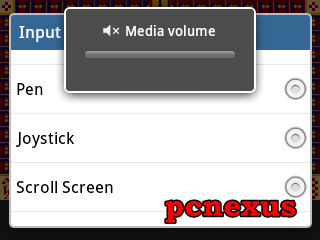
1.While the game is running press the menu button on your android phone and select "Input Mode".Choose "Joystick" from the list.

andosbox settings

2.Again click the menu button and select "Buttons" then select "Hide Buttons".
3.You won't see any buttons to play the dos games and your android phone's touchscreen is the only way to play them.When you touch the screen on right the character will move forward,when you touch it on left the character will move backward and so on.

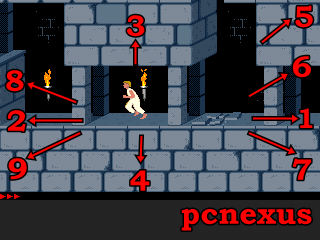
Below is the full image description of touchscreen controls to play dos games on android.

andosbox joystick controls

1.Touching this point will move the prince towards right.
2.Touching point 2 will move the prince character to left.
3.Touch this point to jump vertically.
4.Touch this point to allow the character to sit.
5.Touch this point to start new game after game is over.
6.This point is a combination of up and right buttons.
7.This point is a combination of down and right buttons.
8.This point corresponds to combination of up and left buttons.
9.This point corresponds to combination of down and left buttons.

You can swipe along the directions shown in the picture to move the prince character accordingly.If you face any problem while running the game then feel free to ask.

We have more tutorials for video gaming on android.Check out these.
1.Play Playstation ps1/psx games on android.
2.Play Mame and CPS1 games on android.
3.Play Nes games on android.

Samsung Galaxy Ace Duos S6802 Tips And Tricks

Samsung Galaxy Ace Duos is a dual sim android phone with a 3.5 inch touchscreen and many more decent features.It runs on android 2.3.6 gingerbread and have a single core 832 MHz processor and 397 MB RAM.This phone has an inbuilt storage of 2.5 GB and 0.98 GB is available separately for installing android apps.So in most of the times you won’t need a sd card.You can enjoy android games on it’s big screen and can run higher resolution apps.Here are some tips and tricks for galaxy ace duos S6802.

Samsung Galaxy Ace Duos S6802 Tips And Tricks 1.Add Power Control : A power control is a widget that allows you to turn on and off some connectivity features of your phone.A power control widget is a shortcut to access Bluetooth,wifi,gps,sync and brightness adjustment.By using a power control widget you can turn on or off these connectivity features and can increase or decrease brightness of your phone’s screen with one press of an individual button.To add a power control on your phone’s homescreen click the menu button on homescreen then select Add>Widgets,then scroll down a little bit and select Power control.The widget will be automatically added to your phone’s homescreen.


2.Advanced Calculator : Samsung galaxy ace duos has a built in advanced maths calculator including the trigonometric ratios.You don’t need to download the real calculator app separately because your phone has an inbuilt advanced panel for maths calculations.To enable advanced panel on  calculator open the calculator app then click the menu button on your phone then select “Advanced panel”.Advanced calculator with trigonometric ratios,exponents and logarithms will open.


3.Backup Apps On Galaxy Ace Duos : Galaxy ace duos has an inbuilt storage of 4 GB out of which 2.5 GB is user available and 0.98 GB is reserved for apps what you install on your phone or sd card.So in 0.98 GB of space you can install many apps.Also you can backup the android apps installed on your phone either to phone storage or sdcard.To backup apps you need to install android assistant which is freely available on playstore.


Download it from play store.After downloading it open it and move to tools ,you will see apps and backup.Click on this icon and you will be shown a list of apps you wish to backup.Select the apps you want to backup.The apps will be backed up to the memory card in apk format.Later you don't need to download them from play store.You can directly install them from memory card.Apps will be backed up to AndroidAssistant_appbackup folder.

4.Install Android Apk : Apk is the extension of android apps and stands for android package.Android apps can be installed outside of google play store.First download the required app’s apk file to your phone or memory card and click it to install.But the installation will be blocked due to non playstore apps.To install apk first enable unknown resources by going to Settings>Applications>Unknown resources and check it.Then navigate to that app and click it then select install.After few seconds the app will be automatically installed.

5.Trim Video On Galaxy Ace Duos : You can crop or trim videos on your galaxy ace duos S6802 without installing any app.The video trimming option is inbuilt in galaxy ace duos’s video player.To trim video on galaxy ace duos S6802 you should follow the instructions below.

1.Play any video that you want to trim.


2.While playing a video on galaxy ace duos you will find a scissor icon in the player.You need to click this scissor icon to trim the video.


3.When you click this scissor icon a trim program will open showing you the trimming options and the video itself.You will see two marks one is at the start and other at the end of video.You can adjust these slider according to your needs by sliding them left or right.When you finish selecting the video to trim,click Trim below the sliders.
4.When you click Trim a popup will open.Select “Trim as new video”.
5.The trimmed video is stored in sdcard/phone storage>Output folder.

6.Install Flash Player On Galaxy Ace Duos : Galaxy ace duos is an armv6 android phone.So we can install the armv6 version of the adobe flash player on it.Flash player is needed to play flash content in browser while browsing on your android phone.Check this full tutorial to install flash player on galaxy ace duos.

7.Switch Between SIMs : Samsung Galaxy ace duos is a dual sim phone so you can select the sim for incoming,outgoing calls and data network.Slide down the notification slider and click SIM 1 or SIM 2.When you select any sim then it will be the default sim for outgoing calls however you can receive calls on both sims.Also you can set on which sim you want to use the data network.To do this goto Settings>SIM card manager.Click Data service network and select your desired sim.


8.Smart Dual SIM : With smart dual sim you can receive calls from both SIM cards even during calls.To enable this feature goto Settings>SIM card manager>Smart Dual SIM.Click it then click ok then enter your sim card mobile numbers and follow instructions to enable smart dual sim.

9.Clear RAM On Galaxy Ace Duos : To free up RAM on galaxy ace duos you can use the inbuilt task manager.Open the task manager and click RAM.Then click Clear memory.The android apps wasting phone’s RAM will be killed and RAM will increase.


10.Access Sdcard : Insert a memory card in galaxy ace duos.All files stored on the sdcard can be viewed in My files>external_sd.This folder contains files stored on your memory card.

Hope you liked the tricks for galaxy ace duos S6802.

How To Root AT&T Samsung Galaxy S3 I747 With Casual

How To Root AT&T Samsung Galaxy S3 I747 With Casual This tutorial will teach you to root  at&t galaxy s3 I747 in a simple way.Rooting the android phone was very cumbersome and risky previously because if the procedure fails the can brick itself which is no longer usable.But using casual to root your at&t galaxy s3 is very easy as a press of a single button.Also there is no other risks like device bricking.Rooting galaxy s3 at&t with casual is safe.CASUAL is a java software developed by xda developer Adam Outler specially to root the at&t galaxy s3 which uses the CFAutoRoot script by Chainfire.CASUAL stands for Cross-platform ADB Scripting Universal Android Loader.

galaxy s3 at&t

Things You Will Need
1.Java runtime environment
2.Casual for AT&T galaxy s3 I747
3.Samsung USB drivers or KIES

Note : Pcnexus will not be responsible for any damages to your device.Do it at your own risk.

First of all download and install java from the link above.Without installing java the CASUAL software won’t run because it is a jar file which is a cross platform file that will run on windows,mac and linux.So java needs to be installed.The procedure is same for windows,mac and linux which means that you can root at&t galaxy s3 on these platforms by using the same procedure.

Root AT&T Galaxy S3 I747 With Casual On Windows,Mac And Linux
1.Download the casual software from above link.After downloading it open it.It will take few seconds to open.
2.Enable USB debugging on your phone by going to Settings>Developer Options>USB Debugging.
3.Connect your at&t galaxy s3 to your pc either running windows,mac or linux.

casual

4.Now Click Do It! To root the phone.
5.The rooting process will complete in few minutes.

Now you have successfully rooted the at&t Samsung galaxy s3 I747 with CASUAL.

How To Install Hindi Language Keyboard On Android

How To Install Hindi Language Keyboard On Android This guide will teach you to install a Hindi keyboard on android.The Hindi keyboard is of great importance to Indian android users.The Hindi language is not coming preloaded in any android device but it can be found in some Java based phones.You might be thinking that you need to root your android phone then flashing a software in download mode.But don’t worry the process is totally hassle free and there is no need to root or flash your phone to install Hindi keyboard.

google hindi input

However installing any kind of keyboard is not recommended if it is not from a trusted developer because it may collect your passwords,credit card numbers,secret codes and whatever you type on that particular keyboard.Do not install any keyboard on android until it is from a trusted developer.You will be glad to know that the Hindi keyboard for android is officially and specially developed for Indian android users.So the Hindi keyboard has the trust of Google and we don’t need to worry much.This app is known as Google Hindi Input.Actually it is a keyboard app that allows you to type in Hindi language with good quality font which is easily visible and understandable.

Google Hindi Input is available for free on Google play store and you can download it from the link given below.

Download Google Hindi Input

Setup Google Hindi Input On Android
Before using Google Hindi Input keyboard you need to set it up to write in Hindi.Follow the steps below to set it up.

1.Download and install Google Hindi Input from play store.
2.For android 2.x devices : Goto Settings>Locale & text.Here you will find “Google Hindi Input”.Put a check mark in front of it to enable the Hindi keyboard by google.


3.Now goto messages and create a new message.Now touch the message text area and long press it and select “Input method”.Now select Google Hindi Input from the list of keyboards.


4.The Hindi keyboard will first open with English letters.You need to press the “Earth icon” below the keyword to access Hindi letters.Now you can type in Hindi on your android.


5.For android 4.x devices : Open Settings>Language & Input, under “KEYBOARD & INPUT METHODS” section, check Google Hindi Input, then click Default and select “Hindi transliteration” in the “Choose input method” dialog.When typing in an input box, you can also change the default input method by selecting “Choose input method” in the Notification area.

Now you can easily type in Hindi on any android phone.

Nokia Lumia 920: The most powerful Windows Smartphone

Nokia Lumia 920: The most powerful Windows Smartphone It’s now or never time for Nokia. Their strategy is being watched closely by consumers and industry. Once a numerouno manufacturer, they’ve been outnumbered by the likes of Android and iOS. Nokia has now shifted towards Microsoft’s Windows Phone platform. Though recently, Nokia turned everyone’s head by launching the impressive Nokia PureView 808- having an amazing camera of 41MP, but based on outdated Symbian platform.

Seems like they’ve listened to all concerns and followed it by incorporating a PureView camera into a Windows Phone, which culminated into the Nokia Lumia 920, the successor to the Lumia 900. There’s a lot of excitement for this flagship device – but most importantly, will it actually stir enough noise to entice consumers to buy it? Considering that it’s attached with a very attractive $99.99 on-contract price point, it would seem as though the Lumia 920 will have enough of the prized elements to make it the runaway Windows Phone 8 smartphone to own at the moment.

In the Box
1.Nokia Lumia 920
2.Battery
3.Wall charger
4.microUSB cable
5.NFC tag
6.Quick Start Guide

Design and Build
Distinctively a Lumia handset, there’s nothing particularly new about the design of the Lumia 920, as it maintains an almost identical figure to its predecessor Lumia 900 model and comes in polycarbonate unibody. It also comes in various colors like black, white, yellow and red. The back is wisely curved, which gives a much nicer feel to it, when phone is being held. The phone is pretty heavy at 185 grams. And as such, it's a handset you notice when you drop it in your purse, shove it into a pocket, and casually lift it off a tabletop.

The Lumia 920 has the typical trio of capacitive Windows Phone buttons beneath its display. On the opposite edge, we’ve the usual assortment of characters which include earpiece, light & proximity sensors, and front-facing 1.3-megapixel camera that has the ability to shoot videos in 720p. Looking around the trim of the handset, the left edge is completely barren, but on the right, we’ve the power button, volume control, and two-level shutter key are placed near one another. Meanwhile, the top trim is houses the microSIM slot and 3.5mm headset jack. On the bottom edge, there’s a speaker grill with the microUSB port also there for charging and data connectivity.

Display
Lumia 920 impresses with its larger 4.5-inch IPS LCD PureMotionHD+ display having a resolution of 1280 x 768 pixels. This equates to a pixel density of 332 ppi – which makes it one of the most detailed screens in the market of Smartphones.

Unlike other popular phones and even its predecessor having AMOLED screen, Lumia 920 has IPS LCD screen. Even then, the natural looking color comes good on the screen and it has good viewing angles. Also, the display is clearly visible in outdoor conditions with the sun present. One awesome thing about it screen is that it has supersensitive technology which allows even to use gloves over your hands.

nokia lumia 920


Hardware
The Lumia 920 is power-packed with 1.5GHz dual-core Snapdragon S4 processor, 1GB of RAM, 32GB of onboard storage (no external memory and internal memory is only around 27GB available on boot), NFC (Near Field Communication), Bluetooth 3.0, WiFi.
The Snapdragon S4 processor is superfast, helping the OS to be quick in launching apps and games.It’s also said to be very nimble with the battery (2000 mAh) due to which battery life on the phone is decent. The performance of the battery willneither set any records for longest running hours nor will it send you running for a charger every few hours.

One of the biggest features of Lumia 920 is undoubtedly the wireless charging. Wireless charging pad (and other accessories) makes getting a quick charge out of the phone effortless. By just tossing the phone down on the pad, the device starts to trickle charge away. While it is not as fast as straight USB, it is more than enough to get a quick boost to the device. The wireless charging pad has no internal battery, which means you never escape the wires and have to plug it in. However, the benefit of a charging pad is that you can hide the wires, say behind the computer monitor at your desk, or on a countertop in your home. The charging pad will only draw a charge when you set down your phone. The result is a set-it-and-forget-it situation where you can drop the phone on the charging pad without rummaging around for chargers or taking the time to plug and unplug cable.

OS and Apps
The phone is based upon Microsoft Windows Phone 8 platform. To recap, the OS comes with the NFC features ‘Tap + Send’ to share content, a wallet, Kid's Corner, resizable live tiles and new colors, camera "lenses," Office 2013, and support for cloud content-syncing to another Windows 8 device. But, if there’s one other serious reason to consider the Lumia 920, it has to be the apps. Nokia has created a whole ecosystem of super useful tools that greatly differentiate Lumia from other Windows Phone’s and even other platforms.

Nokia Drive+ Beta is an all-in-one GPS navigation system that works with Nokia Maps. It allows offline navigation by downloading whole maps for states, greatly speeding up the experience. Those offline maps are shared between Maps and Drive+ too, reducing redundancy.
Nokia Music allows you to download a few hours’ worth of music playlists, an incredible value even if you already have Xbox Music.

City Lens is Nokia’s augmented reality app - also a Lens now in Windows Phone 8. You simply hold your phone up in public and it will show you where food, bars, attractions, etc. can be found. It’s a little bit gimmicky and might not be that useful in practical situations.
Nokia Transit is also a location tool that helps you get from one place to another using public transportation. Whether you are in trains, buses or subway the app is quite handy when you’re in a new city.

PureView Camera
A lot has been talked about the 8.7MP PureView camera with Carl Zeiss Lens on the Lumia 920. Nokia started this technology with the Nokia PureView 808 phone, and Lumia 920 has taken it to another level with superb low-light performance. The secret is a combination of various technologies like backside illuminated sensor (BSI) and optical image stabilization (OIS). BSI sensors let more light in from the lens, making scenes brighter; OIS helps steady the camera by having “springs” around the housing allowing you to take longer exposures.

Conclusion
The Lumia 920 is the pinnacle of Nokia engineering. It has good build quality, has the latest technology and it also looks nice from outside. Though there are few issues with the hardware, but if you’re comfortable with Windows Phone 8, this phone is your best option. The PureView camera, while not perfect, gives outstanding night photos and shoots the best video of any phone on the market today. The plethora of Nokia software like Nokia Drive and Music only sweetens the deal.

About The Author
This is a guest post from Julia.She wrote several tech posts for 91mobiles.com.91mobiles is the one stop destination for comparing mobile phones.You can view the details of Nokia Lumia 920 and avail best low price.

Sony Xperia Z Launched In India - Specs,Price And Features

Sony Xperia Z Sony's latest flagship phone features a stunning 443-pixels per-inch,Full HD and a 5-inch display.The Sony Xperia Z boasts of Walkman technology for better audio playback and comes with Sony music jive which offers six months of free,unlimited streaming and music download of over 1.5 million international,bollywood and regional songs.Besides the Sony Liv video streaming app allows access to Sony tv channels like Sony Entertainment,Set Max,Pix and SAB tv.The Xperia Z features a battery stamina mode that increases battery back-up upto 50% and is also water and dust-resistant.Also with a 13 MP camera take photos in any light.With a Qualcomm Snapdragon S4 Pro 1.5 GHz quad core processor and 2 GB RAM it is believed that it is the fastest android phone till yet.Sony Xperia Z Launched In India - Specs,Price And Features

Sony xperia Z

Features Of Sony Xperia Z

1.BE 2 Bravia Engine : Sony Xperia Z has a screen size of 12.7 cm or 5-inches with Full HD reality display powered by Mobile Bravia Engine 2 and having a resolution of 1080x1920 pixels with 443 ppi pixel density.Mobile BRAVIA Engine 2 delivers an even better viewing experience by adding new real-time contrast optimisation to the sharpness enhancement, high-quality colour management and noise reduction. Mobile BRAVIA Engine 2 is also able to analyse content type and adjust the image accordingly.

2.Incredible Sound : It is equipped with hi-fi sound technology from Sony with Walkman,xLoud and ClearAudio+ mode.Xperia Z comes with a high quality stereo headset.Sony MH-EX300AP headset has superior acoustic performance which helps realise sound true to the original recorded sound.

3.Exmor RS High Resolution Camera : The 13 megapixel camera is built with the same modules as leading Sony cameras. Exmor RS for mobile is an evolution of our Sony image sensor technology, with a next-generation BSI light sensor. By adopting the technology of luminance and colour noise reduction, Sony has created a camera that snaps highly detailed shots with low noise – even in challenging lighting conditions. You’re now also able to reproduce objects in more vivid colours and capture night images and faces in stunning clarity. Exmor RS for mobile includes HDR video, for clear shots even when your subject is backlit.

4.Water & Dust Resistant : It can even withstand water jets. The high IP55 & IP57 rating means you can use it in the rain, take photos by the pool and easily clean it off from everyday spills and dirt.

sony xperia z water test

Specifications
This is a listing of Xperia Z’s main features and functions.

Operating System And Processor
Camera and video
  • 13 megapixel Exmor RS camera with Auto focus and Burst Mode
  • 16x digital zoom
  • HDR for both picture/film
  • Face detection
  • Flash/Pulsed LED and Photo light
  • Front-facing camera (2 MP 1080p Exmor R)
  • Geotagging
  • HD video recording (1080p)
  • Image stabiliser
  • Picture Effect
  • Quick Launch
  • Red-eye reduction
  • Scene recognition
  • Self-timer
  • Send to web
  • Smile detection
  • Sony Exmor RS for mobile image sensor
  • Superior Auto
  • Sweep Panorama
  • Touch focus
Display and design
  • 5", 1920x1080 pixels, 16,777,216 colour TFT
  • Sony Mobile BRAVIA Engine 2
  • Scratch-resistant, shatter proof sheet on mineral glass
  • Capacitive touchscreen with on-screen QWERTY keyboard
  • Screenshot capturing
Pre-loaded applications
  • Google Chrome
  • Google Play
  • Google search
  • Google Voice Search
  • Google Maps for Mobile with Street view and Latitude
  • Web browser (WebKit)
  • Google Talk application
Memory
  • RAM: 2GB
  • Flash memory: Up to 16 GB
  • Expansion slot: microSD card, up to 32 GB
Networks
  • UMTS HSPA+ (Bands 1, 3, 5, 8 or bands 1, 2, 4, 5, 8)
  • GSM GPRS/EDGE 850, 900, 1800, 1900 MHz
  • LTE (Bands 1, 3, 5, 7, 8, 20)
Entertainment
  • 3D Surround Sound (VPT)
  • Album art
  • Bluetooth stereo (A2DP)
  • Clear Audio+
  • Dynamic normalizer
  • Music tones (MP3/AAC)
  • PlayNow service
  • TrackID music recognition
  • “WALKMAN” application
  • xLoud Experience
  • 3D games
  • Motions gaming
  • Video streaming
  • Facebook application
  • Twitter
  • YouTube
Connectivity and communication
  • 3.5 mm audio jack (CTIA)
  • aGPS
  • Bluetooth 4.0 wireless technology
  • DLNA Certified
  • GLONASS
  • HDMI via MHL support
  • Media Go
  • Media Transfer Protocol support
  • Micro USB support
  • Native USB tethering
  • NFC
  • PC Companion
  • Screen mirroring
  • Synchronisation via Exchange ActiveSync, Facebook, Google and SyncML
  • USB charging
  • USB High speed 2.0 support
  • Xperia Link
  • Wi-Fi and WiFi Hotspot functionality
  • Wi-Fi Miracast
Sony Xperia Z is priced at 38,990 Rupees in India.

Lock Android Apps With App Lock For Android

Lock Android Apps With App Lock For Android Securing your data is the first step to prevent it from getting into wrong hands.Android is no exception and yes it also needs to be secured.You store your private and secret data on android and do not want that anybody should see it.So you should prevent access to your private data on android so that nobody can view it by securing and locking your phone with default pattern lock or number lock.

But what if somebody breaks your number or pattern lock then he/she will see all the content stored on your android and may even copy sensitive data without your concern.It is very simple to defend those people who always try to explore your phone’s content just to steal something.

App Lock for android is the right app to defend your phone’s content against wrong hands.App Lock for android is an app that can lock all apps in your phone with a number or pattern lock so nobody can view them except you.So if your phone is vulnerable immediately install app lock for android.

Download App Lock 1.61 For Android Apk

Settings For App Lock
1.Open app lock and enter your password.Again enter password to confirm and save.


2.Then enter your desired “Security Question” with security answer and click save.
3.Then you will see the list of all apps installed on your phone and sd card.
4.The first app you need to lock is the Install/Uninstall app.If you lock this system app then nobody will be able to uninstall app lock to gain access to your private data.This is the must step.


5.Now you can lock your desired apps by sliding the slider to right in front of every app.
6.If you want to lock everything on your phone at once then just click the lock icon in blue menu bar below.You can again click it to unlock all apps at once.

Use Pattern Lock Instead Of Number Lock
1.Pattern lock is hard to break than number lock.To use pattern lock for apps on app lock click the key icon in blue menu bar and click “Pattern Lock” in Unlock mode.


2.Now draw your desired lock pattern.Draw again to confirm.
3.Now whenever you open  an app you will need to draw correct pattern to unlock the app.

Hide App Lock
If you bought a pro version of app lock from play store then you can hide it and nobody can see it.This will make them think what is preventing them from accessing your private data because they would not find any answer and will give up after sometime.

1.To hide app lock just click the menu button on your android phone and click settings from the top right and scroll down.
2.Check “Hide App Lock”.App lock will hide itself but only in a paid version.


3.After hiding app lock for android you yourself won’t be able to access it.The only way to access it is to enter a number *#*#12345#*#* in your phone’s dialpad.App Lock will open automatically after entering this number.

Note : This app works best for android phones which have an internal mass storage and there is no need to use sd cards because sd cards can be removed and can be read on other devices.This app doesn’t provide any security against pc suites and USB mass storage mode.

How To Reset Apps On Android Without Uninstallation

How To Reset Apps On Android Without Uninstallation Android apps consume a lot of space on your phone as they grow old day by day.Their size increases because they store data on your android phone everytime you use them.This data is called android application data and is normally stored on your phone’s storage.The more you use the app the more will be the application data size applicable to most android apps.

Some applications like UC browser keeps increasing its application data size day by day as we use it.The application data contains app settings,registries and other important entries entered by you in the app.As the app size increases it uses more and more space on your phone therefore your phone falls short of space and you can’t install other apps due to no space left on your phone.

The only option left is to uninstall the app to free up space on your android phone.But there is another trick by which you can free up space used by that app without uninstalling it.You just have to clear the app data to reset that app.When you clear the app data of an app it will reset to its start point.Also resetting an app will clear all of its data stored on the phone and will bring it to its initial state.

Reset An App Without Uninstallation
1.Goto Settings.
2.Select Applications.
3.Then select Manage applications.
4.Select your desired app.
5.Click Clear data

clear app data

Note : After clearing the app data the desired android app will return to its initial state thereby freeing up the space.Before clearing the app data check its size.Clear app data only if your phone has very low  space otherwise no need to do this.

Download New Opera Browser Beta For Android

Download New Opera Browser Beta For Android Everybody is familiar with opera and opera mini.We have been using opera mini browser from a very long time and I also used it on my previous java phones.Opera mini browser is popular for saving data while browsing the web because it highly compresses the data using the opera servers.Opera sofatware ASA has launched its latest browser for android named opera browser beta.This browser is currently under testing phase but is available free to download on google play store.The new opera browser for android has got a new interface and is ideal for both fast and slow networks.It has got little support for flash player websites.Youtube videos are played through an inbuilt flash video player.

opera browser beta

Features Of Opera Browser Beta For Android

1.Off-Road Mode : If you enable Off-Road mode then you can save data by viewing compressed web pages as in the previous versions of opera.If Off-Road mode is disabled then the websites are loaded in android style.The only difference between enabling and disabling Off-Road mode is that enabling it will turn the browser to work like its previous versions to save data by compressing web pages.While disabling the mode means webpages will load as they load in any android browser.For e.g. open facebook in this browser two times when the Off-Road mode is enabled and when Off-Road mode is disabled.You will see two styles of facebook loading.When the Off-Road mode is disabled facebook will open like the facebook app and when the mode is enabled it loads like simple html.

2.Discover : You can get updates for top stories from any country from these following topics

  • Arts
  • Business
  • Entertainment
  • Food
  • Health
  • Lifestyle
  • Living
  • Motoring
  • News
  • Science
  • sports
  • Technology
  • Travel

To discover content from your favourite country/region just tap the discover tab and click settings and under Country select your region/country then select the topic for top stories.You can select multiple topics for updates.

3.Speed Dial And History : The opera browser beta has preset bookmarks including google+,Wikipedia,gmail,opera apps,youtube,yahoo and news.The only way to add your favourite speed dial is to goto that page and click the + sign to the left of the address bar.The speed dial will be automatically added.The history tab is present next to the speed dial on the home screen and provides a quick way to see your browsing history.Also it shows the percentage of data savings just below the Off-Road mode.

opera browser beta

4.Browsing Mode And Flash Support : There are two modes of browsing available in opera browser beta.One is “Mobile” and other is “Desktop”.The mobile mode loads everything in a single line similar to its previous versions while the desktop version loads the websites in desktop mode and  tricks the websites that you are accessing them from a computer and not from a mobile.It has got a little flash player support and is able to play flash videos through an inbuilt flash player but it is not fully compatible with all kinds of latest flash content today also it doesn’t support the adobe flash player plugin installed on an android phone.

5.Private Tabs : This is new feature in this browser and is similar to google chrome’s incognito window and Mozilla firefox’s private browsing.In a private tab your browsing history will not be recorded so there is no need to clear it.However if you browse in tabs that are not private history will be recorded.To open a private tab click the tabs icon next to the address bar with 1 written in it.A tabs option will open you need to click the 3 vertical dots on the top right and select “New private tab”.If you don’t want to open a private tab and just want a normal tab then click the multiple dots on the top left.


Somethings Missing

The new opera browser beta is fast and fluidic with a good user interface but it lacks some features like there is no exit button in it and the app needs to be terminated manually otherwise it will waste 35 MB memory of your phone.Remember that opera browser beta is in testing mode so you send your feedback to developers and help in the improvement of this app.

Download Opera Browser Beta APK
Play Store Link

Speed Up Android With NQ Android Smart Booster 1.0.01

Speed Up Android With NQ Android Smart Booster 1.0.01 NQ android smart booster is an android app which is used to optimize your android phone's performance.This app is different from others as it provides two ways of optimizing your android phone.First it free up your phone's memory by clearing running apps that are no longer in use and secondly it helps to increase the battery life of your phone by disabling the heavy battery using features on your phone.This app comes with an optimizing assistant which can be seen on the sides of your phone's screen.The NQ android smart booster is free to download from google play store.

NQ Android Smart Booster 1.0.01 Download

How To Use NQ Android Smart Booster

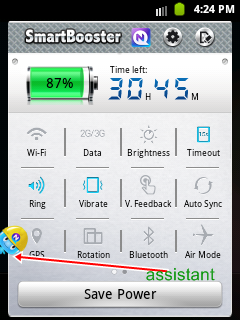
1.Download and install this app.After installtion you can click the blue assistant on the left side of your phone's screen to open the app.

nq android smart booster

2.When you open the app you will see a number of options like brightness,rotation,wifi,bluetooth etc.
3.You can turn off that feature by simply clicking the option visible in this app.When you disable a feature you will see that your android phone's battery time will increase.Keep on disabling features to save more battery life..
4.Do not click the "Save power" button and manually disable the features.
5.Slide the app to the right side and you will see a list of running app.Click close to increase RAM of your android by closing unwanted apps running in background.


6.Now click the gear icon on the top to open settings and click "Assitant Options" and select "Show assistant all the time".When you enable this option then the virtual assistant will be visible on your screen always for quick access to the app.


7.Also to quickly optimize your android click and hold the assistant and slide a little bit to the right then a icon will appear with two moving gears asking you to "Drop me here".You need to drop the assistant in this icon for quick optimization.Initially the color is red but on optimization it will turn to green.