This Domain Name Is Up for Sale
Contact Us

Asus Memo Pad ME172V : Affordable Android Jellybean Tablet

Asus Memo Pad ME172V : Affordable Android Jellybean TabletAsus has launched its memo pad ME172V.It is an affordable tablet by asus running on android jellybean with decent specifications.Priced at only US $184 the asus memo pad is a gift for affordable tablet lovers.The asus memo pad ME172V is suitable for anyone who wants to put his hands on a branded 7 inch tablet.Apart from android 4.1.2 jellybean it has many great features like front hd camera,10 finger multitouch,asus studio and asus cloud experience.These are major features in asus memo pad.According to asus you can call it my mobile or my moment.The asus memo pad is designed to be fit in any hand due to its grippy diamond checkerd back panel.The asus memo pad ME172V has following great features.

asus memo pad

1.7 “ Screen With 10 Finger Multitouch : This tablet has a screen size of 7 inches and it can recognize 10 finger touches at the same time.It is great feature because you can touch its screen with 10 fingers in both your hands and it will recognize every finger touch.

2.Multimedia : You can enjoy HD multimedia on asus memopad.Its screen resolution is 1024x600 pixels with a LED touchscreen.So it is a multimedia powerhouse with a brighter display.It supports sdcard upto 32 GB so you can view unlimited entertainment on this pad.

3.Asus Studio : Asus studio lets you to manage,edit and tag your photos.

4.My Painter : Create your own paintings with my painter on asus memo pad ME172V.Create your masterpiece with my painter.

5.Asus Cloud Experience And Online Office: Get 5 GB free lifetime Asus webstorage and sync it from anywhere and anytime.With Asus webstorage online office create office documents like word,excel and powerpoint using asus webstorage and save them into it.Share with anyone you want.

6.SonicMaster Audio Technology : The asus memo pad is equipped with sonic master Maxx audio to deliver accurate crystal clear sound and virtual surround effects.

7.Front HD Camera : It has a front 1 MP HD camera to capture HD images.

Specifications Of Asus Memo Pad ME172V Android Tablet

OS : Android 4.1.2 Jellybean
CPU : 1 GHz VIA WM8950
RAM : 1 GB
Graphics : Mali 400 GPU
Screen : 7 inches touchscreen 1024x600 pixels
Screen Type : LED backlight WSVGA
Storage : 8GB/16GB internal.Expandable upto 32 GB with 5 GB lifetime Asus cloud storage space.
Asus Apps :

  • ASUS launcher
  • MyLibrary
  • MyCloud
  • Asus webstorage
  • File manager
  • ASUS sync
  • SuperNote Lite
  • App Locker
  • App Backup

Camera : 1 MP HD front facing camera
Connectors/Interfacfe : 1x Micro USB
1x 2 in 1 Audio jack for headset and microphone
1x Micro sd card reader slot
Battery : 7 hrs,Li polymer 16Wh
Connectivity : 2.4 GHz WLAN 802.11b/g/n
Audio : HD audio codec with high quality speaker

Check Out Asus Memo Pad ME172V Pics


asus memo pad

asus memo pad me172v


How To Fix 404 Redirect Error After Moving Blogger Blog To A Custom Domain

How To Fix 404 Redirect Error After Moving Blogger Blog To A Custom Domain Getting a 404 redirect error means that your naked domain is not redirecting to your website.It will show you an error that url not found if you enter your website’s naked domain in the address bar of a browser.A naked domain is domain without prefix ‘www’.Suppose your website is www.abc.com then naked domain will be abc.com.But if your website is not configured properly to redirect your website’s naked domain to your original domain then you will get a 404 redirect error everytime you put the naked domain in address bar.

404 redirect error

This problem becomes very serious when goes unnoticed because people like to enter naked domain more directly into the web browser to reach a website.Suppose someone does the same thing for your website.Then when he will enter the naked domain of your website in a browser he will get a 404 redirect error and may even think that the blog is no longer exist.This error decreases your website’s traffic in days and in nights.This 404 redirect error occurs when you move from blogger to a custom domain while the blog still hosts on blogger.

If you have recently moved to a custom domain from blogger then you will get this 404 redirect error.But don’t worry it is easily fixable.The tutorial is for blogger blog having a custom domain like .net,.com or any TLD(Top Level Domain) but is hosting on blogger.

Fix 404 Redirect Error For A Blogger Blog On A Custom Domain

1.Login to your blogger account.
2.Select your blog and goto its “Basic” settings.
3.Under “Publishing” you will see “Blog Address”.Click “Edit” in front of your blog’s address.

blogger redirect

4.Here you will see an unchecked option “Redirect abc.com to www.abc.com”.
5.You have to check this option to fix the 404 redirect error.Click save after checking it.
6.Now your naked domain abc.com will redirect to www.abc.com.
7.You can check yourself by entering your website’s naked domain directly into web browser and you will see that it will redirect to your original domain.

Following above steps will fix the 404 redirect error for your blogger blog after moving to a custom domain.

How To Setup Multiple Google Accounts On Google Authenticator For Android

How To Setup Multiple Google Accounts On Google Authenticator For Android Hello friends you are familiar of google’s 2-step verification.In 2-step verification you need to enter a mobile number to receive codes and that codes need to be entered by you when google asks for them to login into your account.To enable 2-step verification you can check this tutorial.2-step verification is an excellent way to secure your google account because you need to login once and verify yourself in the the second step.Without verification you can’t login into your  account.

To login successfully you need to enter some code into second step either sent to you by google on your phone as text message or code generated by google authenticator app.Google authenticator is an android app that generates 6 digit random codes every 30 seconds for your google account.You can choose any code generated by google authenticator and put them when google asks for code in 2-step verification after logging in.When you setup google authenticator then google will not send you text message codes because you need to enter the random code generated by this app.But if you do not have access to the android phone on which you setup authenticator then you can receive text message codes.Make sure that you use two different devices ,one for mobile number and one for this app.But to use this google authenticator you need to first download this app from play store,also you need to download “ZXING barcode scanner” this app will be used to scan qr code provided to you during account setup.

Setup Google Authenticator For Multiple Google Accounts
First you will have to enable 2-step verification for google accounts before you can use authenticator.You can do as follows.


  • Goto www.google.com/settings/account and login into your account.
  • Click “Security”.You will see “2-step verification” click “Settings”.A page will open then click “Start set up”.
  • Follow step by step instructions to setup your mobile number.To receive text messages you can use any mobile.
  • Google will send you a code on your mobile number.You should enter this code to verify your mobile number.
  • Once your mobile is verified you will be asked to “Trust this computer”.Only check this option if you are using a personal computer or laptop otherwise uncheck it.When you enable this option then if you lose your mobile phone then you will be able to login from this trusted computer without any verification.
  • Also google will not send any codes if you login from trusted computer but you will receive codes and can’t be allowed to login on other computers without verification.
  • Now 2-step verification is on for your google account and you will see a 2-step verification page after setup.
  • You will see a number of options here.See “Mobile application”.Now we will setup google authenticator for your account.I am doing it for android.Click “Android” in front of “Mobile application”.A page will open with a qr code.Make sure that you have installed google authenticator and “ZXING barcode scanner” app from play store.

google authenticator


  • Now open google authenticator app.Click menu and select “Set up account”.Then select “Scan a barcode”.Scan that qr code on your computer screen via your phone’s camera.
  • When you scan this qr code you will see that your account is automatically added in authenticator app and is generating codes.
  • You need to enter any one random code to verify your android phone.Enter the code and click “Verify and save”.Now google authenticator is setup for your google account.
  • If you don’t want to scan the bar code then click “Can’t scan a barcode?”.Then google will provide you a secret key.
  • Again goto google authenticator>setup account>Enter provided key.Then enter your full google email address and secret key and click next.You will see that account getting randomly generated codes in google authenticator.

The above process can be repeated for multiple google accounts using just the same google authenticator app.This method is faster because you don’t need to receive codes on multiple mobile numbers.You can use this app to use security codes and it works in flight mode also and doesn’t require any data network.Here is the demo how google authenticator works.

  • Login into your account and enter your password.
  • You will see a 2-step verifications like this below.It will ask you for any random code generated by google authenticator app.


  • Open google authenticator app on android and look for the code.If you are using multiple google accounts within the same app then choose the code of the right account to enter for verification otherwise it will say wrong code added.


  • Enter the code and you will login into account.Check or uncheck “Don’t ask for codes on this computer” if you want to trust or untrust that computer.


2-step verification

Note : After enabling two step verification you will be unable to login in to gmail for android.It will say wrong password entered everytime.But don’t worry this is due to 2-step verification.You need to create application specific passwords to login into gmail android after enabling 2-step verification for google account.You can learn by checking how to create application specific passwords for google account.


Get Login Notifications On Facebook Via Email And Text Message

facebook logo

Everybody has a facebook account in this today's world.And its our duty to keep it safe and secure and avoid it from being hacked.Being alert on the internet is the only way to keep oneself secure to a greater extent.In this post you will know about facebook's login notifications.Facebook login notifications alert you when someone logs in your account.If you get this alert then the immediate first step you should take is to change your facebook password because somebody might have broke into your account.

First of all make your facebook account impossible to be hacked by choosing a difficult password.A difficult password would be a combination of numbers,alphabets and special characters.Facebook allows every special character to use within a password.You can see how to secure a facebook account.

Enable Login Notifications On Facebook

1.Goto www.facebook.com and login into your account.
2.Click the settings icon a gear and choose Account Settings.
3.Now click "Security" below "General" on left side.
4.Now clik "edit" in front of "Login Notifications".


5.Check "Email" and "Text message/Push notification".
6.When you check "Text message/Push notification" then you will have to enter your personal mobile number to receive codes to verify.
7.A popup will open which will ask you to enter mobile number.Enter mobile number to proceed.You will receive a code which you have to enter in facebook for verification of mobile.
8.Click save after this and you are done.

Now when your facebook account is accessed from a computer or device which you never used before then you will receive notifications on your mobile and email.If you get any kind of this login notification then understand that your facebook account might be compromised or hijacked.If you were lucky then you can even recover your hacked facebook account.

Ultimate Guide To Install Adobe Flash Player On Any Android Device

Ultimate Guide To Install Adobe Flash Player On Any Android DeviceHello friends I have written many articles about installing adobe flash player on different android devices.I started with Samsung galaxy y and ended with Samsung galaxy note 10.1 but that doesn’t mean that we can’t install adobe flash player on any other android device.As you know that there are number of android devices and tablets are available in the market and that number is huge including popular brands like HTC,Samsung,Sony,LG etc.So it is not possible to write flash player tutorials for all the android devices.But if you have an android phone or tablet no matter whatever its brand is,you can install flash player on it by reading and following the instructions in this post.By reading this post you will be able to install flash player on any android device of any brand like HTC,Samsung,Sony etc.

flash player android

Install Flash Player On Any Android Device

1.Goto this link and scroll down.
2.When you scroll down you will see “Flash Player for Android 4.0,2.x and 3.x”.
3.Download the flash player apk according to your phone’s android version.For e.g. if your phone is running on android 4.0 ice cream sandwich then select flash player apk from android 4.0 archives.
4.Install this flash player apk.If install is blocked then goto settings>applications>unknown sources.Put a check mark on it.Then again install this apk.
5.Now download UC browser for android from here and install it.
6.Now you are all set to view flash on any android device.
NOTE : The above method will work on flash certified android devices only.If your phone is not flash certified then you will not be able to install official flash player apk.But you can install it manually on your phone.

Install Flash Player On Android 2.2 Froyo Flash Uncertified Devices
1.Flash player apk for Froyo Download

Install Flash Player On Android 2.3 Gingerbread Flash Uncertified Devices
1.Flash player apk for Gingerbread Download

Install Flash Player On Android 4.0 Ice Cream Sandwich Flash Uncertified Devices
1.Flash player apk for Ice Cream Sandwich Download

Install Flash Player On Android 4.1 JellyBean Flash Uncertified Devices
1.Flash player apk for JellyBean Download

If your android device is flash uncertified then you can download the flash player apk from above links and install UC browser to view flash content.If you want to know how to install flash with UC browser then you can check the following links.

1.For Gingerbread
2.For Ice Cream Sandwich
3.For JellyBean

Simmtronics Xpad X720 : Android 4.0 Tablet

Simmtronics Xpad X720 : Android 4.0 TabletSimmtronics semiconductors has launched its android 4.0 xpad x720 tablet.It has launched two more tablets but xpad x720 is the cheapest of all.Simmtronics xpad x720 being priced at only INR 3999 is loaded with great hardware capability and android 4.0 ice cream sandwich.The Xpad X720 is far much better than Aakash tablet in hardware and software specifications.Unlike Aakash tablet which was nowhere available to buy,the Simmtronics Xpad X720 is available to buy at leading digital outlets in India.

simmtronics xpad x720

Is Simmtronics Xpad X720 A Worth Buy

First of all look at its price.It is priced at only INR 3999 and comes with a decent specifications of hardware with a dual core A13 1 GHz A8 cortex processor,512 MB RAM,Dual mali 400 2D/3D graphics processor,android 4.0 ice cream sandwich and 7 inch capacitive touchscreen with 16 M colors.So under this price range we are getting a good processor,android 4.0 and a big capacitive touchscreen with 16 M colors.You won’t get these specifications at this price  range.The only thing that may upset you is a single core 1 GHz processor if you are a serious android gamer but at this price range this situation is compromisable.However it can’t be compared to any samsung tablet.

How can I forget about Simmtronics Xpad X720 connectivity features.Well the Simmtronics Xpad X720 is 3G and wifi enabled unlike Aakash tablet which is only wifi enabled.You need a 3G dongle to use high speed  internet on Xpad X720.Also if you have an another android phone then you can use its 2G/3G network on Xpad X720 via wifi hotspot.To know how you can do this read this tutorial.

Features And Specifications Of Simmtronics Xpad X720

Processor And GPU
1 GHz A13 Cortex A8 processor.
Dual mali 400 2D/3D graphics processor.

RAM And Storage
512 MB DDR3 RAM.
4 GB internal storage.Expandable upto 32 GB via micro sd card.

Connectivity
Wifi 802.11 b/g/n.
3G via usb dongle.
No Bluetooth.
No GPS receiver
3.5 mm audio jack
Micro USB with female connector

Camera
0.3 MP front facing camera with a resolution of 640x480 pixels.
Video recording.

Display
7 inch TFT capacitive LCD touchscreen.
Resolution of 800x480 pixels.
16 M colors display with multitouch

Operating System
Android 4.0 Ice Cream Sandwich

Battery And Multimedia
Battery backup of upto 4 hours with not stop video playback.
Video formats : MKV,3GP,MP4,MPEG2,RMVB,MPG,MOV,FLV,WMV,AVI.
Audio formats : MP3,M4A,OGG,MP2,FLAC,AAC,WMA.

Conclusion : The Simmtronics Xpad X720 tablet is worth buy if you are buyingit  for gaming and entertainment.It will run all android games without any problem.You can also use it as multimedia powerhouse by connecting a USB drive and watching movies from it.Its upto you whether you want to buy it or not.If you are in a situation which tablet to buy then go for this cheap android tablet.

Infolinks Intext Advertising Program : Review


Infolinks is an intext advertising program which helps to monetize your blog by providing text ad links on your blog.Infolinks is the leader in intext ads and they support blogger,wordress,joomla,drupal etc. and almost any platform that supports infolinks javascript code.To use infolinks on your website you have to signup first and then have to add atleast one website or blog.Your website should have atleast 10 well written posts to get approved.Your website will be approved within 2 days.If you don’t have an infolinks publisher account then sign up first for the program.

Infolinks SignUp

I am writing this review because most people still thinks that infolinks is not good for monetizing your blog,but after reading this review you will know that infolinks is the best intext ads advertising program available today.

infolinks

How Does Infolinks Works
After getting your website approved you have to integrate the infolinks javascript ad code on your blog by getting the code from your infolinks account.When you login into the account you will see an integrate tab.Click on it and select the website for which you want to get the code.That code smartly scans your blog’s text and turns them into double underlined links.When someone clicks on these links you get paid.Infolinks pays 70% of the revenue share which is greater than any intext advertising program.You can check your daily earnings for all websites separately.

Does Infolinks Really Pays
Yes infolinks really pays and they pay on time and on a monthly basis.Some says that infolinks is a scam,but this is not true.They are saying this because they are unable to generate any income or do not know about infolinks.Infolinks is not a scam,it is a genuine advertising program which is the best intext advertising program available today.They are ready to help us everytime we want them to help and they also provide their best to help monetize your blog.They make every publisher feel special by providing quality support whenever needed.Here is the infolinks payments proof.

infolinks payments proof

How Can I Receive Payments
Infolinks provides us 6 ways to receive our payments.We can choose the payment method which suits us best.The 6 payment methods are eCheck,Paypal,BankWire,ACH(for US bank accounts only),Western Union and Payoneer.

1.eCheck : If you select eCheck to receive your infolinks payments then your payments will be directly deposited to your bank account.You have to submit your bank details in infolinks account to receive payments via eCheck.The minimum threshold for eCheck is $50 dollars.You will be charged $6 dollars plus 2% of total earning as currency conversion.eCheck is a very low cost method of receiving payments.

2.Paypal : You can receive your payments via paypal.Paypal may or may not be available in your country.Check it before selecting this method.The minimum threshold is $50 and $1 fee is charged for US paypal transactions plus 2% of your total earnings.If you are outside of US then you will be charged $10 plus additional fee charged by paypal.

3.BankWire : It is direct transaction of funds from infolinks to your personal bank account.The minimum threshold is $100.You will be charged $25 plus 2% of total earnings as currency conversion.BankWire is available where bank accounts use SWIFT system.

4.Western Union : You can receive your infolinks payments via Wetern Union Money Transfer.The minimum threshold is $100 and $15 will be charged plus 2% for currency conversion.

5.ACH : ACH is only available for US bank accounts.It is a kind of Bank Wire transfer.The minimum threshold is $50 and there is no fee charged by infolinks but some bank charge transaction fee.

6.Payoneer : It is an infolinks prepaid debit master card and is accepted where mastercard is accepted.You can also use it at most ATMs.You need to signup for payoneer account.For more information about infolinks payoneer check this.

As you see Infolinks is providing us 6 ways to receive payments.That is the reason for which infolinks is best.You can see many popular advertising programs like

Google Adsense : Only pays via check.
Chitika : Only Pays via paypal & check.

But infolinks pays via 6 ways which is not provided by any other advertising program.Accordig to me infolinks is the best intext advertising program to monetize your website.If you have any problem about any topic regarding infolinks then feel free to ask.

Unable To Login In Gmail For Android After Enabling 2-Step Verification On Gmail

Unable To Login In Gmail For Android After Enabling 2-Step Verification On GmailGoogle’s gmail provide us many security features to secure our account from being hacked.One of the most widely used security feature is the 2-step verification on gmail account or google account.Whether we say gmail account or google account it means the same thing.In 2-step verification you have to provide a mobile number to google to send you codes.When you login into your google account then google will ask you for that code sent on your mobile.You can’t login unless you enter the code.You can get 2-step verification codes either by sms,a phone call or google authenticator app for android.This tutorial applies to android,iOS,Java phones and blackberry smartphones.

After enabling 2-step verification on google or gmail account you will see that you are unable to login in the gmail app for android.Everytime you login into the gmail android app then it will always show that you have entered a wrong password.But don’t worry it is not due to password but is due to 2-step verification which can’t be resolved by the gmail app for android.But you can still login into gmail app no matter if you have enabled 2-step verification on google account.All you have to do is to login in the gmail app for smartphones by entering an “application specific password”.

How To Get An Application Specific Password For Gmail

Application specific passwords are different for different google apps.You don’t need to remember them,you have to enter them only once in the required google app.Application specific passwords are required if 2-step verification is enabled for google account.

1.Goto http://www.google.com/setting/account and login.
2.Click “Security” under the “Account” on left side.
3.Under 2-Step Verification click “Settings”.
4.Now under “Application specific passwords” click “Manage application specific passwords”.You have to enter your google account password to continue for security purposes.
5.Now you have to generate an application specific password for android gmail app.

application specific password

6.Enter a name like “Password for gmail android” or you can choose of your choice and then click “Generate password”.


7.Now you will see a generated password.You have to enter this password in gmail app for android.In notifications you will see a white triangle login error.Click this white triangle and enter your generated password.
8.When you enter this application specific password in gmail android then you will not get a wrong password error again.

If you would like to know about all the security features of google account and how to enable them then you should read Google Account Security.

5 Tips To Buy Products Online

5 Tips To Buy Products OnlineBuying products online sometimes proves useful because it saves much time and product is delivered to your doorstep.But buying all products online is not recommended if you buy costly products online.If you are a beginner to online shopping then you may be fooled by many ecommerce websites if you are not aware of them.Here are some tips that will make you feel safe while shopping online.

online shopping

Tips To Buy Products Online

1.Ecommerce Website Reputation : You will see a number of ecommerce websites on the web from which you want to buy products.But all ecommerce websites are not good at giving good customer service and their most of the products are faulty.I myself got cheated from one of an online shopping website.I bought a product and it was faulty and not working at all.So always shop online with a trusted online shopping  website.Some of trusted online shopping websites are amazon,ebay and flipkart(only for India).

2.Buy Branded Products Only : Always buy original and branded products because original and branded products are manufactured from high quality hardware and equipments.For example if you are buying a mobile phone or a television then you can go for Samsung.Samsung’s customer service is very good and there is no problem with warranty.If you buy an unbranded product then you may be wasting your money.So always buy branded and original products.

3.Research About Products : Always make a detail research about the product which you are buying online.Check the specifications of that product on that online shopping website and also check the same product’s specifications on the manufacturer’s website.Specifications on both the websites should match.For example if you are buying a Samsung smartphone from a trusted ecommerce website then check its all specifications on that online shopping website as well as check them on samsung’s website.Specifications on both websites should match exactly.

4.Cash On Delivery : If you are shopping online then always choose “Cash On Delivery” as the payment method.If you choose this method of payment then you can save your money from being wasted because suppose if you receive a product that is faulty,mishandled or having manufacturing defects then you can easily save your money by saying that “I am not going to pay for this faulty product”.However if you had made an online payment for the same then when you receive this faulty product you should ask the delivery boy for replacement.Replacement may take upto one week.It does not mean that all online shopping websites deliver faulty products but one product is faulty in every ten products.So wisely choose the payment methods.

5.Payment Gateways : If you are making an online payment(however it is not recommended for costly product) then that ecommerce website will automatically redirect you to your bank’s website.What you have to do is  to check that it is your bank’s website and is secured with a SSL certificate,do not enter your payment details if you find something wrong and treacherous.All banks websites are secured by a 128 bit or 256 bit SSL certificate which can be seen as green https in google chrome.Green https means that identity of website is verified and is secure.

SSL

These are some tips that will help you to buy products online smartly.While buying products online you should be aware of the product by properly researching about it.It will not only save your money but also you will get right product and satisfaction.

Try Out The New Email Composer On Gmail

Try Out The New Email Composer On GmailGoogle has launched the new email composer for gmail.The new gmail email composer has replaced the traditional email composing form in which you see two long text boxes and a big text area for email message.The new gmail composer looks like a google+ chat box and is very easy to use at composing emails on gmail.In this post you will know about all the features of this new gmail email composer.
To try the new gmail composer log in to your gmail account and click compose.The old email composer form will open.Then select “Try the new compose experience”.Then you will be redirected to new gmail email composer.Google has again simplified the email.

Features Of New Gmail Email Composer

1.Simplicity : The new gmail composer is small and easy to use in design.It seems like a chat box.When you first see it you will see various options in it.At the top of the composer you will see the recipient’s address bar and a subject text box.The wide area below it is the composing area.Below this you will see formatting options,file sharing options and some miscellaneous options like deleting and printing an email in real time.

2.Formatting Options: The new gmail composer consists of basic formatting options like bold,italics,underline,text size,text fonts,font color,bullets and numbering and text alignment options.These formatting options will allow you to compose a full html message which is properly formatted.You can access these formatting tools by clicking the underlined “A” next to the send button.

new gmail composer

3.File Sharing Options : You can attach files either by uploading them from your pc or choosing files from google drive linked to that google account.Clicking the “+” sign will reveal the file sharing options.You can insert an image,a hyperlink,a smiley and a calendar date.The file sharig option from google drive is very fast because it will save your uploading time and data if the file is already on google drive.To delete the message click the “garbage bin” icon and your message will be deleted.


4.Other Options : You can access these options by clicking the small triangle button next to the garbage bin.When you click this little triangle you will see 5 options.These options include switching back to old gmail compose,assigning a lable to your email,plain text mode in which the formatting options will not be available and you just type the message like you do in a notepad.You can print your composed message and can even save this message as pdf file if you are using google chrome.Click the “Check spelling” option to check the words you type in realtime.


So that was the new gmail composer.Hope you would like it because it is very simple and easy to use and quick to attach and share files even large ones.However if you do not like it then you can switch back to old gmail composer by clicking the small triangle button and selecting “Switch back to old compose”.Share this post if you like it.Be social.

How To Choose A Graphics Card For Gaming On Windows Pc

How To Choose A Graphics Card For Gaming On Windows Pc Gaming on windows is awesome and affordable because it is cheaper to buy a nvidia graphics card rather than buying a dedicated gaming console.Gaming on windows is almost similar as on latest gaming consoles like ps3 if we talk about graphics.To run latest games you need a graphics card of a good brand like nvidia or amd radeon.You might be thinking what is a graphics card.A graphics card is an advanced gpu chip specially designed to decode the game software programs that cannot be done by onboard intel graphics chip.Latest windows games require a good hardware specification in your computer,out of which pci graphics card is the most important.

asus nvidia gt 610

In this post you will know how to choose a graphics card for gaming on windows.Before buying a graphics card you should be aware of existing hardware on your pc like ram,processor and expansion slots.A pc having low ram and a processor having low frequency can’t be used to play latest ps3 games on windows.I am assuming that your pc has a good processor,RAM around 2 GB and a good motherboard which has PCIex16 slot PCI 1.0.PCIex16 is a graphics card slot on your motherboard.If your pc has all these specifications and just missing a GPU unit then you can turn your computer into a gaming pc.

How Choose A Graphics Card For Gaming

1.Select A Brand : To buy a graphics card you need to select a brand or OEM manufacturer.Some brand names are Asus,Nvidia and Amd.In my opinion I will prefer Nvidia because nvidia is the leading GPU manufacturer around the globe.Nvidia graphics chips are also used in the playstation 3 which delivers life like graphics on playstation 3.So nvidia is the best graphics card manufacturer.

2.Graphics Memory : Most games require graphics memory upto 512 MB but you should buy a graphics card having memory of 1GB or more.Having a larger graphics memory will ensure excellent gaming experience and you will not fall short for memory because you have enough of it.So look for graphics memory before choosing.

3.Direct X Version : Today all latest games require that your GPU should be direct X 11 compatible.The latest version is direct X 11.Every graphics card that you are buying should be direct X 11 compatible otherwise there is no use of buying it.

4.Open GL : Open GL is a multiplatform API which is responsible for rendering 2D and 3D computer graphics.Without open GL we can’t render 2D or 3D gaming graphics.Open GL is used in almost every graphics rendering like virtual reality and specially in gaming.The current stable version for open GL is 4.3 and your graphics card should be open GL 4.2 compatible.Buying a graphics card lower than this open GL version is of no use.

5.Nvidia Cuda Cores : If you are a buying a nvidia then look for cuda cores.The more number of cuda cores the more smooth will be the gaming experience.Cuda cores are actually small processors that handle different tasks during decoding a game program.These tasks include virtual reality rendering and tough physics calculations.If your budget is low then search for best graphics card in that range having good number of cuda cores by comparing them.

5.GPU Clock And Pixel Shader: Check the GPU clock.It should be above 700 MHz.The pixel shader version should be 5.0.Pixel shader is a code running on gpu which creates shades and appropriate lights in images in games.

6.Connectivity : The graphics card you are buying should have a VGA port.A VGA port is a monitor port.Every monitor supports vga but it is excellent if your monitor has a HDMI port because with HDMI you will experience the true experience of gaming.HDMI cable’s speed is 8 Gbps which delivers a high resolution life like graphics on your computer’s screen.Also check that it is PCIeX16 graphics card if your pc’s motherboard has PCIex16 slot.

7.Power Consumption : Most graphics card has a specification that they require a power supply unit of your pc capable of providing enough power for them to operate.Your power supply unit should be around 300W or you can check what is the power supply requirement of that graphics card.Heavy graphics require a bigger power supply. So you may require to change the power supply unit of your pc if graphics card a bigger power supply.Running a heavy graphics card on a smaller power supply unit can bring down your system.

By checking all the above specifications you will be able to buy a best graphics card that will be best for your computer.Don’t opt for any GPU blindly,choose it smartly.Feel free to ask any problem about graphics cards.

How To Install Android 4.1.2 Jellybean Update On Samsung Galaxy Note 10.1 Wifi GT-N8013

Samsung galaxy note 10.1 wifi GT-N8013 is a samsung android tablet running on jellybean 4.1.But galaxy note 10.1 received the jellybean update 4.1.2 in US as GT-XAR-N8013UEUCMA3.If you have a galaxy note 10.1 and want to update it to latest android update then you can do it manually on your tablet.You can also update the tablet using samsung kies.However most times samsung kies is unable to put any update in the device and wastes our time.It shows that your galaxy note 10.1 wifi N8013 has got an update to jellybean 4.1.2 but download process terminates before full setup.But first prefer kies then manual installation.


galaxy note 10.1 wifi n8013

If this happens with you then you can manually update your galaxy note 10.1 wifi N8013 by first downloading the stock android 4.1.2 jellybean samsung rom and then flashing it via odin on windows pc.Before doing any update backup your data with kies and backup files of sdcard.

Note : Do it carefully otherwise I won't be responsible  for any damages.

Tools Needed

1.Odin v3 for windows Download.
2.Android jellybean 4.1.2 N8013UEUCMI3 Samsung rom Download
3.Samsung Kies for android usb drivers.
4.USB cable.

Insall Android 4.1.2 Jellybean Update On Samsung Galaxy Note 10.1 Wifi N8013

1.Download above two files from the above links.
2.Install Samsung kies for samsung android usb drivers.Because odin will not work without usb drivers.
3.Extract the odin zip and the rom zip in a single folder.
4.Now start odin by clicking odin.exe.Do not configure any setting of odin.
5.Do not connect your galaxy note 10.1 till yet.
6.Now switch off the tablet and enter into download mode(odin mode).You can enter into download mode by pressing power key and volume down key at the same time.Keep pressing until you see a warning to install custom rom.When warning appears press the 'volume up' button to enter download mode or odin mode.You will see a picture like this below.

odin mode

7.Now connect galaxy note 10.1 to pc via usb cable while odin is still running.When you connect the tablet in download mode to odin then the field under the "ID:COM" in odin will turn blue and show you the connection ID.Also in message you will see "<ID:0/016> Added!!".This means that your galaxy note 10.1 N8013 is now ready for flashing android jellybean 4.1.2.

odin

8.If odin does not recognize your galaxy note 10.1 then you need to install samsung usb drivers separately.
9.Now put a check in front of "PDA" then click "PDA" in odin and browse the android jellybean 4.1.2 rom file which you have downloaded its format is pd5 this is the rom which is to be installed in your samsung galaxy note 10.1 wifi N8013 and will replace the old rom.
10.Now click "Start".You will see progress in the progress bar above ID:COM.
11.After completion your galaxy note 10.1 will auto reboot and start with latest android 4.1.2 jellybean update.

Now you have installed the jellybean update for galaxy note 10.1 wifi N8013 manually.If you have any problem while installing the update then feel free to ask.

How To Install Android 4.1.2 Jellybean On Samsung Galaxy Note 10.1 Wifi GT-N8013

How to Get Quality Backlinks for Your Site to Drive Traffic

How to Get Quality Backlinks for Your Site to Drive TrafficBacklinks are one of the best ways to increase your page rank and raise your position in search results. The more links you have, the higher your page rank. However, not all links are created equal. The links you get must be from quality sites, or else they may actually bring down your page rank.

backlinks

Quality backlinks come from high-ranking sites in your niche.Quality backlinks are responsible for driving quality traffic to your site.Not sure where to start? Here are some of the best ways to get quality backlinks for your site to drive traffic.

1.Guest Blogging
The preferred method for getting quality backlinks is to write guest posts for other blogs that have a high page rank. You write the post, and the blog admin publishes it with your byline and a link to your site.
The key to successful link building with guest posting is to target blogs in your niche that have a high page rank and high traffic. The more authority the guest blog has, the more you will benefit from having it in your link portfolio.

2.Commenting on Blogs and Forums
If you can't get a guest post published on an authority blog, you can try commenting on it instead. Commenting on blog posts and forum threads on high-quality, high-ranking sites can give you a valuable link. The key is to write a comment that adds value to the conversation -- not just a comment that says "I agree" or "Nice post".
When you leave a link with your comment, make sure it's relevant. Spamming sites with your link will only work against you and bring down the value of the link.

3.Submitting to Article Directories
There are dozens of article directories on the web, and if you submit content for them, you can get back a link to your site. However, there are many spammy directories out there, so it is important to choose your submissions wisely. Be sure to choose a directory that has a high page rank, and submit unique content to each directory. Duplicate content can bring down the value of your link.You can submit your content to article directories like ezinearticles.

4.Social Media Marketing
Links on some social media sites, like Pinterest, can help boost your page rank. There has long been speculation that the more +1's you get on Google+ the more of a boost your page will get. However, the majority of social media sites do not generate quality links for your site.
The reason these sites are still useful is that they help you to connect with readers who may share your content and get it linked out to other sites because of the exposure. Share your content regularly on social media, and devise a strategy for growing your followers to get the most exposure for your content.
Generating quality backlinks is one of the best ways to raise the page rank of your site and to get more traffic. While these strategies are not difficult to employ, they will take time if used correctly by sourcing the most high-quality sites.

How do you get high-quality backlinks for your site? Share your most successful strategies in the comments!
Sarah Clare is a writer and oversees the site projectmanagementsoftware, where she has recently been researching task management. In her spare time, Sarah enjoys cooking and scrapbooking.

How To Use Android Phone 2G/3G/4G Network As Wifi Hotspot

 All of us know that any android phone can be used as a wifi hotspot,which means that your can share your phone’s wifi network with other android,laptops or non android wifi enabled devices.To create a wifi hotspot you need a wifi connection but don’t worry if you do not have wifi connection in range.You can use your android phone’s 2G/3G/4G,GPRS networks as wifi hotspot.

This trick of creating an wifi hotspot will work with your phone’s 2G/3G/4G networks.Then your android phone will convert the 2G or 3G network into a wifi hotspot.So any wifi enabled laptop,android device,smartphone device like windows phone 8 and iOS iphone can use your phone’s network as wifi network,because other devices will recognize your android device as a wifi network.

Use Android Phone’s 2G/3G/4G Network As Wifi Hotspot

1.You will need atleast 1 android device and wifi enabled phone or other android phone or a laptop.We are using two android phones and a HP laptop.
2.Your phone should have a working data connection i.e the phone which is to be used as a hotspot should have a data connection.
3.To setup your phone as a wifi hotspot goto Settings>Wireless & Networks>Mobile Networks>Use Packet Data.Enable packet data.
4.Now goto Settings>Wireless & Networks>Tethering & Portable Hotspot.
5.Enable portable wifi hotspot.You will see a notification in the notification bar.Click on portable wifi hotspot settings.
6.Now click configure “Portable wifi hotspot”.
7.You can change the “Network SSID”.It is the name of your phone’s wifi network.Enter "my android wifi" in network SSID.
8.Click security and select “WPA2 PSK” and enter your wifi network password.
9.When you enter a password then nobody can connect to your phone's wifi hotspot without a password.You have to give them the password to connect.You can select “Open” in security.When open is selected everybody can connect to your phone’s wifi hotspot without password.
10.Now we connect an android device to this wifi hotspot.

Connecting An Android Device To Wifi Hotspot Network

To connect any android phone to your phone's wifi hotspot Follow the steps below.
  • Goto Settings>Wireless and networks>Wi-Fi settings.
  • Turn on the wifi and keep hotspot active on other phone.
  • Your phone will automatically scan the wifi networks and give you a list of active networks in range.
  • You will see "my android wifi" below wifi networks.
  • Click this networkYou will see a prompt to connect.Click connect.
  • Within few seconds you will be connected to this wifi hotspot and you will see connected under this network.
  • Now open any browser and start surfing internet without paying any money.


Connecting A Laptop To Android Wifi Hotspot Network

You can share your android phone's wifi hotspot with your laptop.I am using a HP laptop.If you are using a HP laptop you will need HP wireless assisstant software otherwise your laptop's wifi will not work.You can download HP wireless assisstant from the link given below.

HP Wireless Assisstant Download

1.After downloading this software install it and open it.
2.You will see two options one is bluetooth and other is "Wireless LAN".Click turn on button to turn on your laptop's wifi.
3.Now goto your android phone's setting.Click "wireless and networks>Tethering and portable hotspot".Put a check on "Portable Wi-Fi hotspot".
4.Now click the network icon in your laptop's taskbar.You will see "my android wifi" in that network list like this image below.

hp wireless assisstant

5.Click this "my android wifi".It will prompt you to enter password which you used for your phone's wifi.Now after entering password it will show connected and now you are done.If you are using 3G or 4G network then you will experience high speed browsing on any browser.

Share this post if you like it.Feel free to ask any problem if you face while doing this.You can share this on facebook,google plus and twitter.


How To update All Android Apps At Once In Google Play Store

How To update All Android Apps At Once In Google Play StoreGoogle Play store is an android apps store where you can buy or download android apps. Android apps can be downloaded directly to your phone. But when you download many apps from Google play store then they may require frequent updates. However most apps won’t require frequent updates. But apps which are of heavy use like Facebook android app require frequent updates. So if you have installed apps like Facebook which require frequent updates then updating them one by one is very cumbersome and slow.

But don’t worry you can update all android apps at once in Google play store without using another app. It is a built-in feature of the play store android app which allows us to update all android apps installed on your phone at once.

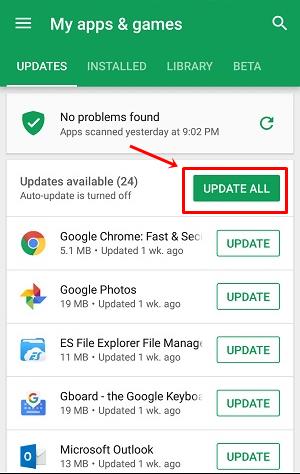
Update All Android Apps At Once In Google Play Store

  • Open Google play store app on android. Let it load for few seconds.
  • Now tap the hamburger menu on top left corner. It is like three vertical lines. From this menu tap 'My apps & games'.


  • When you tap “My apps & games” it will show all the apps installed requiring updates on your android phone.
  • You have to tap “UPDATE ALL”. After tapping this button all of the android apps will start updating one by one. You just have to sit and relax during this time.
Update All Android Apps At Once In Google Play Store
  • When you click update all of your apps will start updating at once.So you don’t have to update them one by one.
  • When one app finishes updating then another app will automatically start updating.
  • It will take some time if you have lots of apps installed on your android phone.

Now you can easily update android apps at once in google play store.Share this article if you like it.

Google Chrome Tips,Tricks And Hidden Secrets 2013

Google Chrome Tips,Tricks And Hidden Secrets 2013Google chrome is a web browser.It is the best browser present today.It is a light weight and fastest of all browsers because it works well with slow GPRS and EDGE networks.Google chrome is much more secure than other browsers and is almost unhackable so we can easily browse through various websites.When some phishing or tricky occurs google chrome warns us that website is not safe and we should leave.It is the safest and best browser to be used on any pc.It has a built in flash player.In this post you will know some google chrome tips,tricks and hidden secrets which you might not know.

Google Chrome Tips,Tricks And Secrets 2013

1.Disable Website Permission : You can disable a website in google chrome from storing cookies on computer,loading images in browser,accessing your locations,disabling javascript,disable plugins,disable popups and disabling media like unwanted videos and apps.Blocking some images and media can increase you net speed.Also disabling javascript also increase internet speed but website will look messy.To disable website permissions just click the folded page icon next to the home button in address bar.You can choose any option which you want to block.But when you block any permission it will be permanent and when you visit that site next time that features will be blocked.If you don’t want these then you can clear the permissions.


For example if you blocked images on some site then when you visit it next time images will be blocked.To clear this goto settings>Advanced Settings>Privacy>Content Settings>Images>Manage Exceptions>Delete Hostname>Ok

2.Save Web Pages As PDF : To save a web page as a pdf file in google chrome just press CTRL+P.It is a print command.When you give this command a print dialog will open.Under the “Destination” click “Change” and select “Save as PDF”.Then click “Save” and give a file name to your pdf file.It can be opened in adobe acrobat reader.

3.Add Multiple Users In Google Chrome : You can add multiple users in google chrome and can sync your apps,settings,passwords,omnibox etc with google chrome.You need to sign in with google chrome if you want to use google chrome sync,but if you want to use without signing in then you can still use it.If you sync your settings with google chrome they will can be used with other chrome browsers.To add multiple users in google chrome.

google chrome  add user

Goto Settings.Under “Users” tab click “Add new user”.Choose your favourite picture and enter your name and click “Create”.Your user profile will be created now you can setup google chrome according to your profile.To switch between multiple users just click on the top left of the browser a dropdown list will appear giving you names of all users.Select your favourite one which you want to use.

4.Import Bookmarks And Settings : You can import bookmarks and settings from other browsers like internet explorer,Mozilla firefox,opera browser and any other browser that is installed on your pc.To import bookmarks and settings goto “Settings” and click “Import bookmarks and settings” under the “Users” tab now select your browser from the list and click “Import”.All bookmarks will be imported to google chrome from other browsers.

import bookmarks in google chrome

5.Google Chrome Shortcuts : Shortcuts on a web browser are very fast rather than doing the mouse work because you have to press only one or two keys rather than manually exploring the browser for settings.Here are some google chrome shortcuts

CTRL+P : To start print dialog
CTRL+J: To see downloads
CTRL+H : To see browsing history
CTRL+S : To save a web page as HTML in google chrome
CTRL+N : Opens a new Window
CTRL+Shift+N : Opens a new incognito window.An incognito window does not record your browsing history.
CTRL+Shift+Delete : To delete your browsing history

6.Google Chrome Secret Commands : These are google chrome secret commands.By typing these commands directly into the address bar you can access a specific setting of google chrome without exploring much.

chrome://help : Check your browser version and update google chrome.
chrome://extensions : Shows you the installed addons in your browser.
chrome://downloads : Shows the list of downloads.
chrome://history : Shows the browsing history.
chrome://settings : Opens the settings page for google chrome.
chrome://settings/searchEngines : Deleting or adding a new search engine to google chrome
chrome://settings/importData : Import bookmarks and settings.
chrome://settings/manageProfile : Manage your profile picture and user name.
chrome://settings/content : Change or manage content settings
chrome://settings/clearBrowserData : Deletes chrome browsing data and history.
chrome://settings/contentExceptions#cookies : Manage cookies.
chrome://settings/contentExceptions#images : Manage images allowed to or blocked by you for specific websites.
chrome://settings/contentExceptions#javascript : Manage javascript for websites.
chrome://settings/contentExceptions#plugins : Manage plugins for websites.
chrome://settings/contentExceptions#location : Manage location.Allow or block it websites.
chrome://settings/contentExceptions#pepper-flash-cameramic : Allow or disable permission to websites to access your webcam and microphone.

7.Remove Stored Cookies : You can check which cookies are stored on your pc and you can delete them.Cookies are not harmful but it may contain a tracking cookie.To remove all cookies from google chrome just type this following command in address bar “chrome://settings/cookies” .It will directly take you to cookies page.Here you can see all the cookies stored on pc by all the websites.Click “Remove all”.All the cookies will be removed.

Note : If you are running an incognito window then your browser extensions will not work.To enable them type this command in your google chrome browser’s address bar and press enter.

“chrome://extensions”

An extension page will open.Below every extension check the option “Allow in incognito”.Then all your extensions will work in incognito.

I think I have covered the topic well.However I missed some google chrome commands but that are of not much use.Share this wonderful post and feel free to ask for any help.

Samsung Galaxy Grand Duos I9082 : New Samsung Phablet

Samsung Galaxy Grand Duos I9082 : New Samsung Phablet Samsung galaxy grand duos I9082 is a new phablet launched by Samsung.This phone has a five inch touchscreen with a dual core processor.This gadget is a phablet priced at affordable price.It comes with android 4.1.2 jellybean os and Mali graphics.So being a dual core processor it is suitable for gaming and phone and tablet experience.But being a 5 inch phablet Samsung galaxy grand duos lacks some features but if you see the price then you will be ready to compromise with the features.This post will be beneficial to you if you are thinking to buy it.We will tell the pros and cons of this Samsung phablet.Lets check out the specifications of this phone first.

samsung galaxy grand duos I9082

Cpu : 1.2 GHz Dual core processor
Os : Android 4.1.2 Jellybean
RAM : 1 GB RAM
Storage : Internal 8 GB(expandable upto 32 GB)
Camera : Primary 8 MP,Secondary 2 MP with 1920x1080 HD video recording
Flash : LED Flash
Screen Size : 5 inches,480x800 pixels,16M colors
Screen Type : LCD
SIM : Dual SIM (GSM+GSM)
UI : Touchwiz 4.0
Connectivity : 3G,WiFi,GPRS,Hotspot,GPS,EDGE
Sensors : Proximity,Accelerometer,Gyro and  Compass

These were some important specification of samsung galaxy grand duos.There are two views by which we can review this phone and can tell the pros and cons.One is the price view and other is feature view.

Feature View
  • Screen : If we look at the features of this phone then we can say that features are good but not perfect.The screen size of galaxy grand duos is of 5 inches but the screen is of LCD type not super AMOLED or super LCD like in galaxy s3 and galaxy note 2.So forget about high screen quality like in galaxy note 2.The screen is LCD having 16M colors only.
  • Processor : The processor is just fine.Its a dual core 1.2 GHz (broadcomm processor).This is the only reason why it is priced at low price.You will not have any problems with the peocessor performance because its a dual core and can deliver smooth performance while gaming and multiwindow tasks.Multiwindow is a new feature in touchwiz 4.0 in which we can run multiple apps on same screen.
  • RAM : RAM is 1 GB and could have been better like 1.5 GB or 2 GB.
  • Android Version : Galaxy grand duos runs on android 4.1.2 jellybean os which comes preinstalled and samsung touchwiz 4.0.
Price View
The price of this phone is around 21500 INR.So according to me this phablet is a best buy in this price range.In this affordable price range you are getting much good features like a 1.2 GHz dual core processor,1 GB RAM,Mali graphics,5 inch touchscreen with a phablet experience.Compare this phone with Sony Xperia P and you will know the difference.This is the best android deal in this price range.Only screen may be the issue for some but rest is excellent in this phone.

Why You Should Buy This Phone
You should buy this phone if you want to buy a good brand dual core phablet running on android 4.1.2 jellybean with a decent specification of hardware and software.You will not buy this phone if you want a phone with super AMOLED touchscreen with a quad core processor.Before looking at specifications look at the price of this phablet.Hats off to Samsung for creating a phablet at this low price because technology is never bad we should always admire it.

Android Guide To Transfer And Read Android SMS Messages On Windows Pc

Android Guide To Transfer And Read Android SMS Messages On Windows PcThis tutorial will teach you to read your android phone’s sms messages on windows pc.This trick will work on windows xp,windows 7 and windows 8.To read your android phone’s messages on windows you need a pc suite installed on your pc because an unrooted android will not allow you to excess phone’s sms memory.A pc suite is like Samsung kies.Don’t worry if you do not have any pc suite because after reading this article there is no need to use any pc suite and a single android app will do the work for you.

Reading sms messages on windows pc is useful when your android sms backup is of around 10000 sms messages.However if you try to restore this huge backup on smaller android phones then they will hang permanently.I tried to restore Smasung galaxy note 2 sms backup containing 10000 sms on Samsung galaxy y but my galaxy y hanged permanently and responded to commands after minutes.So it’s not a good idea.Also it is also not possible to read this huge backup on galaxy note 2 due to small screen and can take days to read and analyze.So I found an other way to read the backup of 10000 sms messages on windows pc.

Reading android sms messages on windows is easy and well organized and we read many messages at once due to large screen.So lets do it.

Guide to Read Android SMS Message On Windows Pc
1.Download SMS backup and restore from play store.It is free to download.
2.After installing this app open it.

sms backup and restore

3.Now click “Backup”.Then click ok.
4.You will see a string like “Sms-1589671.xml”.This is the name of your sms backup.Now change the name of this backup to “mysms.xml”.
5.Then click ok.Wait for few seconds and all your sms messages will be backed up to this directory sdcard>SMSBackupRestore.
6.You can check that your sms backup named “mysms.xml” will be present in this folder.
7.Now you need to plug your android phone to your pc in storage mode via usb cable.Then copy files from sdcard>SMSBackupRestore folder to your desktop.
8.You will find two files in this folder one is “mysms.xml” and other is “sms.xsl”.You need to copy both these files in a folder on your desktop.
9.Now right click on “mysms.xml” and select “open with” then choose internet explorer or Mozilla firefox browser.This file won’t run in google chrome.
10.When you open this file in Mozilla firefox or internet explorer you will see your sms messages in an organized way which are easy to read.A screenshot is given below.


Now you can easily read as many messages of your android phone in your windows browser.This trick is very useful in reading a large number of messages with ease.Share this post be social.